Kubernetes

Getting To Know K8s | Lab #10: Setup Kubernetes Federation Between Clusters in Different AWS Regions

Federation - Latency Test

This post was updated on September 18th, 2017 for Kubernetes version 1.7.6 & Kops version 1.7.0

Introduction

Kubernetes Cluster Federation, which was first released in version 1.3 back in July 2016, allows you to federate multiple clusters together and then control them as a single entity using a Federation control plane. Federation supports adding clusters located in different regions within the same cloud provider network, clusters spanning across multiple cloud providers and can even include on-premise clusters.

Some of the use cases for Federation are:

  • Geographically Distributed Deployments: Spread Deployments across clusters in different parts of the world
  • Hybrid Cloud: Extend Deployments from on-premise clusters to the cloud
  • Higher Availability: Ability to federate clusters across different regions/cloud providers
  • Application Migration: Simplify the migration of applications from on-premise to the cloud or between cloud providers

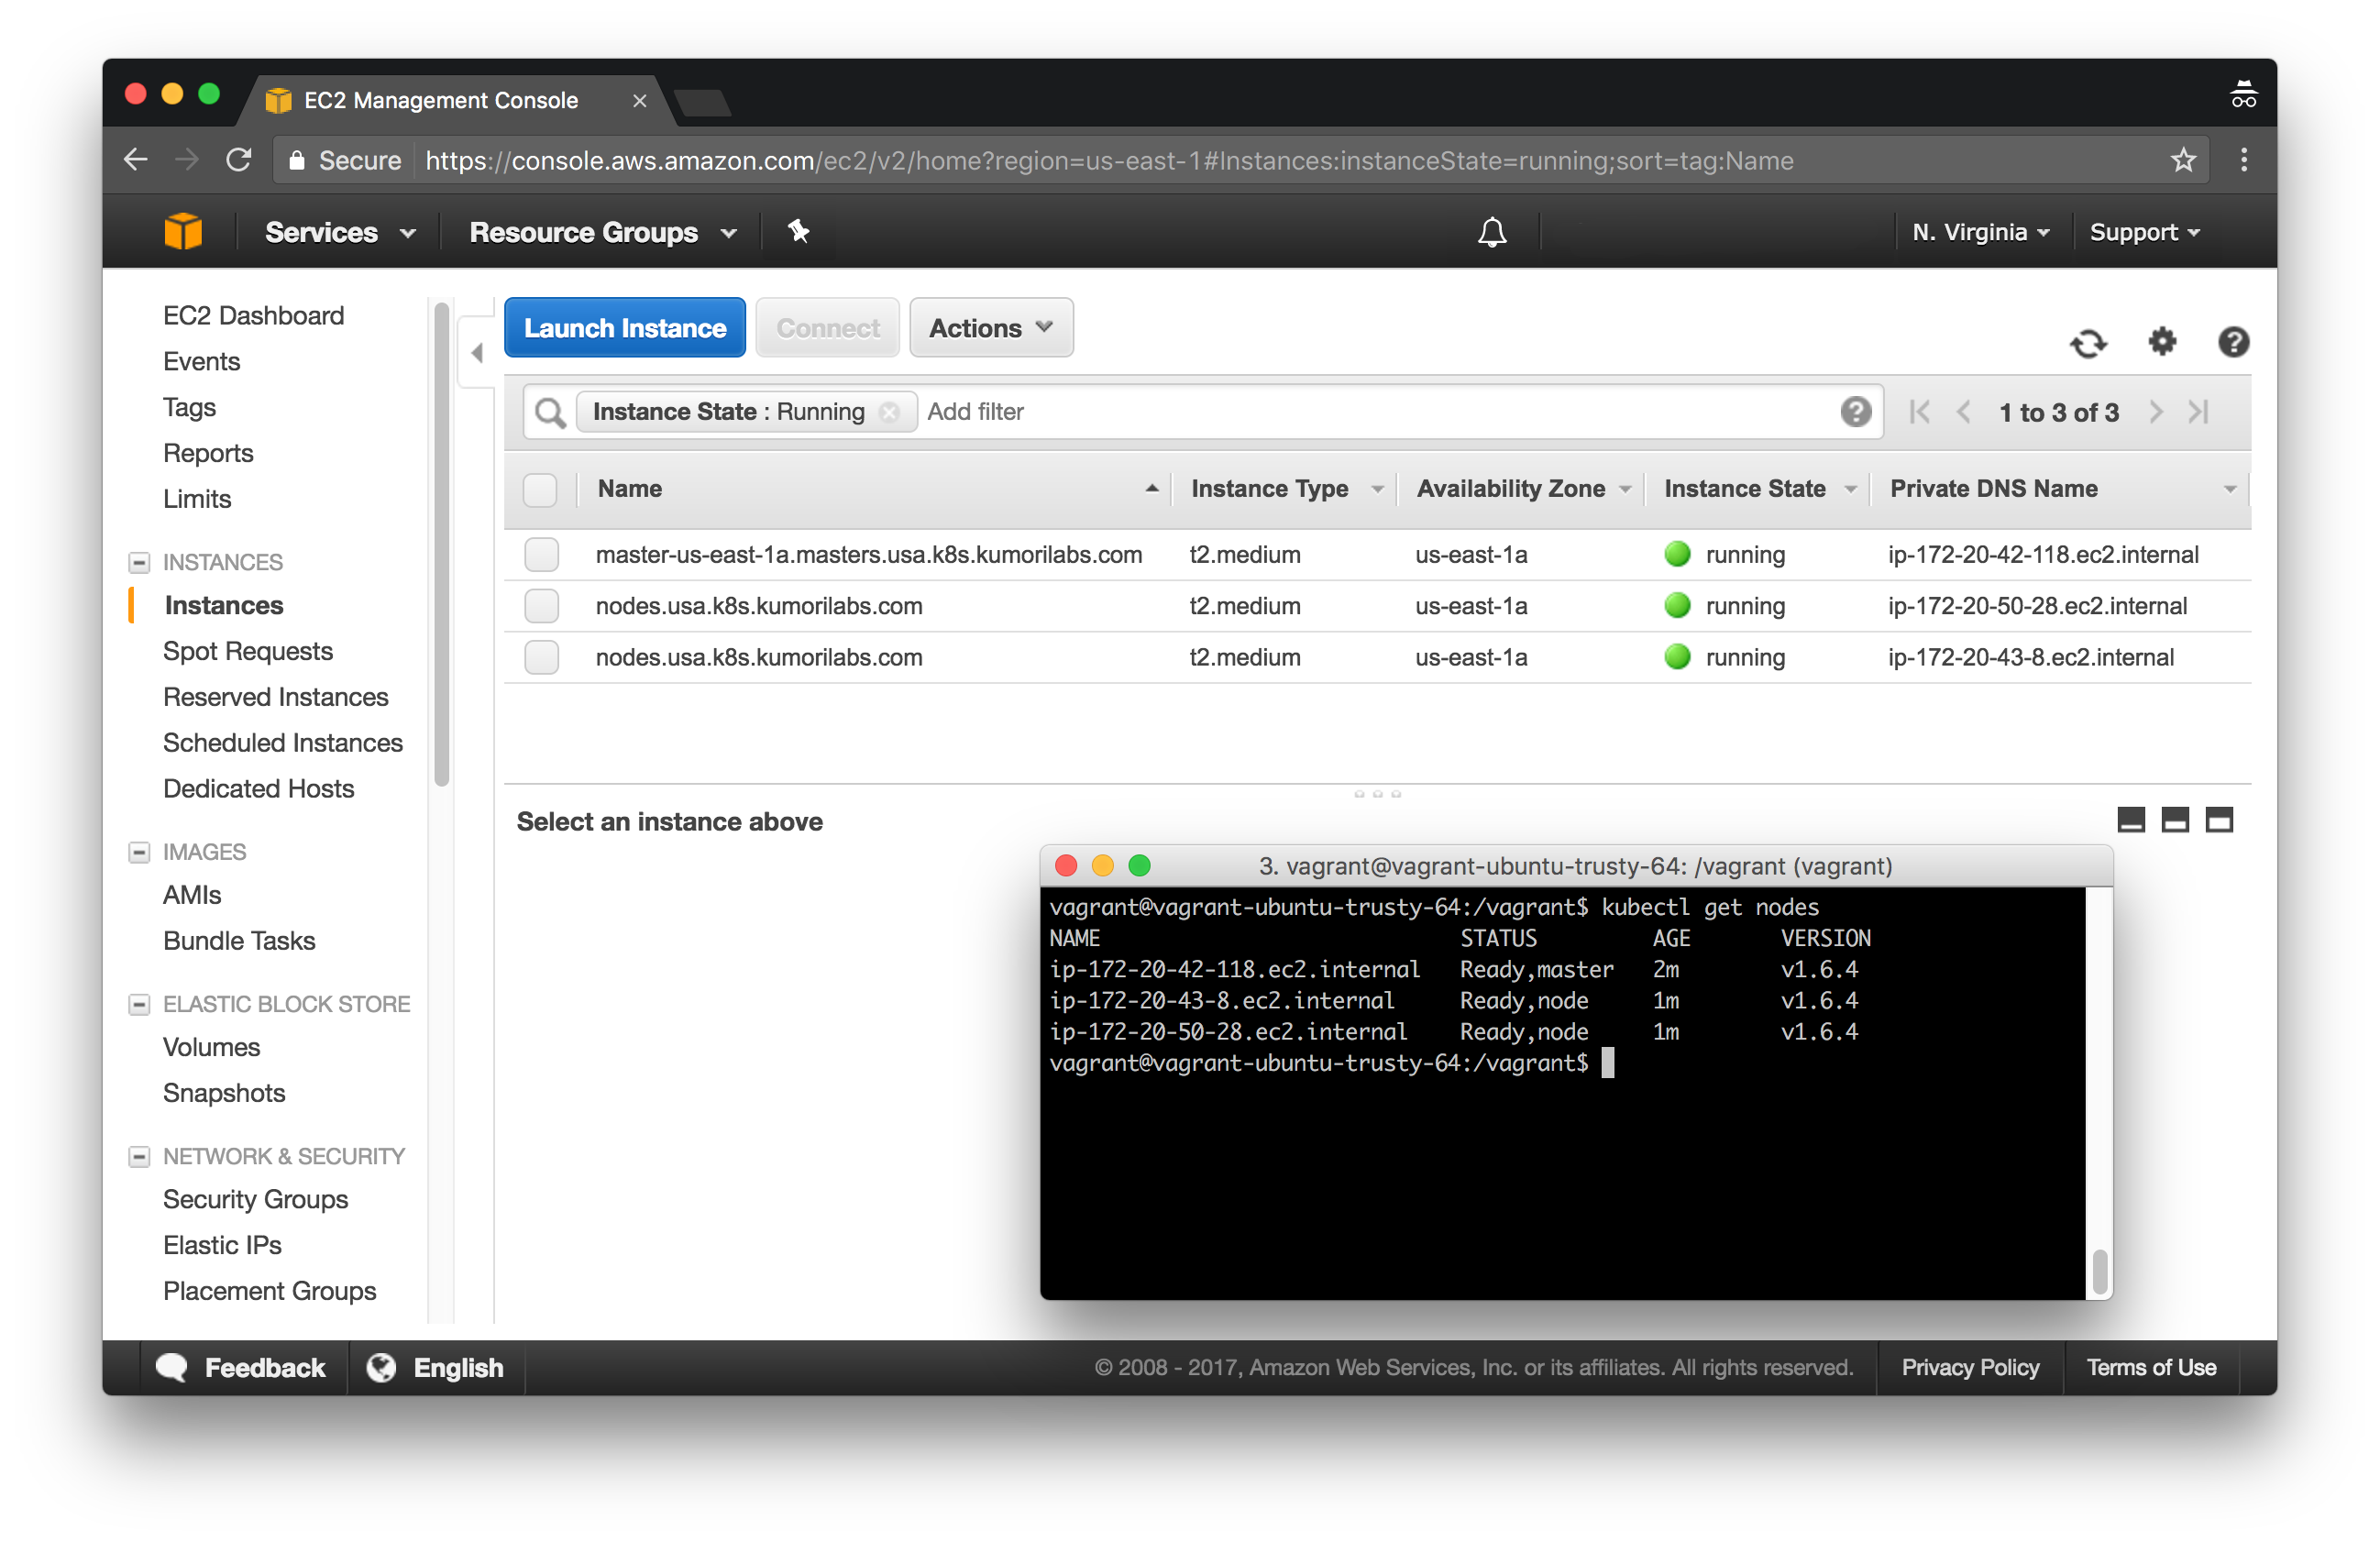
In this lab, we will deploy clusters in three different AWS regions:

  • USA: N. Virgina (us-east-1)
  • Europe: Ireland (eu-west-1)
  • Japan: Tokyo (ap-northeast-1)

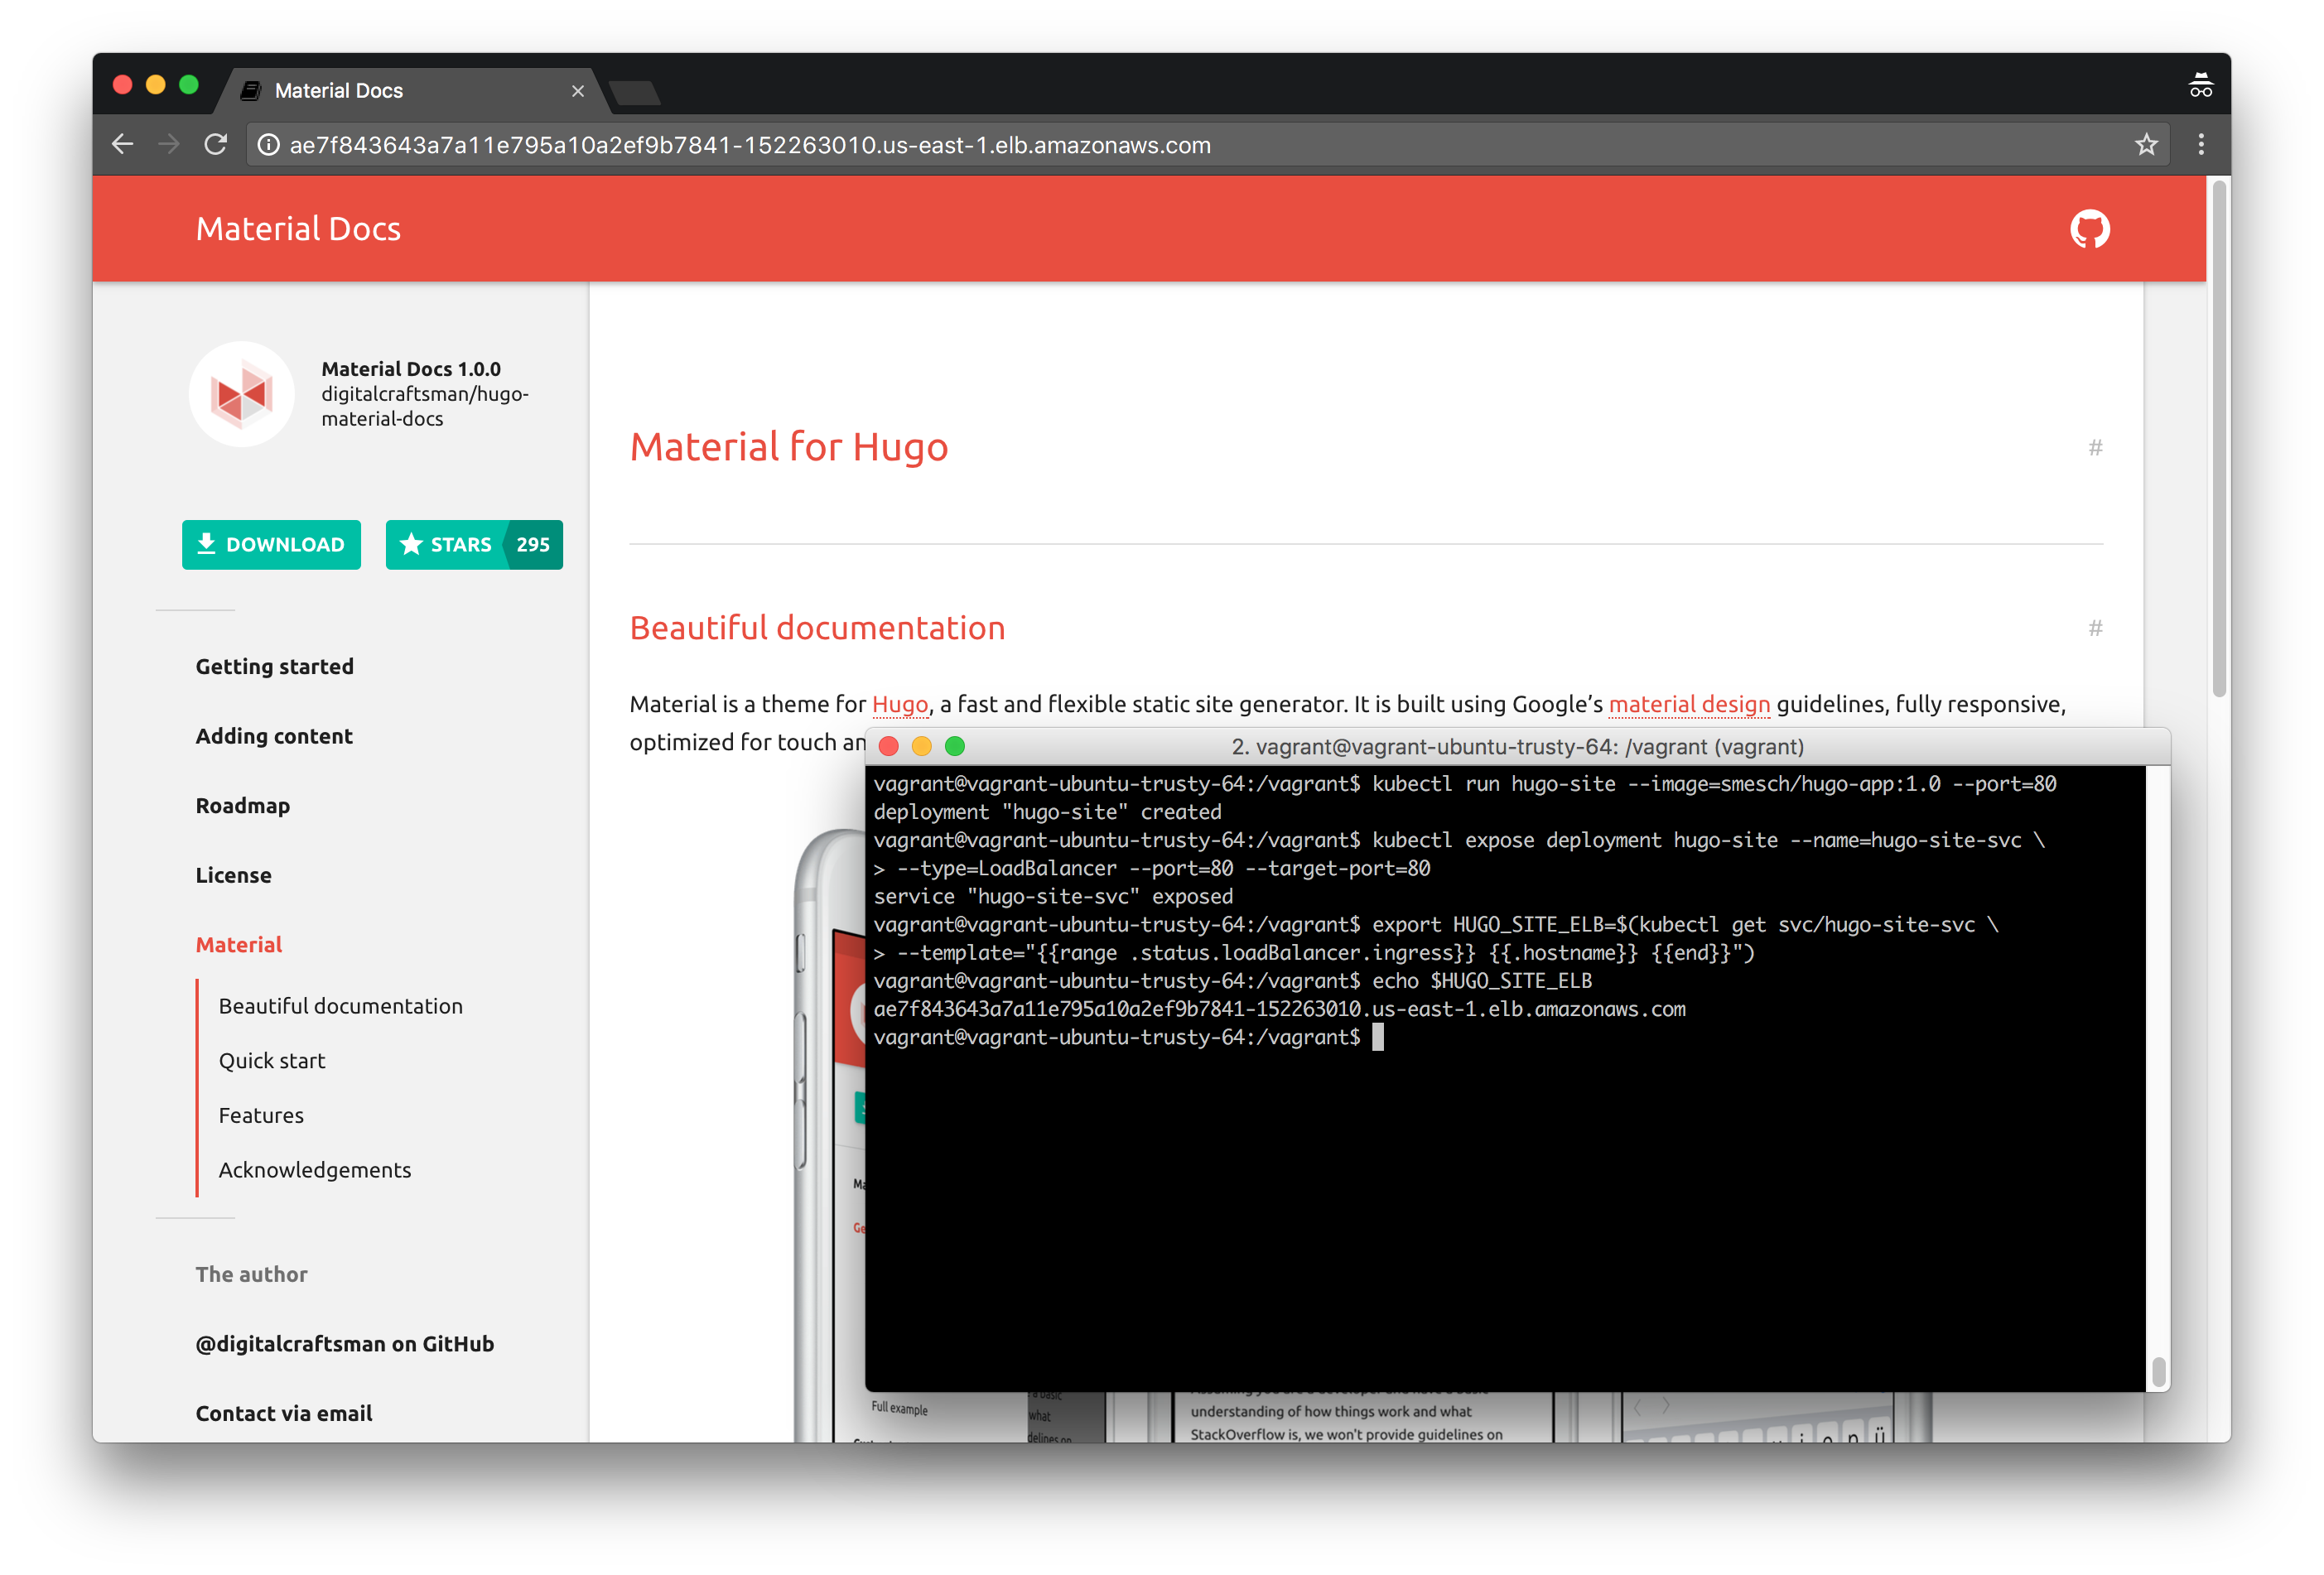
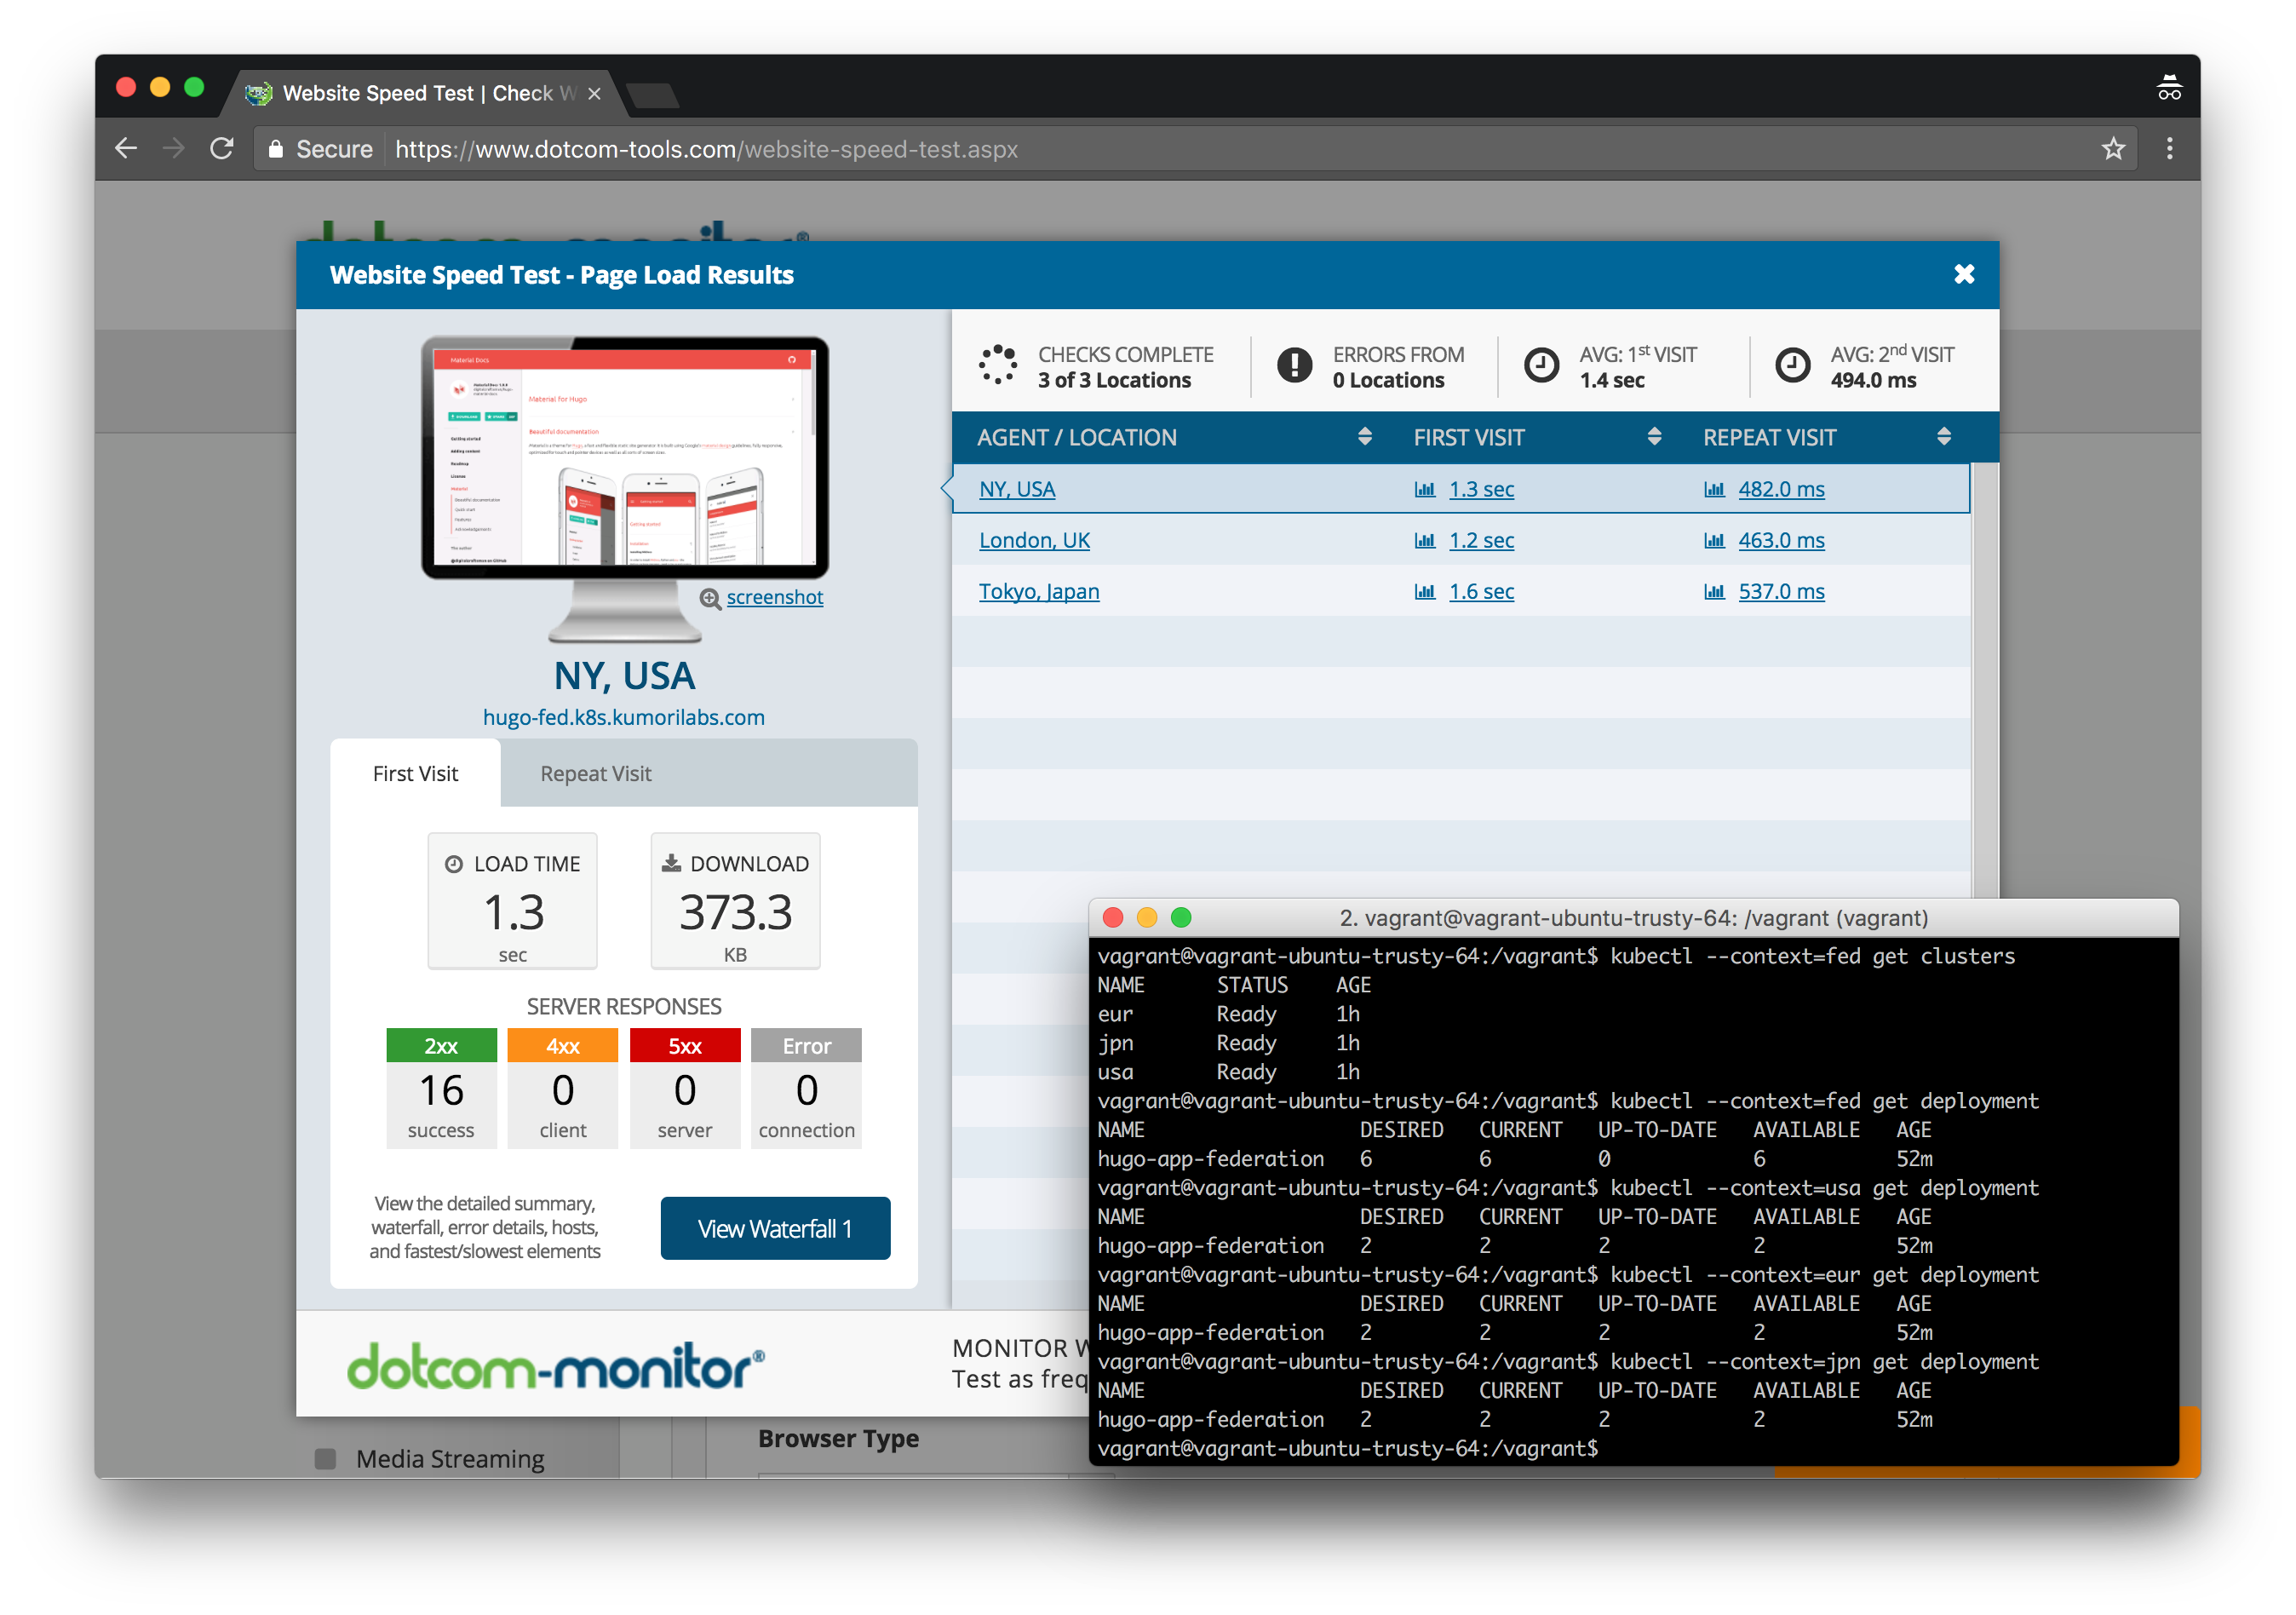
We will deploy the Federation control plane to the USA cluster (host cluster) and then add all three clusters to the Federation. We will then create a federated Deployment for the same Hugo site we have used in previous labs. By default, the Pods for the federated Deployment will be spread out evenly across the three clusters.

And finally, we will create latency-based DNS records in Route 53, one for each cluster region. This will result in a globally distributed Deployment where end users are automatically routed to the nearest cluster based on proximity.

Continue reading

Getting To Know K8s | Lab #9: Continuous Deployment with Wercker and Kubernetes

Wercker - Build Summary Page

This post was updated on September 18th, 2017 for Kubernetes version 1.7.6 & Kops version 1.7.0

Introduction

In the previous two labs, we created an example continuous deployment pipeline for a Hugo site, using both Jenkins and Travis CI. And in this lab, we will be recreating the same continuous deployment pipeline using Wercker.

Wercker is similar to Travis CI as it is also a hosted continuous integration service. One difference is that Wercker uses a concept called Steps, which are self-contained bash scripts or compiled binaries used for accomplishing specific automation tasks. You can create custom steps on your own or use existing steps from the community via the Steps Registry. And as of now, Wercker is free to use for both public and private GitHub repositories (Travis CI is free for only public repositories).

The Wercker pipeline we will create will cover the same four stages that the Jenkins & Travis CI pipelines did in the previous labs:

  • Build: Build the Hugo site
  • Test: Test the Hugo site to confirm there are no broken links
  • Push: Create a new Docker image with the Hugo site and push it to your Docker Hub repository
  • Deploy: Trigger a rolling update to the new Docker image in your Kubernetes cluster

The configuration of the pipeline will be defined in a wercker.yml file in your Hugo site GitHub repository, similar to the Jenkinsfile & .travis.yml file used in the previous labs.

And as Wercker is tightly integrated with GitHub, the pipeline will be automatically run every time there is a commit in your GitHub repository.

Continue reading

Getting To Know K8s | Lab #8: Continuous Deployment with Travis CI and Kubernetes

Travis CI - Build Summary

This post was updated on September 18th, 2017 for Kubernetes version 1.7.6 & Kops version 1.7.0

Introduction

In the previous lab, we created an example continuous deployment pipeline for a Hugo site, using a locally installed instance of Jenkins in your Kubernetes cluster.

And in this lab, we will be recreating the same continuous deployment pipeline using Travis CI. Travis CI is a hosted continuous integration service used to build and test software projects that are stored in GitHub. It is free to use for any public GitHub repositories and they have commercial offerings if you want to use it for private repositories.

The Travis CI pipeline we will create will cover the same four stages that the Jenkins pipeline did in the previous lab:

  • Build: Build the Hugo site
  • Test: Test the Hugo site to confirm there are no broken links
  • Push: Create a new Docker image with the Hugo site and push it to your Docker Hub repository
  • Deploy: Trigger a rolling update to the new Docker image in your Kubernetes cluster

The configuration of the pipeline will be defined in a .travis.yml file in your Hugo site GitHub repository, similar to the Jenkinsfile we created for the Jenkins pipeline.

And as Travis CI is tightly integrated with GitHub, the pipeline will be automatically run every time there is a commit in your GitHub repository.

Continue reading

Getting To Know K8s | Lab #7: Continuous Deployment with Jenkins and Kubernetes

Jenkins - Pipeline Job History

This post was updated on September 18th, 2017 for Kubernetes version 1.7.6 & Kops version 1.7.0

Introduction

In the previous lab, we went through how to deploy Jenkins and integrate it with your Kubernetes cluster.

And in this lab, we will setup an example continuous deployment pipeline with Jenkins, using the same Hugo site that we have used in previous labs.

The four main stages of the pipeline that we will create are:

  • Build: Build the Hugo site
  • Test: Test the Hugo site to confirm there are no broken links
  • Push: Create a new Docker image with the Hugo site and push it to your Docker Hub account
  • Deploy: Trigger a rolling update to the new Docker image in your Kubernetes cluster

The configuration of the pipeline will be defined in a Jenkinsfile, which will be stored in your GitHub repository for the Hugo site.

And after configuring the GitHub plugin in Jenkins, the pipeline will be automatically triggered at every commit.

Continue reading

Getting To Know K8s | Lab #6: Integrating Jenkins and Kubernetes

Jenkins - Test Pipeline Job Running

This post was updated on September 18th, 2017 for Kubernetes version 1.7.6 & Kops version 1.7.0

Introduction

In this lab, we will look at integrating Jenkins with your Kubernetes cluster. Jenkins is an open source automation server which is commonly used as a continuous integration and continuous delivery application.

Integrating Jenkins with Kubernetes using the Kubernetes plugin provides several key benefits. No longer are you required to maintain a static pool of Jenkins slaves and have those resources sitting idle when no jobs are being run.

The Kubernetes plugin will orchestrate the creation and tear-down of Jenkins slaves when jobs are being run. This makes things easier to manage, optimizes your resource usage and makes it possible to share resources with an existing Kubernetes cluster running other workloads.

In this first post related to Jenkins, we will focus on creating the Jenkins Deployment and Service. And we will be using a Persistent Volume to store the Jenkins configuration in a dedicated AWS EBS volume, which will preserve that data in the event of a Pod failure.

We will then install and configure the Kubernetes plugin and then run a test job to confirm that the integration was successful.

Finally, you will see how to create your own custom Docker image for Jenkins, with the Kubernetes integration incorporated.

And in the next post, we will setup a example continuous deployment pipeline for the Hugo site we have used in previous posts.

Continue reading

Getting To Know K8s | Lab #5: Setup Horizontal Pod & Cluster Autoscaling in Kubernetes

HPA - Demo Application

This post was updated on September 18th, 2017 for Kubernetes version 1.7.6 & Kops version 1.7.0

Introduction

In the previous lab, we demonstrated three of the common methods for updating Deployments: Rolling Updates, Canary Deployments & Blue-Green Deployments

In this lab, we will demonstrate two types of autoscaling:

  • Horizontal Pod Autoscaling (HPA): Automatic scaling of the number of Pods in a Deployment, based on metrics such as CPU utilization and memory usage. The Heapster Monitoring cluster add-on is required. An API is also available if you want to use custom metrics from third-party monitoring solutions.

  • Cluster Autoscaler: A cluster add-on, which will automatically increase or decrease the size of your cluster when certain conditions are met:

    • An additional node will be added to the cluster when a new Pod needs to be scheduled, but there is insufficient resources in your cluster to run it.
    • A node will be removed from the cluster if it is underutilized for a period of time. Existing Pods will be moved to other nodes in the cluster.

Continue reading

Getting To Know K8s | Lab #4: Kubernetes Deployment Strategies: Rolling Updates, Canary & Blue-Green

Hugo App - All Colors

This post was updated on September 18th, 2017 for Kubernetes version 1.7.6 & Kops version 1.7.0

Introduction

In the previous lab, we took you through how to create Deployments and Services in your cluster.

In this lab, we will demonstrate three common methods for updating Deployments in your cluster:

  • Rolling Update: Rollout of a new release to an existing Deployment in a serial fashion, where the Pods are incrementally updated one at a time. If problems are detected during the rollout, it is possible to pause the rollout and even rollback the Deployment to a previous state.

  • Canary Deployment: A parallel Deployment of a new release which is exposed to a subset of end users, thereby reducing the impact if problems arise. The associated LoadBalancer service routes traffic to both Deployments sequentially, where the ratio of requests that will be routed to the canary release is determined by how many Pods there are for each of the two Deployments. For example, if the Deployment for the stable release has three Pods and the canary release Deployment has two replicas, then 40% of the requests will go to the canary release.

  • Blue-Green Deployment: A parallel Deployment of a new release, where all traffic gets instantaneously rerouted to from the existing Deployment, by changing the selector of the associated LoadBalancer service. If problems are detected with the new release, all traffic can be rerouted back to the original Deployment by reverting back to the original selector of the LoadBalancer service.

Continue reading

Getting To Know K8s | Lab #3: Creating Deployments & Services in Kubernetes

Hugo Site - Deployment & Service

This post was updated on September 18th, 2017 for Kubernetes version 1.7.6 & Kops version 1.7.0

Introduction

In the previous lab, we took you through some common maintenance tasks for your cluster.

In this lab, we will show you how to create Deployments and Services for applications in Kubernetes.

For the demo application, we will be using a website built with Hugo, which is “A Fast & Modern Static Website Engine” written in Go. We will apply the Material Docs Hugo theme to the site, which was created by Digitalcraftsman and is based on Google’s Material Design guidelines.

When building the Hugo site, the output is the static HTML website which will be hosted using a base Docker image of NGINX.

And after we deploy the Hugo site in your cluster, we will create a Service for it which will create a ELB (Elastic Load Balancer) in AWS that exposes the Deployment publicly.

Continue reading

Getting To Know K8s | Lab #2: Maintaining your Kubernetes Cluster

Dashboard - System Pods

This post was updated on September 18th, 2017 for Kubernetes version 1.7.6 & Kops version 1.7.0

Introduction

In the previous lab, we showed you how to deploy a cluster in AWS using Kops.

In this lab, we will go through some common maintenance tasks for your cluster.

We will start out by deploying a cluster with an older version of Kubernetes (1.6.4) and we will then perform a rolling update with Kops to upgrade the cluster to version 1.7.6. A rolling update for a cluster is the process of updating one host at a time and moving onto the next host only when the previous host has been updated successfully. Pods that are running on a node which is about to be updated are seamlessly moved to another healthy node before the update starts.

You will then see how to increase or decrease the amount of nodes in an existing cluster and how to prepare an existing node for maintenance by temporarily reliving it of it’s cluster duties.

Finally, we will deploy the Kubernetes dashboard add-on to your cluster, which is a web-based UI that allows you to view the status of your cluster & applications and perform basic management tasks.

Continue reading

Getting To Know K8s | Lab #1: Deploy a Kubernetes Cluster in AWS with Kops

Kops - Create Cluster

This post was updated on September 18th, 2017 for Kubernetes version 1.7.6 & Kops version 1.7.0

Introduction

In this first lab, we will deploy a Kubernetes cluster in AWS using Kops, the command line tool from Kubernetes for deploying production-grade clusters. The cluster will be located in a single availability zone, with one master and two nodes. You will also see what options to change if you want to deploy a high-availability (HA) cluster spread across different availability zones and with multiple masters.

Once the cluster is operational, you will see how to check the status of the cluster and the cluster controlling services (API server, controller manager, scheduler, etc.) running on the master.

And finally, you will see how to completely delete the cluster and all it’s associated objects in AWS with Kops.

Continue reading