By Steven Eschinger | February 24, 2017
This post was updated on September 18th, 2017 for Kubernetes version 1.7.6 & Kops version 1.7.0
Introduction
In the previous lab, we demonstrated three of the common methods for updating Deployments: Rolling Updates, Canary Deployments & Blue-Green Deployments
In this lab, we will demonstrate two types of autoscaling:
Horizontal Pod Autoscaling (HPA): Automatic scaling of the number of Pods in a Deployment, based on metrics such as CPU utilization and memory usage. The Heapster Monitoring cluster add-on is required. An API is also available if you want to use custom metrics from third-party monitoring solutions.
Cluster Autoscaler: A cluster add-on, which will automatically increase or decrease the size of your cluster when certain conditions are met:
- An additional node will be added to the cluster when a new Pod needs to be scheduled, but there is insufficient resources in your cluster to run it.
- A node will be removed from the cluster if it is underutilized for a period of time. Existing Pods will be moved to other nodes in the cluster.
Activities
- Deploy a new cluster with small node instances
- Deploy the Heapster Monitoring add-on
- Deploy the Cluster Autoscaler add-on
- Deploy the demo HPA site
- Generate load against the HPA site
- Verify that the cluster and HPA site have been autoscaled
- Delete the cluster
Warning: Some of the AWS resources that will be created in the following lab are not eligible for the AWS Free Tier and therefore will cost you money. For example, running a three node cluster with the suggested instance size of t2.medium will cost you around $0.20 per hour based on current pricing.
Prerequisites
Review the Getting Started section in the introductory post of this blog series
Log into the Vagrant box or your prepared local host environment
Update and then load the required environment variables:
# Must change: Your domain name that is hosted in AWS Route 53
export DOMAIN_NAME="k8s.kumorilabs.com"

# Friendly name to use as an alias for your cluster
export CLUSTER_ALIAS="usa"

# Leave as-is: Full DNS name of you cluster
export CLUSTER_FULL_NAME="${CLUSTER_ALIAS}.${DOMAIN_NAME}"

# AWS region where the cluster will be created
export CLUSTER_AWS_REGION="us-east-1"

# AWS availability zone where the cluster will be created
export CLUSTER_AWS_AZ="us-east-1a"
Implementation
Deploy a new cluster with small node instances
Create the S3 bucket in AWS, which will be used by Kops for cluster configuration storage:
aws s3api create-bucket --bucket ${CLUSTER_FULL_NAME}-state
Set the KOPS_STATE_STORE variable to the URL of the S3 bucket that was just created:
export KOPS_STATE_STORE="s3://${CLUSTER_FULL_NAME}-state"
Create the cluster with Kops, specifying t2.micro for --node-size=.:
kops create cluster \
     --name=${CLUSTER_FULL_NAME} \
     --zones=${CLUSTER_AWS_AZ} \
     --master-size="t2.medium" \
     --node-size="t2.micro" \
     --node-count="2" \
     --dns-zone=${DOMAIN_NAME} \
     --ssh-public-key="~/.ssh/id_rsa.pub" \
     --kubernetes-version="1.7.6" --yes
It will take approximately five minutes for the cluster to be ready. To check if the cluster is ready:
kubectl get nodes
NAME                            STATUS    AGE       VERSION
ip-172-20-48-9.ec2.internal     Ready     4m        v1.7.6
ip-172-20-55-48.ec2.internal    Ready     2m        v1.7.6
ip-172-20-58-241.ec2.internal   Ready     3m        v1.7.6
Deploy the Heapster Monitoring add-on
To deploy the Heapster monitoring add-on to your cluster:
kubectl create -f https://raw.githubusercontent.com/kubernetes/kops/master/addons/monitoring-standalone/v1.7.0.yaml
deployment "heapster" created
service "heapster" created
serviceaccount "heapster" created
clusterrolebinding "heapster" created
role "system:pod-nanny" created
rolebinding "heapster-binding" created
Deploy the Cluster Autoscaler add-on
Before we deploy the Cluster Autoscaler add-on, we first need to adjust the Kops instance group configuration to specify the minimum & maximum number of nodes that the AWS autoscaling group will allow:
kops edit ig nodes
This will bring up a text editor with the instance group configuration for the nodes:
apiVersion: kops/v1alpha2
kind: InstanceGroup
metadata:
  creationTimestamp: 2017-09-26T20:13:23Z
  labels:
    kops.k8s.io/cluster: usa.k8s.kumorilabs.com
  name: nodes
spec:
  image: kope.io/k8s-1.7-debian-jessie-amd64-hvm-ebs-2017-07-28
  machineType: t2.micro
> maxSize: 2
> minSize: 2
  role: Node
  subnets:
  - us-east-1a
Change the values for maxSize: from 2 to 4 (leave minSize: as-is):
maxSize: 4
minSize: 2
Save the file and then update the cluster configuration:
kops update cluster ${CLUSTER_FULL_NAME} --yes
This will update auto-scaling group in AWS.
We now need to create a new AWS IAM policy to allow the cluster to make changes to the AWS autoscaling group for the nodes:
aws iam put-role-policy --role-name nodes.${CLUSTER_FULL_NAME} \
    --policy-name asg-nodes.${CLUSTER_FULL_NAME} \
    --policy-document file://scripts/addons/cluster-autoscaler/policy-cluster-autoscaler.json
This will grant the following permissions to your cluster:
"autoscaling:DescribeAutoScalingGroups",
"autoscaling:DescribeAutoScalingInstances",
"autoscaling:DescribeTags",
"autoscaling:SetDesiredCapacity",
"autoscaling:TerminateInstanceInAutoScalingGroup"
Next, we need to update the manifest for the Cluster Autoscaler add-on with the minimum (2) & maximum (4) number of nodes that the AWS autoscaling group will allow, the name of the AWS autoscaling group and the AWS region:
export MIN_NODES="2"
export MAX_NODES="4"
sed -i -e "s|--nodes=.*|--nodes=${MIN_NODES}:${MAX_NODES}:nodes.${CLUSTER_FULL_NAME}|g" \
    ./kubernetes/cluster-autoscaler/cluster-autoscaler-deploy.yaml
sed -i -e "s|value: .*|value: ${CLUSTER_AWS_REGION}|g" \
    ./kubernetes/cluster-autoscaler/cluster-autoscaler-deploy.yaml
And now we can deploy the Cluster Autoscaler add-on:
kubectl apply -f ./kubernetes/cluster-autoscaler
deployment "cluster-autoscaler" created
To confirm that the Cluster Autoscaler pod is running, you need to specify the system namespace kube-system:
kubectl get pods --namespace=kube-system
NAME                                                    READY     STATUS    RESTARTS   AGE
cluster-autoscaler-2966300785-74mcc                     1/1       Running   0          10s
...
...
Deploy the demo HPA site
Now that both add-ons have been deployed, we can run the horizontal pod autoscaling application for the demonstration. We will be using the demo application from the Kubernetes documentation, which is defined as a “Custom Docker image based on the php-apache image. It defines an index.php page which performs some CPU intensive computations.”:
kubectl run php-apache --image=gcr.io/google_containers/hpa-example \
        --requests=cpu=200m --expose --port=80
service "php-apache" created
deployment "php-apache" created
We will create the autoscaler for the php-apache application, which will maintain between 2 to 20 Pods and increase/decrease the amount of Pods in order to maintain an average CPU utilization across all Pods of 5% (this low value is for the purpose of the demonstration):
kubectl autoscale deployment php-apache --cpu-percent=5 --min=2 --max=20
deployment "php-apache" autoscaled
Wait a minute or two for the autoscaler to initialize and you should then see a value of 0% for the current load (first value of TARGETS) when viewing the HPA configuration of the Deployment:
kubectl get hpa php-apache
NAME         REFERENCE               TARGETS   MINPODS   MAXPODS   REPLICAS   AGE
php-apache   Deployment/php-apache   0% / 5%   2         20        2          1m
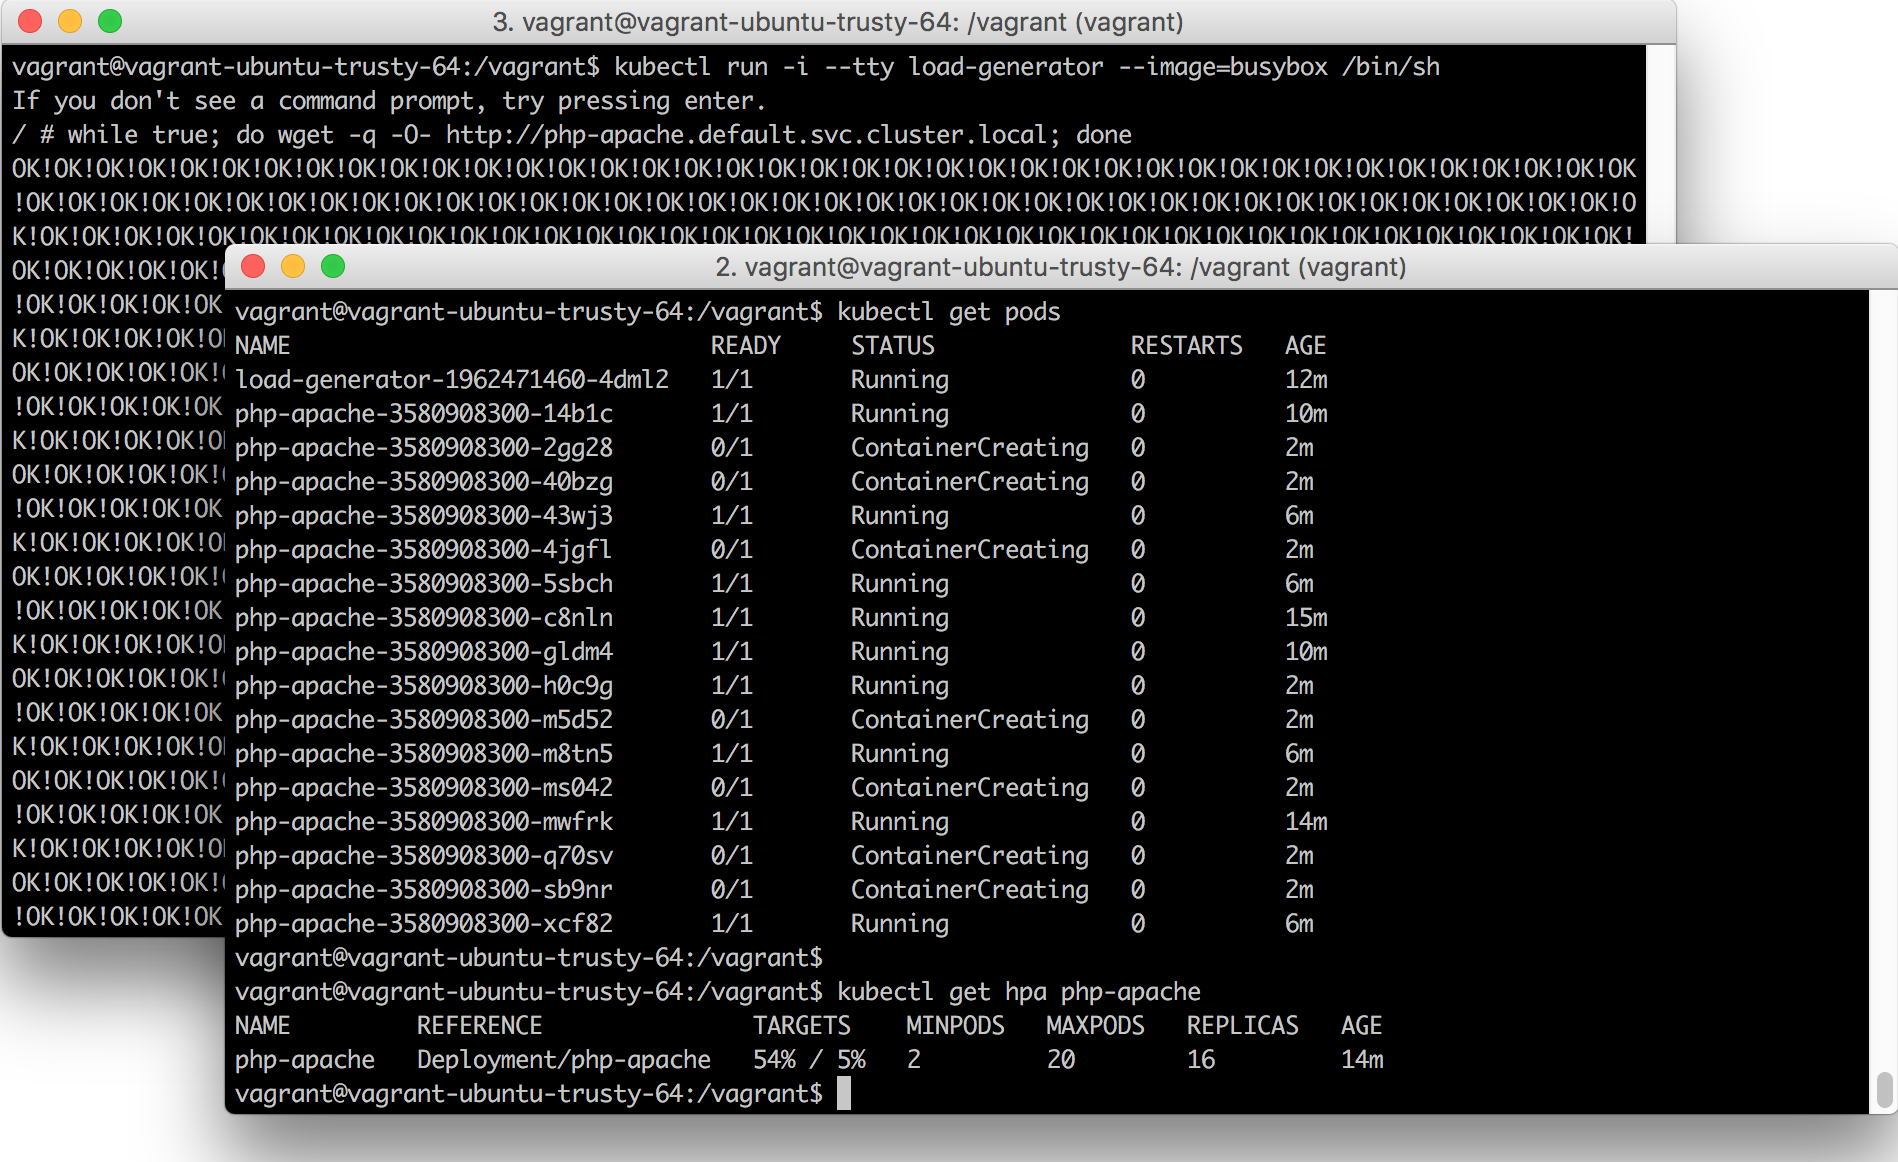
Generate load against the HPA site
We will now generate load against the php-apache application using the load-generator tool from another terminal. Open up a second terminal (if using Vagrant, browse to the root of the repository from a second terminal and connect with vagrant ssh) and run the following:
kubectl run -i --tty load-generator --image=busybox /bin/sh
# Hit enter for command prompt
while true; do wget -q -O- http://php-apache.default.svc.cluster.local; done
OK!OK!OK!OK!OK!OK!OK!OK!OK!OK!OK!OK!OK!OK!OK!OK!OK!OK!OK!OK!OK!OK!OK!OK!OK!OK!OK!
OK!OK!OK!OK!OK!OK!OK!OK!OK!OK!OK!OK!OK!OK!OK!OK!OK!OK!OK!OK!OK!OK!OK!OK!OK!OK!OK!
OK!OK!OK!OK!OK!OK!OK!OK!OK!OK!OK!OK!OK!OK!OK!OK!...
Verify that the cluster and HPA site have been autoscaled
Switch back to the first terminal and within one to two minutes, you should see that the current load of the php-apache application has increased dramatically and the number of Pods for the Deployment has increased to 4:
kubectl get hpa php-apache
NAME         REFERENCE               TARGETS     MINPODS   MAXPODS   REPLICAS   AGE
php-apache   Deployment/php-apache   242% / 5%   2         20        4          5m
Over the course of the next several minutes, you will see the number of Pods continue to increase, until it reaches 20 (which is the maximum number of Pods we set when creating the autoscaler):
kubectl get hpa php-apache
NAME         REFERENCE               TARGETS    MINPODS   MAXPODS   REPLICAS   AGE
php-apache   Deployment/php-apache   28% / 5%   2         20        16         18m
And if you check the Pods that are running, you will see that some have a status of Pending. This means that there isn’t enough capacity to run those Pods on the existing nodes:
kubectl get pods
NAME                              READY     STATUS    RESTARTS   AGE
load-generator-1962471460-hdswv   1/1       Running   0          9m
php-apache-3580908300-0smm1       0/1       Pending   0          54s
php-apache-3580908300-2zcgh       0/1       Pending   0          54s
php-apache-3580908300-6pdk8       0/1       Pending   0          54s
php-apache-3580908300-6q7mr       1/1       Running   0          4m
php-apache-3580908300-6wvvl       1/1       Running   0          54s
php-apache-3580908300-crlv5       0/1       Pending   0          54s
php-apache-3580908300-cslsm       1/1       Running   0          8m
php-apache-3580908300-j2274       1/1       Running   0          54s
php-apache-3580908300-j6zrb       1/1       Running   0          4m
php-apache-3580908300-jk650       1/1       Running   0          8m
php-apache-3580908300-jvc0v       1/1       Running   0          12m
php-apache-3580908300-mssn2       0/1       Pending   0          54s
php-apache-3580908300-rz48m       0/1       Pending   0          54s
php-apache-3580908300-sq63j       1/1       Running   0          4m
php-apache-3580908300-t46f6       1/1       Running   0          13m
php-apache-3580908300-xhf0t       1/1       Running   0          4m
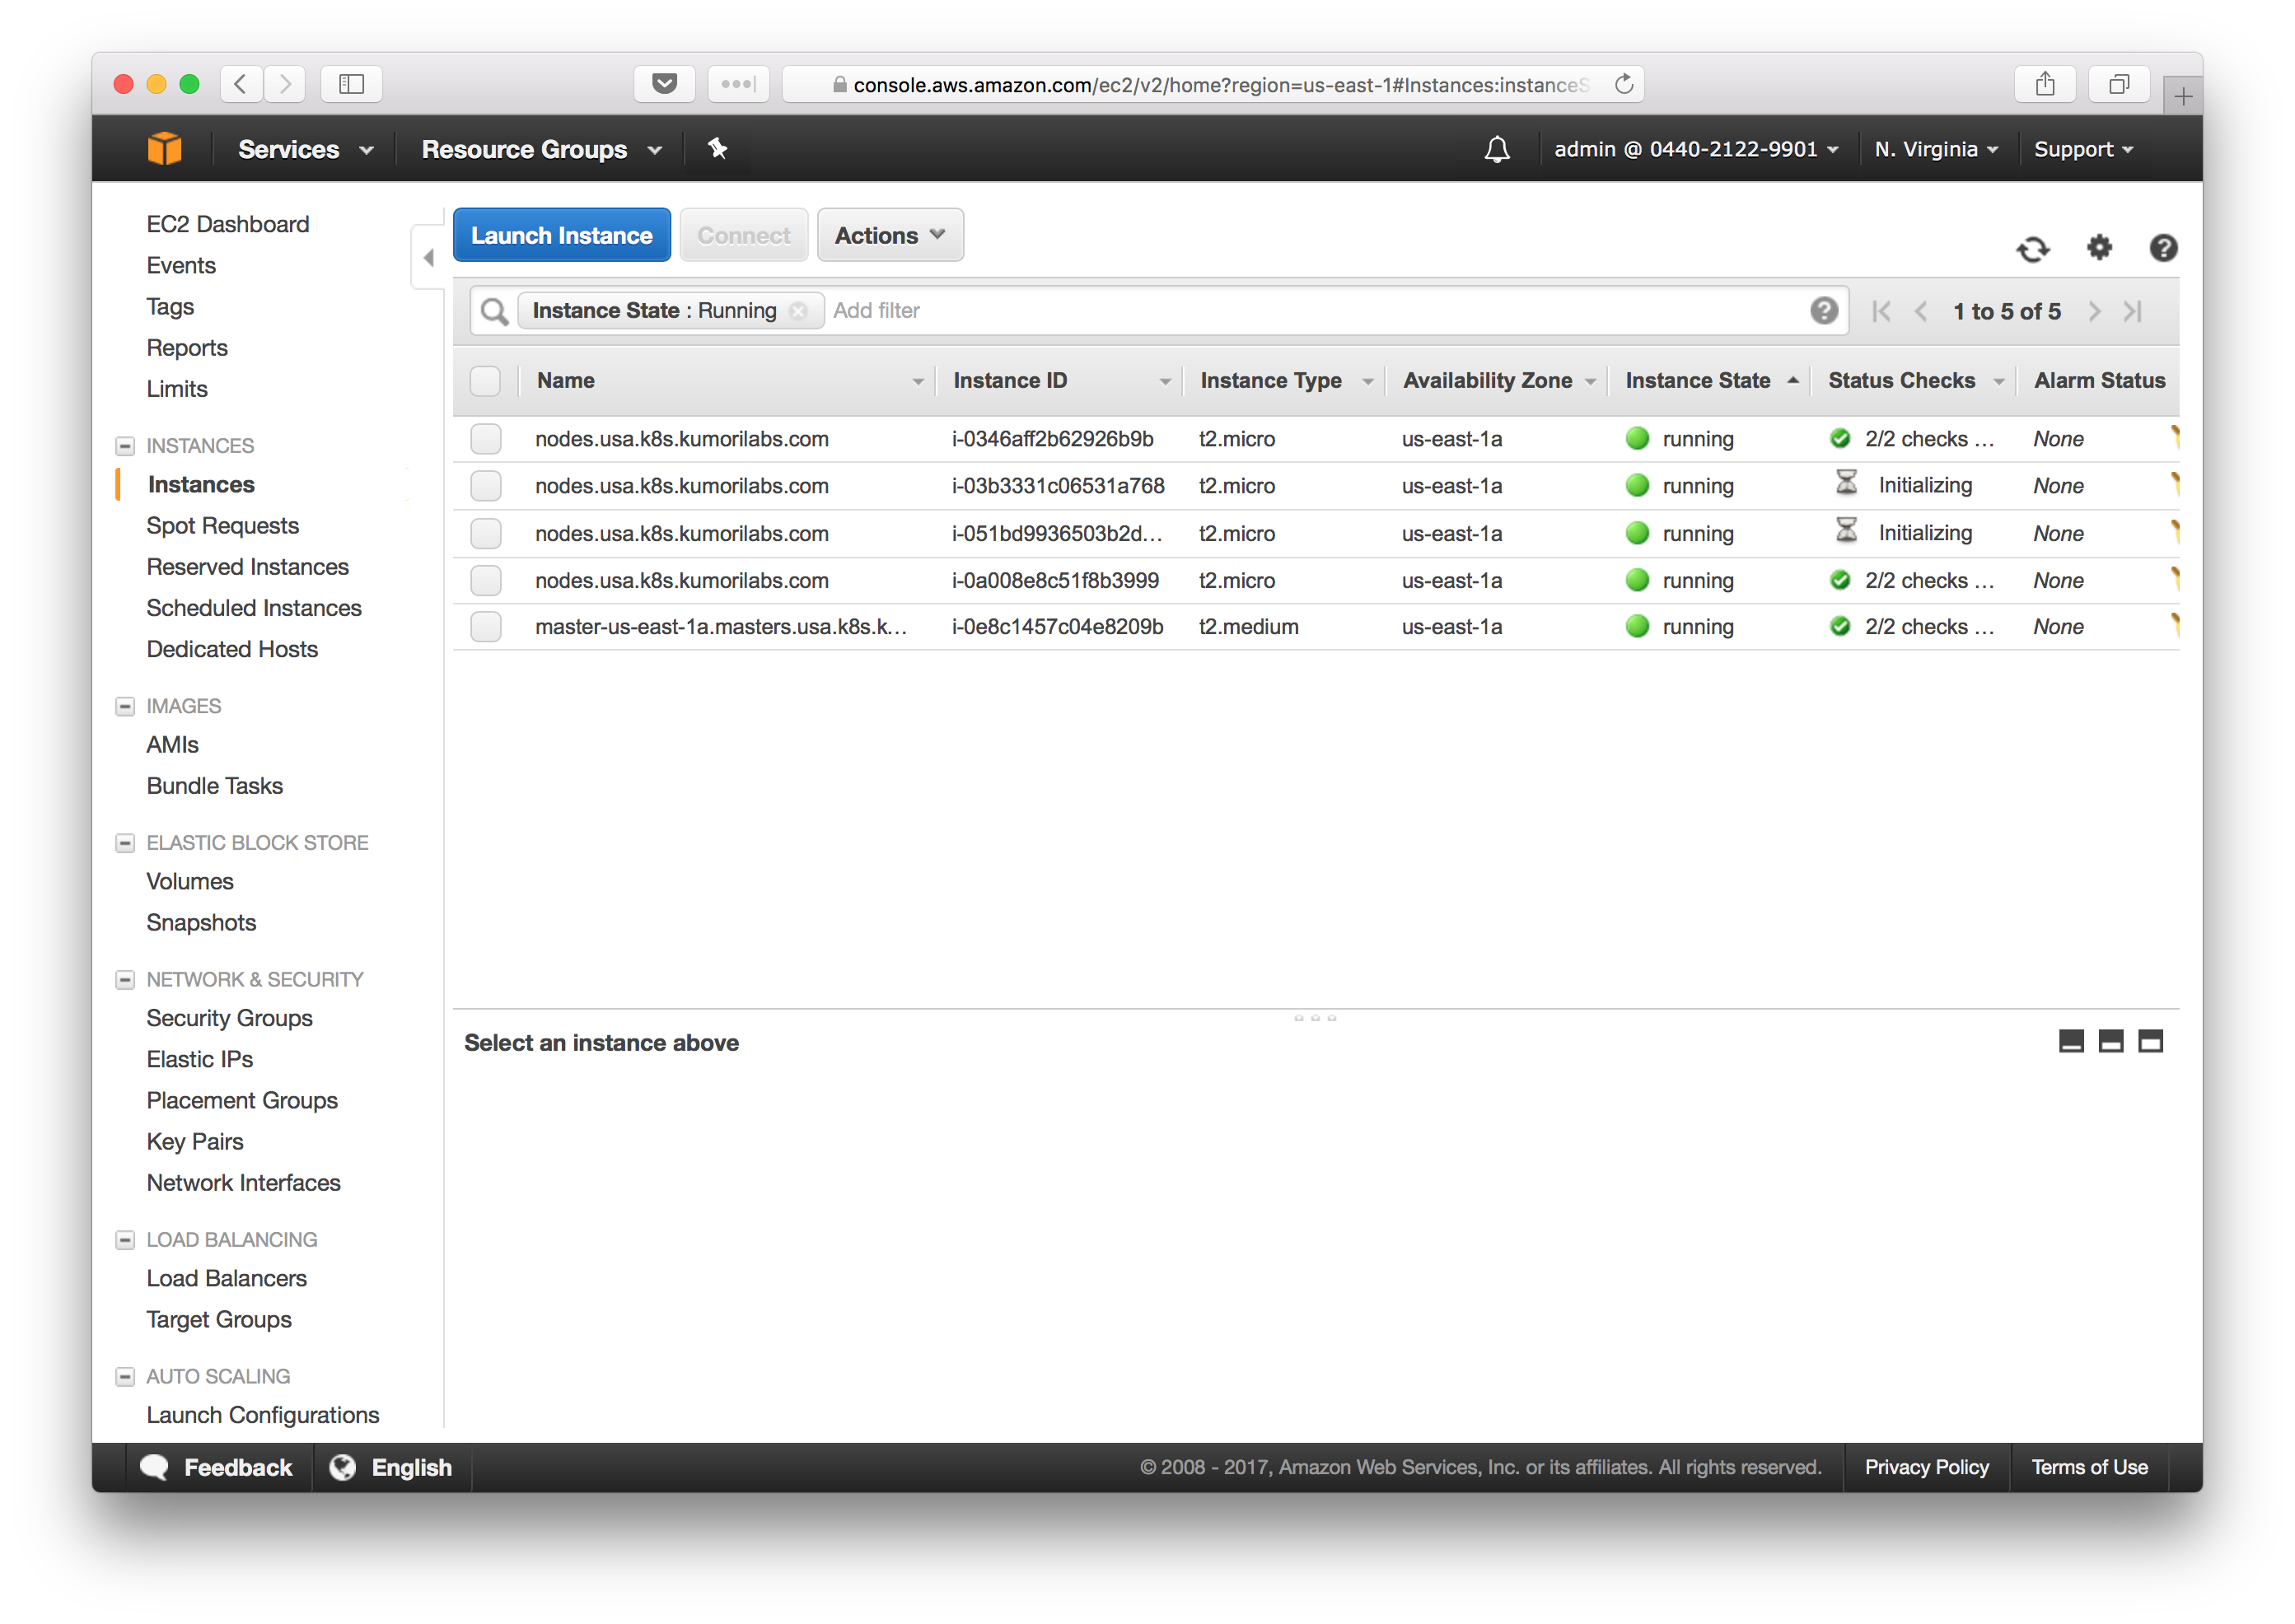
To verify if the Cluster Autoscaler is working, check the EC2/Instances page in the AWS management portal and you should see two new instances being launched:
You can also check the log of the Cluster Autoscaler Pod, to see the cluster scaling occurring:
kubectl get pods -n=kube-system
NAME                                                    READY     STATUS    RESTARTS   AGE
cluster-autoscaler-2966300785-dttl7                     1/1       Running   0          32m
kubectl logs cluster-autoscaler-2966300785-dttl7 -n=kube-system
scale_up.go:44] Pod default/php-apache-3580908300-mssn2 is unschedulable
scale_up.go:44] Pod default/php-apache-3580908300-2zcgh is unschedulable
scale_up.go:44] Pod default/php-apache-3580908300-crlv5 is unschedulable
scale_up.go:44] Pod default/php-apache-3580908300-0smm1 is unschedulable
scale_up.go:145] Best option to resize: nodes.usa.k8s.kumorilabs.com
scale_up.go:149] Estimated 2 nodes needed in nodes.usa.k8s.kumorilabs.com
scale_up.go:157] Capping size to MAX (4)
scale_up.go:169] Scale-up: setting group nodes.usa.k8s.kumorilabs.com size to 4
aws_manager.go:124] Setting asg nodes.usa.k8s.kumorilabs.com size to 4
To see when the new nodes are active:
kubectl get nodes
NAME                            STATUS    AGE       VERSION
ip-172-20-41-197.ec2.internal   Ready     3m        v1.7.6
ip-172-20-47-59.ec2.internal    Ready     26m       v1.7.6
ip-172-20-52-239.ec2.internal   Ready     3m        v1.7.6
ip-172-20-53-62.ec2.internal    Ready     27m       v1.7.6
ip-172-20-60-101.ec2.internal   Ready     28m       v1.7.6
And if you want to also see the scale down of the HPA application and the cluster, stop the load-generator tool from the second terminal, wait about five to ten minutes and then check the following to confirm:
kubectl get hpa php-apache
NAME         REFERENCE               TARGETS   MINPODS   MAXPODS   REPLICAS   AGE
php-apache   Deployment/php-apache   0% / 5%   2         20        2          30m
kubectl logs cluster-autoscaler-2966300785-dttl7 -n=kube-system
scale_down.go:245] Scale-down: removing empty node ip-172-20-52-239.ec2.internal
aws_manager.go:160] Terminating EC2 instance: i-051bd9936503b2d00
...
...
scale_down.go:245] Scale-down: removing empty node ip-172-20-41-197.ec2.internal
aws_manager.go:160] Terminating EC2 instance: i-03b3331c06531a768
kubectl get nodes
NAME                            STATUS    AGE       VERSION
ip-172-20-47-59.ec2.internal    Ready     26m       v1.7.6
ip-172-20-53-62.ec2.internal    Ready     27m       v1.7.6
ip-172-20-60-101.ec2.internal   Ready     28m       v1.7.6
Cleanup
Before proceeding to the next lab, delete the cluster and it’s associated S3 bucket:
Delete the cluster
Delete the cluster:
kops delete cluster ${CLUSTER_FULL_NAME} --yes
Delete the S3 bucket in AWS:
aws s3api delete-bucket --bucket ${CLUSTER_FULL_NAME}-state
In addition to the step-by-step instructions provided for each lab, the repository also contains scripts to automate some of the activities being performed in this blog series. See the Using Scripts guide for more details.
Next Up
In the next lab, Lab #6: Integrating Jenkins and Kubernetes, we will go through the following:
- Deploying and configuring Jenkins
- Installing and configuring the Kubernetes Jenkins plugin
- Testing the integration of Jenkins and Kubernetes
- Creating a custom Docker image for Jenkins
Other Labs in the Series
- Introduction: A Blog Series About All Things Kubernetes
- Lab #1: Deploy a Kubernetes Cluster in AWS with Kops
- Lab #2: Maintaining your Kubernetes Cluster
- Lab #3: Creating Deployments & Services in Kubernetes
- Lab #4: Kubernetes Deployment Strategies: Rolling Updates, Canary & Blue-Green
- Lab #6: Integrating Jenkins and Kubernetes
- Lab #7: Continuous Deployment with Jenkins and Kubernetes
- Lab #8: Continuous Deployment with Travis CI and Kubernetes
- Lab #9: Continuous Deployment with Wercker and Kubernetes
- Lab #10: Setup Kubernetes Federation Between Clusters in Different AWS Regions