By Steven Eschinger | February 6, 2017
This post was updated on September 18th, 2017 for Kubernetes version 1.7.6 & Kops version 1.7.0
Introduction
In the previous lab, we took you through some common maintenance tasks for your cluster.
In this lab, we will show you how to create Deployments and Services for applications in Kubernetes.
For the demo application, we will be using a website built with Hugo, which is “A Fast & Modern Static Website Engine” written in Go. We will apply the Material Docs Hugo theme to the site, which was created by Digitalcraftsman and is based on Google’s Material Design guidelines.
When building the Hugo site, the output is the static HTML website which will be hosted using a base Docker image of NGINX.
And after we deploy the Hugo site in your cluster, we will create a Service for it which will create a ELB (Elastic Load Balancer) in AWS that exposes the Deployment publicly.
Activities
- Deploy a new cluster
- Create the demo Hugo site
- Create the GitHub repository for the Hugo site
- Create the initial Docker image for the Hugo site
- Create the Kubernetes Deployment for the Hugo site
- Create the Kubernetes Service for the Hugo site
- Create the DNS record for the Hugo site
- Delete the cluster
Warning: Some of the AWS resources that will be created in the following lab are not eligible for the AWS Free Tier and therefore will cost you money. For example, running a three node cluster with the suggested instance size of t2.medium will cost you around $0.20 per hour based on current pricing.
Prerequisites
Review the Getting Started section in the introductory post of this blog series
Log into the Vagrant box or your prepared local host environment
Update and then load the required environment variables:
# Must change: Your domain name that is hosted in AWS Route 53
export DOMAIN_NAME="k8s.kumorilabs.com"

# Friendly name to use as an alias for your cluster
export CLUSTER_ALIAS="usa"

# Leave as-is: Full DNS name of you cluster
export CLUSTER_FULL_NAME="${CLUSTER_ALIAS}.${DOMAIN_NAME}"

# AWS availability zone where the cluster will be created
export CLUSTER_AWS_AZ="us-east-1a"

# Leave as-is: AWS Route 53 hosted zone ID for your domain
export DOMAIN_NAME_ZONE_ID=$(aws route53 list-hosted-zones \
       | jq -r '.HostedZones[] | select(.Name=="'${DOMAIN_NAME}'.") | .Id' \
       | sed 's/\/hostedzone\///')
Implementation
Deploy a new cluster
Create the S3 bucket in AWS, which will be used by Kops for cluster configuration storage:
aws s3api create-bucket --bucket ${CLUSTER_FULL_NAME}-state
Set the KOPS_STATE_STORE variable to the URL of the S3 bucket that was just created:
export KOPS_STATE_STORE="s3://${CLUSTER_FULL_NAME}-state"
Create the cluster with Kops:
kops create cluster \
--name=${CLUSTER_FULL_NAME} \
--zones=${CLUSTER_AWS_AZ} \
--master-size="t2.medium" \
--node-size="t2.medium" \
--node-count="2" \
--dns-zone=${DOMAIN_NAME} \
--ssh-public-key="~/.ssh/id_rsa.pub" \
--kubernetes-version="1.7.6" --yes
It will take approximately five minutes for the cluster to be ready. To check if the cluster is ready:
kubectl get nodes
NAME                            STATUS    AGE       VERSION
ip-172-20-42-192.ec2.internal   Ready     1m        v1.7.6
ip-172-20-57-77.ec2.internal    Ready     2m        v1.7.6
ip-172-20-63-92.ec2.internal    Ready     3m        v1.7.6
Create the demo Hugo site
We will first create a blank Hugo site and then clone the theme to it.
From the root of the repository, run the following, which will:
- Create a new blank Hugo site in the
hugo-app/folder - Clone the Material Docs Hugo theme to the
hugo-app/themes/folder - Copy the example content from the Material Docs theme to the root of the Hugo site
- Remove the Git folder from the Material Docs theme
- Change the value of the
baseurlin the Hugo config file to ensure the site will work with any domain
hugo new site hugo-app/

git clone https://github.com/digitalcraftsman/hugo-material-docs.git \
    hugo-app/themes/hugo-material-docs

cp -rf hugo-app/themes/hugo-material-docs/exampleSite/* hugo-app/
rm -rf hugo-app/themes/hugo-material-docs/.git/
sed -i -e 's|baseurl =.*|baseurl = "/"|g' hugo-app/config.toml
Create the GitHub repository for the Hugo site
We will now create a new GitHub repository in your GitHub account and then upload the contents of the Hugo site we just created.
Configure your global Git settings with your username, email and set the password cache to 60 minutes:
# Set your GitHub username and email
export GITHUB_USERNAME="smesch"
export GITHUB_EMAIL="steven@kumorilabs.com"

git config --global user.name "${GITHUB_USERNAME}"
git config --global user.email "${GITHUB_EMAIL}"
git config --global credential.helper cache
git config --global credential.helper 'cache --timeout=3600'
Create a new GitHub repository called hugo-app in your GitHub account (you will be prompted for your GitHub password):
curl -u "${GITHUB_USERNAME}" https://api.github.com/user/repos \
     -d '{"name":"hugo-app"}'
Create the README.md file and the upload the contents of the Hugo site (hugo-app/) to the GitHub repository you just created (you will be prompted for your GitHub credentials):
echo "# hugo-app" >> hugo-app/README.md
git -C hugo-app/ init
git -C hugo-app/ add .
git -C hugo-app/ commit -m "Create Hugo site repository"
git -C hugo-app/ remote add origin \
    https://github.com/${GITHUB_USERNAME}/hugo-app.git
git -C hugo-app/ push -u origin master
Create the initial Docker image for the Hugo site
Now that you have a GitHub repository with the contents of the Hugo site, you can proceed to create the Docker image. The Docker image we will create uses the nginx:alpine base image, which is a minimalist NGINX image (approximately 34MB) based on Alpine Linux.
Login to the Docker Hub (you will be prompted for your Docker Hub password):
# Set your Docker Hub username
export DOCKER_HUB_USERNAME="smesch"

docker login -u ${DOCKER_HUB_USERNAME}
Update MAINTAINER and ENV GITHUB_USERNAME in the Dockerfile with your information:
vi docker/hugo-app/Dockerfile
FROM nginx:alpine
MAINTAINER Steven Eschinger <steven@kumorilabs.com>

ENV HUGO_VERSION="0.20"
ENV GITHUB_USERNAME="smesch"
ENV DOCKER_IMAGE_NAME="hugo-app"

USER root

RUN apk add --update \
    wget \
    git \
    ca-certificates

RUN wget --quiet https://github.com/spf13/hugo/releases/download/v${HUGO_VERSION}/hugo_${HUGO_VERSION}_Linux-64bit.tar.gz && \
    tar -xf hugo_${HUGO_VERSION}_Linux-64bit.tar.gz && \
    chmod +x hugo_${HUGO_VERSION}_linux_amd64/hugo_${HUGO_VERSION}_linux_amd64 && \
    mv hugo_${HUGO_VERSION}_linux_amd64/hugo_${HUGO_VERSION}_linux_amd64 /usr/local/bin/hugo && \
    rm -rf hugo_${HUGO_VERSION}_linux_amd64/ hugo_${HUGO_VERSION}_Linux-64bit.tar.gz

RUN git clone https://github.com/${GITHUB_USERNAME}/${DOCKER_IMAGE_NAME}.git

RUN hugo -s ${DOCKER_IMAGE_NAME} -d /usr/share/nginx/html/ --uglyURLs

CMD nginx -g "daemon off;"
Breakdown of the Dockerfile
- Install wget, git and ca-certificates
- Install Hugo
- Clone your GitHub repository
- Build the Hugo site from your repository and output the static HTML to the default NGINX folder
- Start the NGINX service
Finally, run the following, which will:
- Build a Docker image using the Dockerfile you just updated
- Tag the image with
1.0 - Push the Docker image to your Docker Hub account
- Remove the local version of the Docker image
export HUGO_APP_TAG="1.0"
docker build -t ${DOCKER_HUB_USERNAME}/hugo-app:${HUGO_APP_TAG} --rm docker/hugo-app/
docker push ${DOCKER_HUB_USERNAME}/hugo-app:${HUGO_APP_TAG}
docker rmi $(docker images --filter=reference="${DOCKER_HUB_USERNAME}/hugo-app" -q)
Create the Kubernetes Deployment for the Hugo site
At this point, you have a Docker image in your Docker Hub account, which has the static HTML content that was generated from the Hugo site in your GitHub repository. And that content is ready to be served by the NGINX web server from the base Docker image.
Let’s now proceed to create the Deployment for the Hugo site in your cluster. We will use the Kubernetes manifest file called hugo-app-deploy.yaml:
apiVersion: extensions/v1beta1
kind: Deployment
metadata:
  name: hugo-app
spec:
  replicas: 5
  template:
    metadata:
      labels:
        app: hugo-app
    spec:
      containers:
        - name: hugo-app
          image: smesch/hugo-app:1.0
          ports:
            - containerPort: 80
This file will create a Deployment named hugo-app with five Pods and it specifies the details for the container that will be run. There is also one label being defined (app: hugo-app), which will be used to link this Deployment with the Service we will create afterwards.
We need to update the container image that the Deployment will use to the Docker image you just created. We will update the file using sed:
sed -i -e "s|image: .*/|image: ${DOCKER_HUB_USERNAME}/|g" \
    ./kubernetes/hugo-app/hugo-app-deploy.yaml
You are now ready to create the Deployment in your cluster:
kubectl create -f ./kubernetes/hugo-app/hugo-app-deploy.yaml --record
deployment "hugo-app" created
To check that the Deployment was completed successfully:
kubectl get deployment
NAME       DESIRED   CURRENT   UP-TO-DATE   AVAILABLE   AGE
hugo-app   5         5         5            5           1m
To view the Pods that were deployed:
kubectl get pods
NAME                        READY     STATUS    RESTARTS   AGE
hugo-app-3848737078-757bg   1/1       Running   0          1m
hugo-app-3848737078-d6d6v   1/1       Running   0          1m
hugo-app-3848737078-dd2bm   1/1       Running   0          1m
hugo-app-3848737078-m480d   1/1       Running   0          1m
hugo-app-3848737078-x1d0r   1/1       Running   0          1m
For a detailed view of the Deployment:
kubectl describe deployment hugo-app
Name:			hugo-app
Namespace:		default
CreationTimestamp:	Thu, 18 September 2017 18:15:14 +0000
Labels:			app=hugo-app
Annotations:		deployment.kubernetes.io/revision=1
			kubernetes.io/change-cause=kubectl create --filename=./kubernetes/hugo-app/hugo-app-deploy.yaml --record=true
Selector:		app=hugo-app
Replicas:		5 desired | 5 updated | 5 total | 5 available | 0 unavailable
StrategyType:		RollingUpdate
MinReadySeconds:	0
RollingUpdateStrategy:	1 max unavailable, 1 max surge
Pod Template:
  Labels:	app=hugo-app
  Containers:
   hugo-app:
    Image:		smesch/hugo-app:1.1
    Port:		80/TCP
    Environment:	<none>
    Mounts:		<none>
  Volumes:		<none>
Conditions:
  Type		Status	Reason
  ----		------	------
  Available 	True	MinimumReplicasAvailable
OldReplicaSets:	<none>
NewReplicaSet:	hugo-app-3848737078 (5/5 replicas created)
Events:
...
Create the Kubernetes Service for the Hugo site
Now let’s create the Service for the Hugo site, using the hugo-app-svc.yaml manifest file:
apiVersion: v1
kind: Service
metadata:
  name: hugo-app-svc
  labels:
    app: hugo-app
spec:
  type: LoadBalancer
  ports:
  - port: 80
    targetPort: 80
    protocol: TCP
    name: http
  selector:
    app: hugo-app
This file will create a Service named hugo-app-svc, which will create a ELB (Elastic Load Balancer) in AWS that exposes TCP port 80 publicly. The selector for the Service looks for the app: hugo-app label, which we defined for the Deployment we just created. This is how the Service knows which Deployment(s) to target.
To create the Service in your cluster:
kubectl create -f ./kubernetes/hugo-app/hugo-app-svc.yaml
service "hugo-app-svc" created
To view a summary of the Services in a cluster:
kubectl get svc
NAME           CLUSTER-IP      EXTERNAL-IP        PORT(S)        AGE
hugo-app-svc   100.66.254.15   a2566557b341b...   80:31456/TCP   10s
kubernetes     100.64.0.1      <none>             443/TCP        27m
For a detailed view of the Service:
kubectl describe svc hugo-app-svc
Name:			hugo-app-svc
Namespace:		default
Labels:			app=hugo-app
Annotations:		<none>
Selector:		app=hugo-app
Type:			LoadBalancer
IP:			100.66.254.15
LoadBalancer Ingress:	a2566557b341b11e7a2cb0ae4c885502-1459726985.us-east-1.elb.amazonaws.com
Port:			http	80/TCP
NodePort:		http	31456/TCP
Endpoints:		100.96.1.2:80,100.96.1.3:80,100.96.1.4:80 + 2 more...
Session Affinity:	None
Events:
...
Create the DNS record for the Hugo site
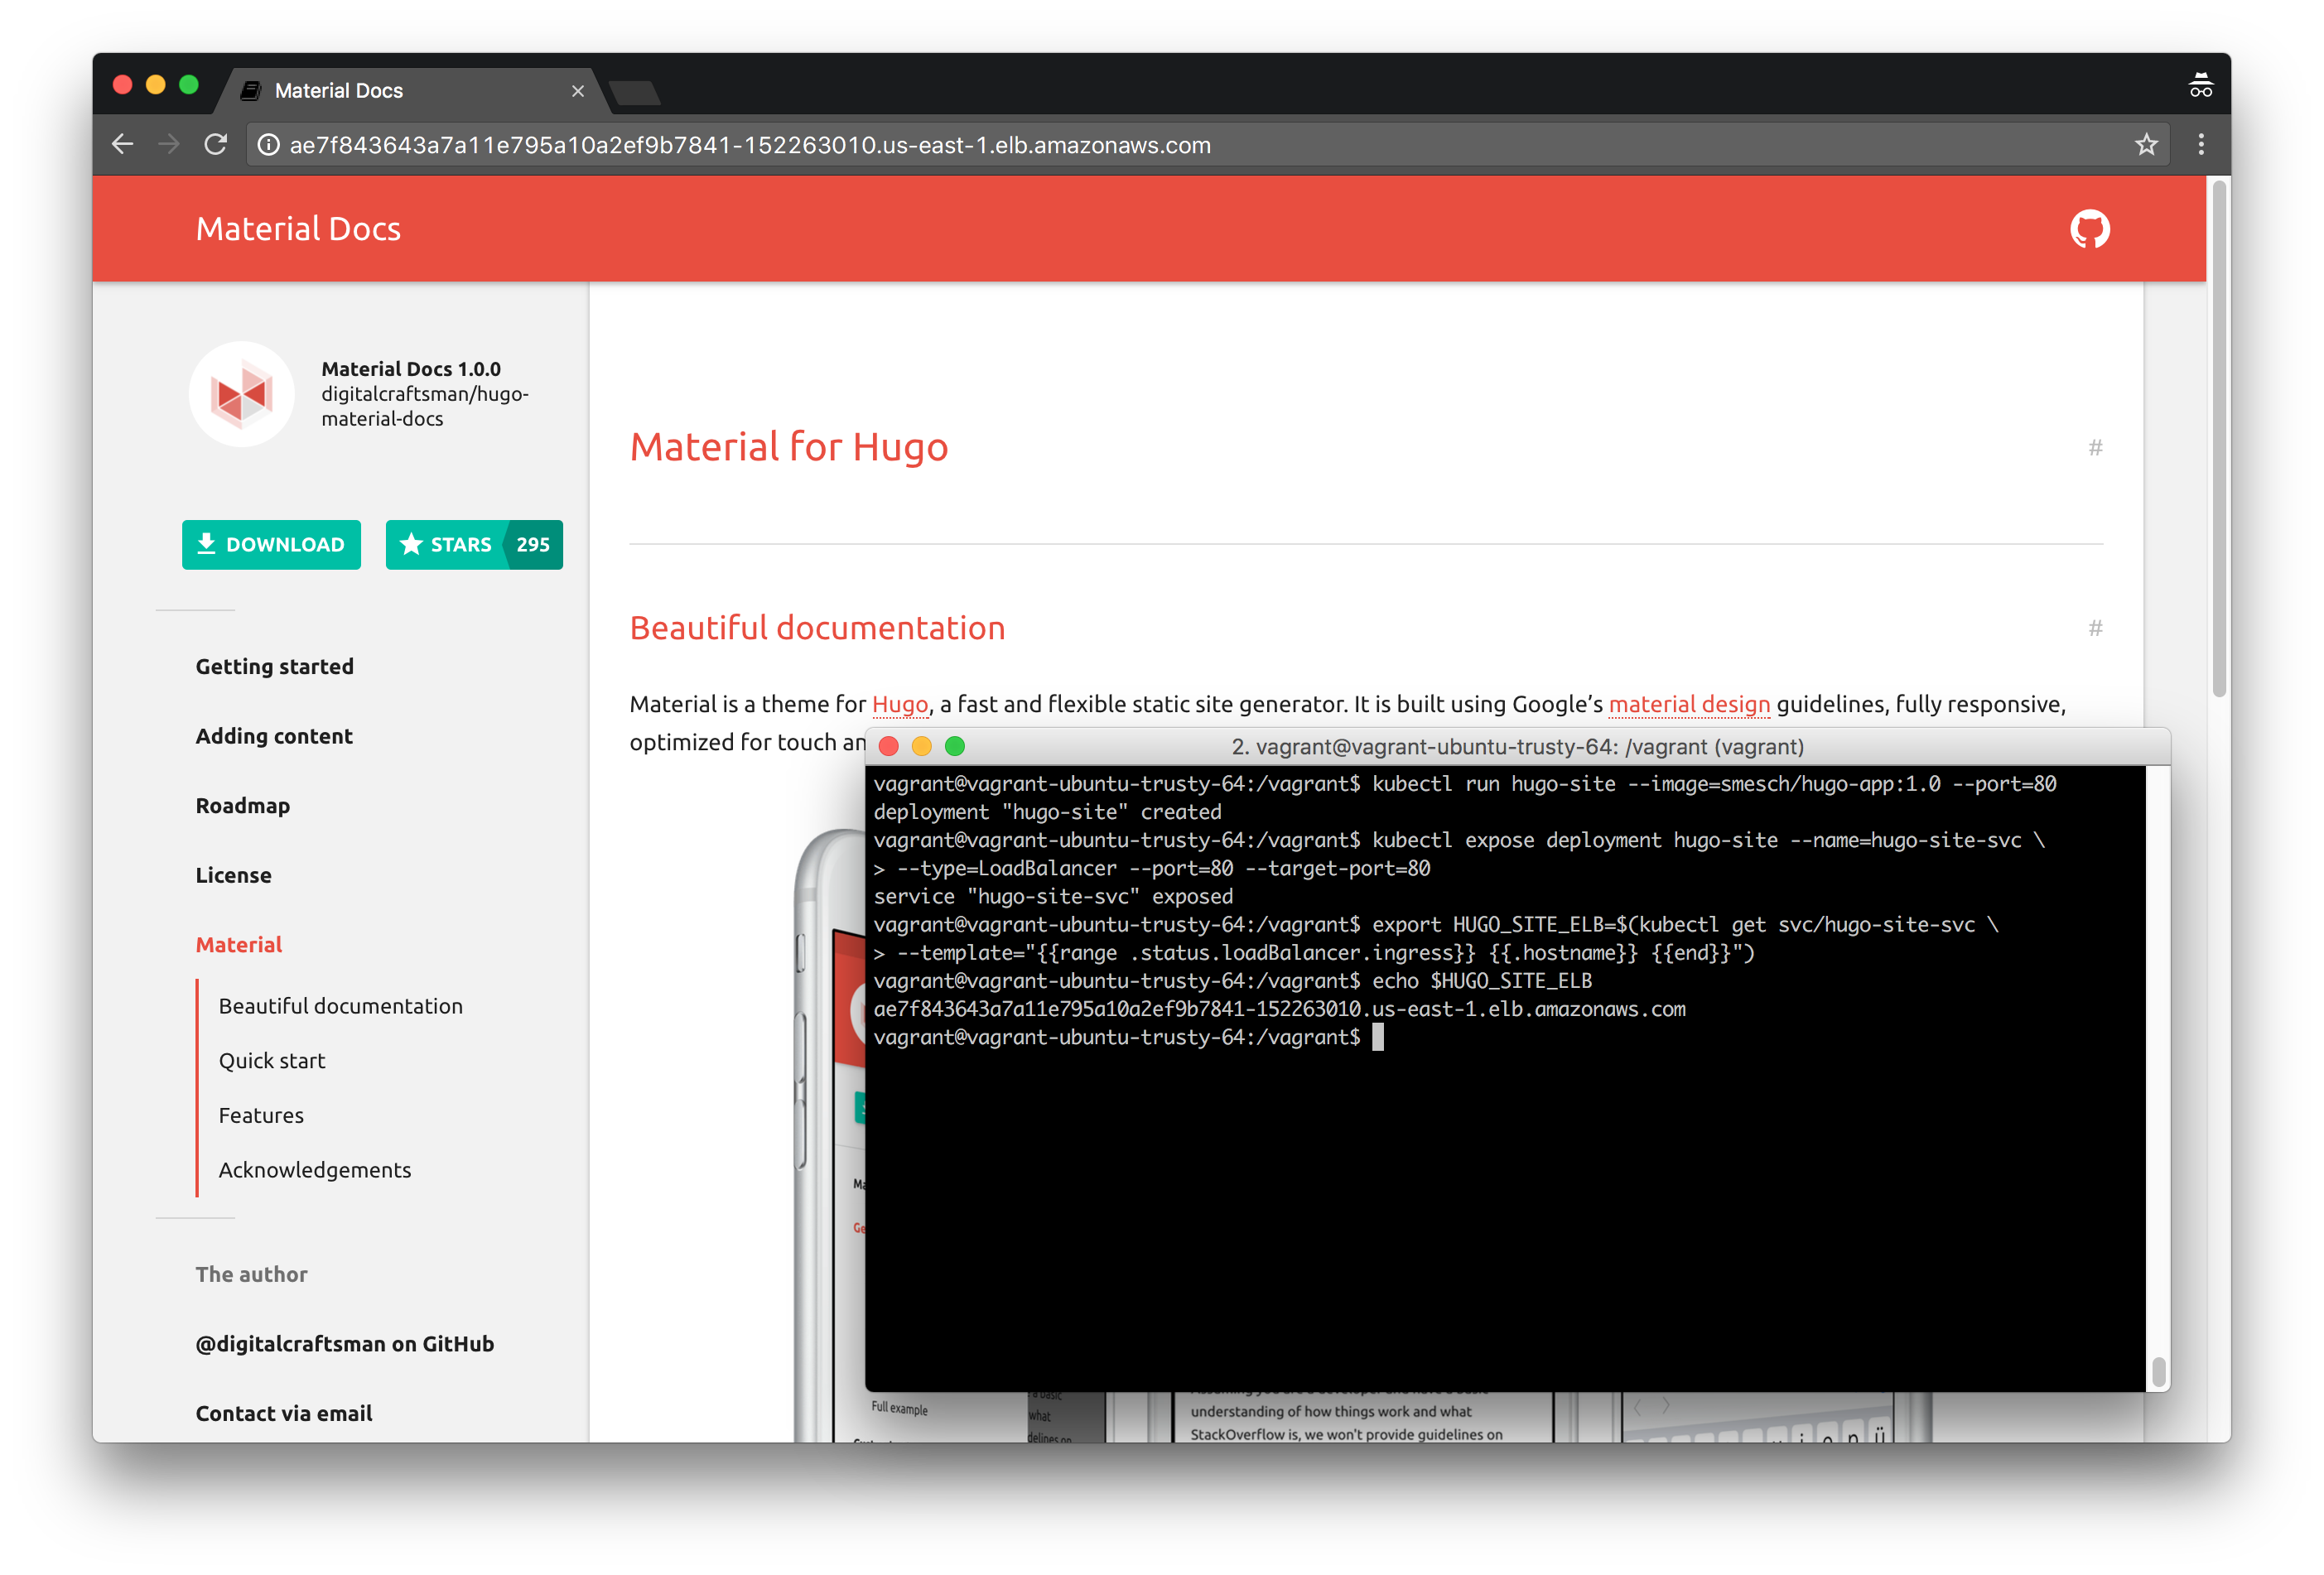
Now that both the Deployment and Service have been created, your Hugo site is actually reachable using the auto-generated URL of the AWS ELB:
kubectl get svc/hugo-app-svc --template="{{range .status.loadBalancer.ingress}} {{.hostname}} {{end}}"
a320000e31ed911e7b07e0a75b36def5-208999317.us-east-1.elb.amazonaws.com
But to make things more user-friendly, we will create a DNS CNAME record in your Route 53 domain with a prefix of hugo (e.g., hugo.k8s.kumorilabs.com), using the dns-record-single.json template file:
# Set the DNS record prefix & the Service name and then retrieve the ELB URL
export DNS_RECORD_PREFIX="hugo"
export SERVICE_NAME="hugo-app-svc"
export HUGO_APP_ELB=$(kubectl get svc/${SERVICE_NAME} \
       --template="{{range .status.loadBalancer.ingress}} {{.hostname}} {{end}}")

# Add to JSON file
sed -i -e 's|"Name": ".*|"Name": "'"${DNS_RECORD_PREFIX}.${DOMAIN_NAME}"'",|g' \
    scripts/apps/dns-records/dns-record-single.json
sed -i -e 's|"Value": ".*|"Value": "'"${HUGO_APP_ELB}"'"|g' \
    scripts/apps/dns-records/dns-record-single.json

# Create DNS record
aws route53 change-resource-record-sets \
    --hosted-zone-id ${DOMAIN_NAME_ZONE_ID} \
    --change-batch file://scripts/apps/dns-records/dns-record-single.json
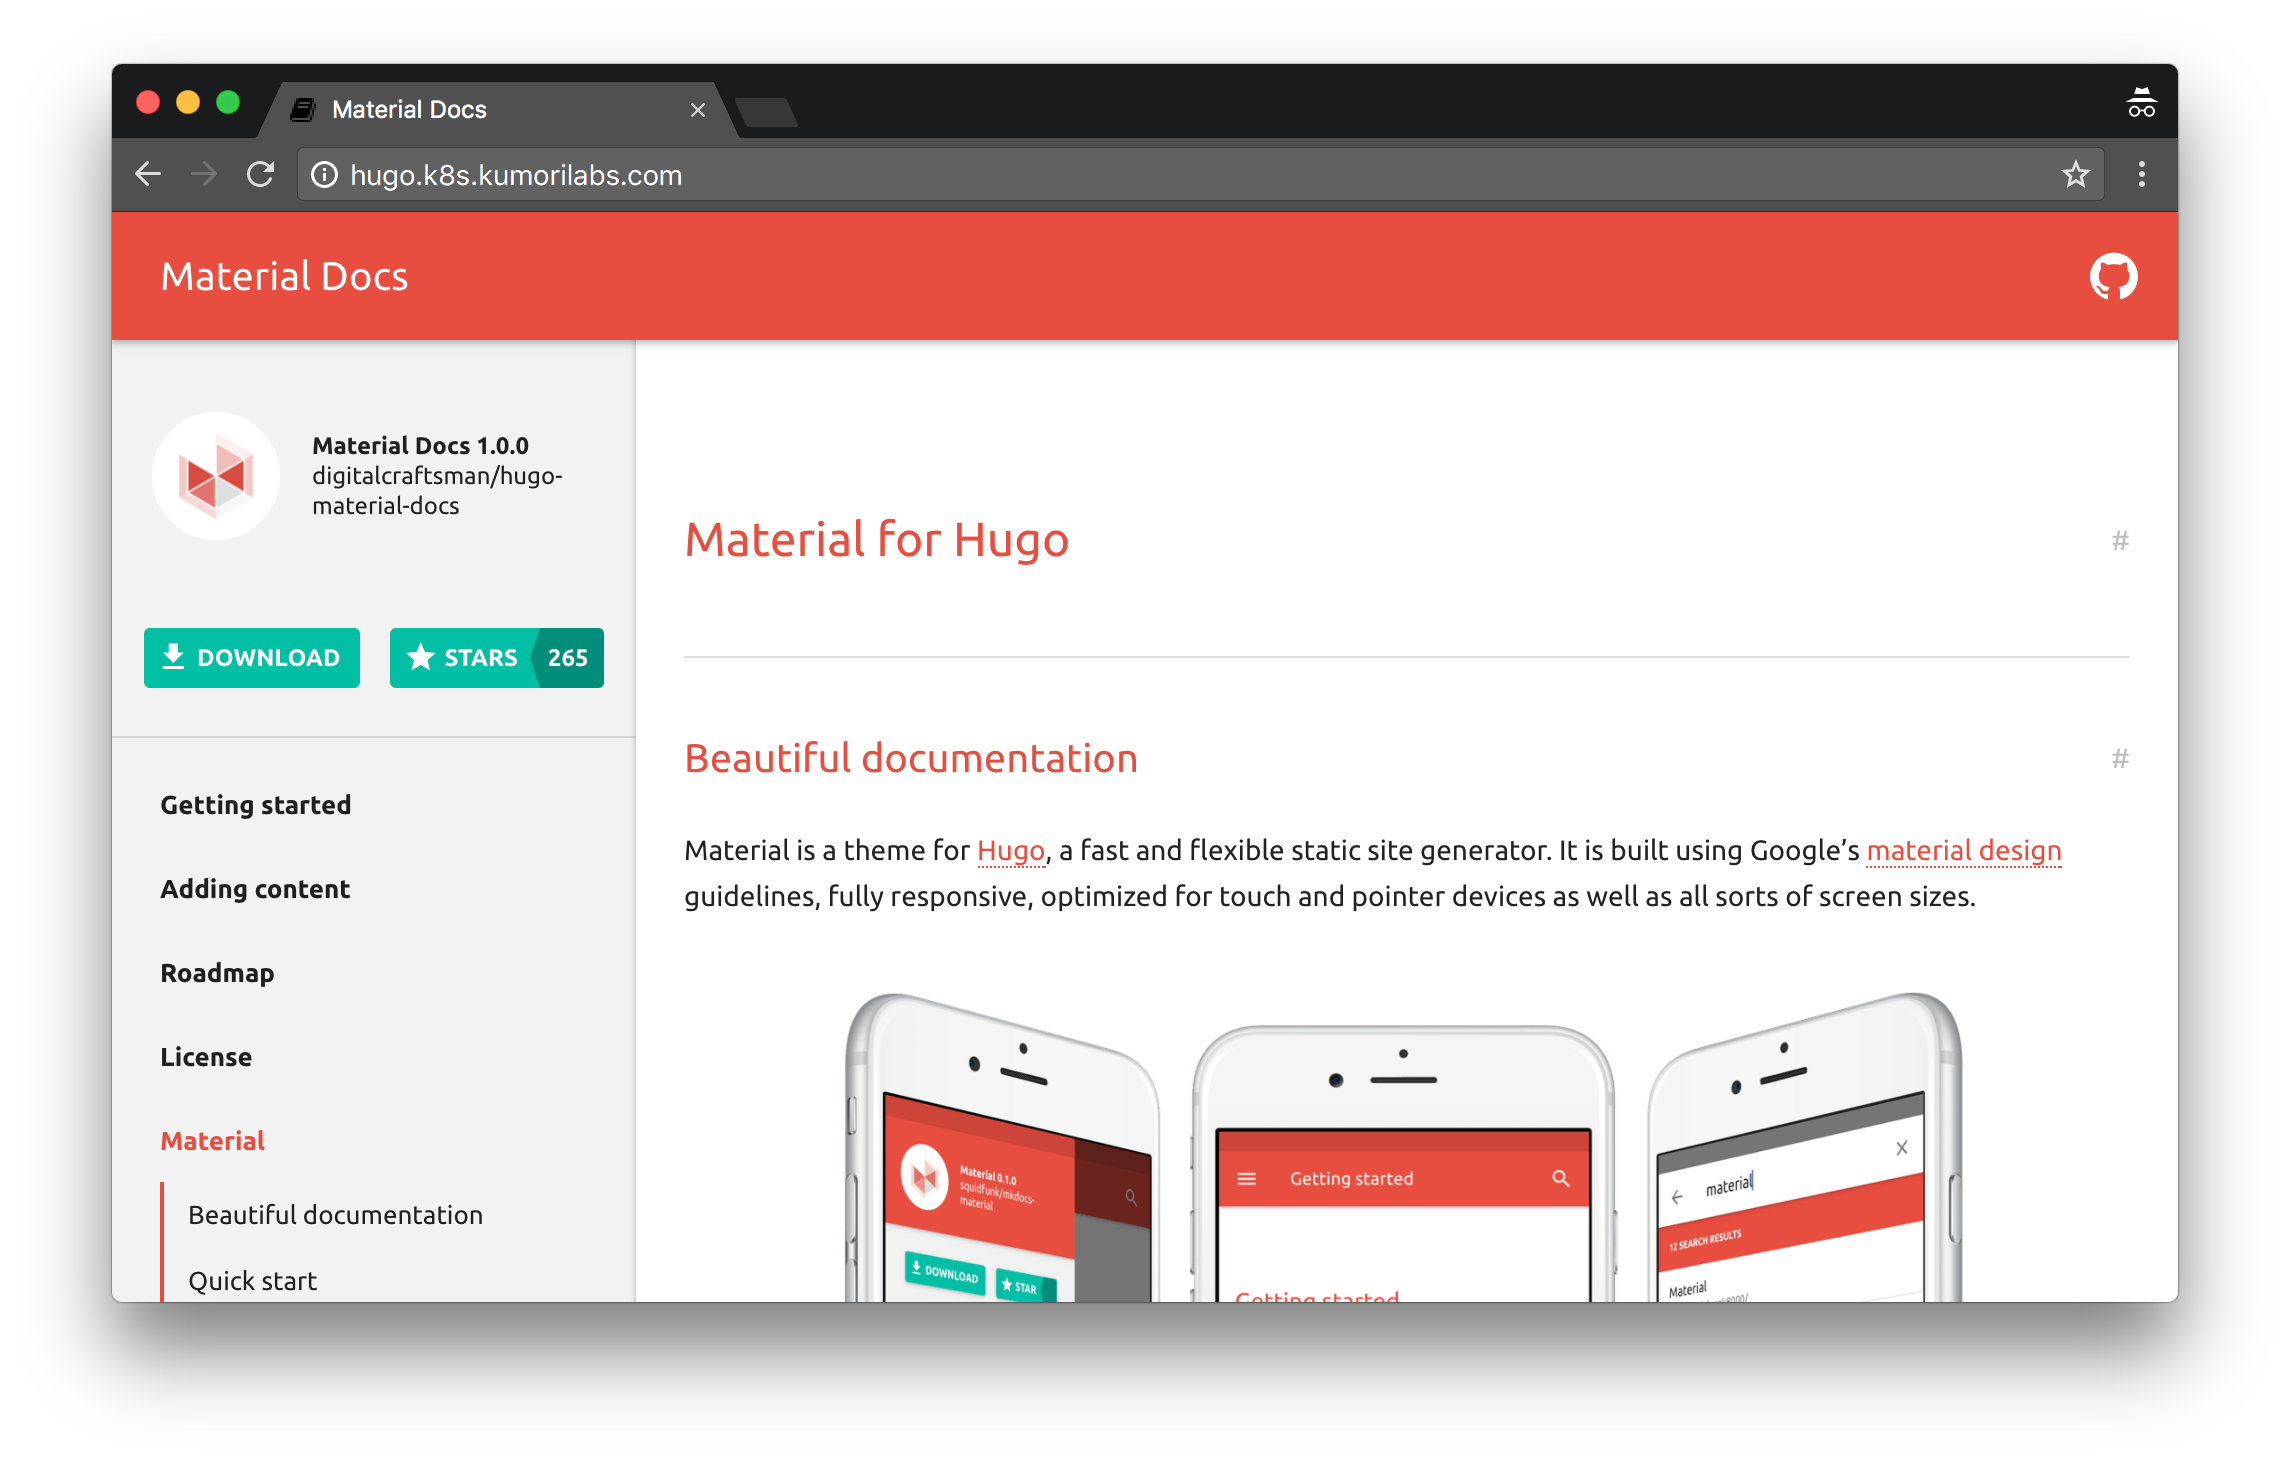
Within a few seconds, your Hugo site should be reachable at the DNS name you just created (e.g., hugo.k8s.kumorilabs.com):
Cleanup
Before proceeding to the next lab, delete the cluster and it’s associated S3 bucket:
Delete the cluster
Delete the cluster:
kops delete cluster ${CLUSTER_FULL_NAME} --yes
Delete the S3 bucket in AWS:
aws s3api delete-bucket --bucket ${CLUSTER_FULL_NAME}-state
In addition to the step-by-step instructions provided for each lab, the repository also contains scripts to automate some of the activities being performed in this blog series. See the Using Scripts guide for more details.
Next Up
In the next lab, Lab #4: Kubernetes Deployment Strategies: Rolling Updates, Canary & Blue-Green, we will go through the following:
- Rolling Updates
- Rolling back a Deployment
- Canary Deployments
- Blue-Green Deployments
Other Labs in the Series
- Introduction: A Blog Series About All Things Kubernetes
- Lab #1: Deploy a Kubernetes Cluster in AWS with Kops
- Lab #2: Maintaining your Kubernetes Cluster
- Lab #4: Kubernetes Deployment Strategies: Rolling Updates, Canary & Blue-Green
- Lab #5: Setup Horizontal Pod & Cluster Autoscaling in Kubernetes
- Lab #6: Integrating Jenkins and Kubernetes
- Lab #7: Continuous Deployment with Jenkins and Kubernetes
- Lab #8: Continuous Deployment with Travis CI and Kubernetes
- Lab #9: Continuous Deployment with Wercker and Kubernetes
- Lab #10: Setup Kubernetes Federation Between Clusters in Different AWS Regions