By Steven Eschinger | February 14, 2017
This post was updated on September 18th, 2017 for Kubernetes version 1.7.6 & Kops version 1.7.0
Introduction
In the previous lab, we took you through how to create Deployments and Services in your cluster.
In this lab, we will demonstrate three common methods for updating Deployments in your cluster:
Rolling Update: Rollout of a new release to an existing Deployment in a serial fashion, where the Pods are incrementally updated one at a time. If problems are detected during the rollout, it is possible to pause the rollout and even rollback the Deployment to a previous state.
Canary Deployment: A parallel Deployment of a new release which is exposed to a subset of end users, thereby reducing the impact if problems arise. The associated LoadBalancer service routes traffic to both Deployments sequentially, where the ratio of requests that will be routed to the canary release is determined by how many Pods there are for each of the two Deployments. For example, if the Deployment for the stable release has three Pods and the canary release Deployment has two replicas, then 40% of the requests will go to the canary release.
Blue-Green Deployment: A parallel Deployment of a new release, where all traffic gets instantaneously rerouted to from the existing Deployment, by changing the selector of the associated LoadBalancer service. If problems are detected with the new release, all traffic can be rerouted back to the original Deployment by reverting back to the original selector of the LoadBalancer service.
Activities
- Deploy a new cluster
- Create additional Docker images for the Hugo site
- Rolling Updates
- Rolling back a Deployment
- Canary Deployments
- Blue-Green Deployments
- Delete the cluster
Warning: Some of the AWS resources that will be created in the following lab are not eligible for the AWS Free Tier and therefore will cost you money. For example, running a three node cluster with the suggested instance size of t2.medium will cost you around $0.20 per hour based on current pricing.
Prerequisites
Review the Getting Started section in the introductory post of this blog series
Log into the Vagrant box or your prepared local host environment
Update and then load the required environment variables:
# Must change: Your domain name that is hosted in AWS Route 53
export DOMAIN_NAME="k8s.kumorilabs.com"

# Friendly name to use as an alias for your cluster
export CLUSTER_ALIAS="usa"

# Leave as-is: Full DNS name of you cluster
export CLUSTER_FULL_NAME="${CLUSTER_ALIAS}.${DOMAIN_NAME}"

# AWS availability zone where the cluster will be created
export CLUSTER_AWS_AZ="us-east-1a"

# Leave as-is: AWS Route 53 hosted zone ID for your domain
export DOMAIN_NAME_ZONE_ID=$(aws route53 list-hosted-zones \
       | jq -r '.HostedZones[] | select(.Name=="'${DOMAIN_NAME}'.") | .Id' \
       | sed 's/\/hostedzone\///')
Implementation
Deploy a new cluster
Create the S3 bucket in AWS, which will be used by Kops for cluster configuration storage:
aws s3api create-bucket --bucket ${CLUSTER_FULL_NAME}-state
Set the KOPS_STATE_STORE variable to the URL of the S3 bucket that was just created:
export KOPS_STATE_STORE="s3://${CLUSTER_FULL_NAME}-state"
Create the cluster with Kops:
kops create cluster \
     --name=${CLUSTER_FULL_NAME} \
     --zones=${CLUSTER_AWS_AZ} \
     --master-size="t2.medium" \
     --node-size="t2.medium" \
     --node-count="2" \
     --dns-zone=${DOMAIN_NAME} \
     --ssh-public-key="~/.ssh/id_rsa.pub" \
     --kubernetes-version="1.7.6" --yes
It will take approximately five minutes for the cluster to be ready. To check if the cluster is ready:
kubectl get nodes
NAME                            STATUS    AGE       VERSION
ip-172-20-42-192.ec2.internal   Ready     1m        v1.7.6
ip-172-20-57-77.ec2.internal    Ready     2m        v1.7.6
ip-172-20-63-92.ec2.internal    Ready     3m        v1.7.6
Create additional Docker images for the Hugo site
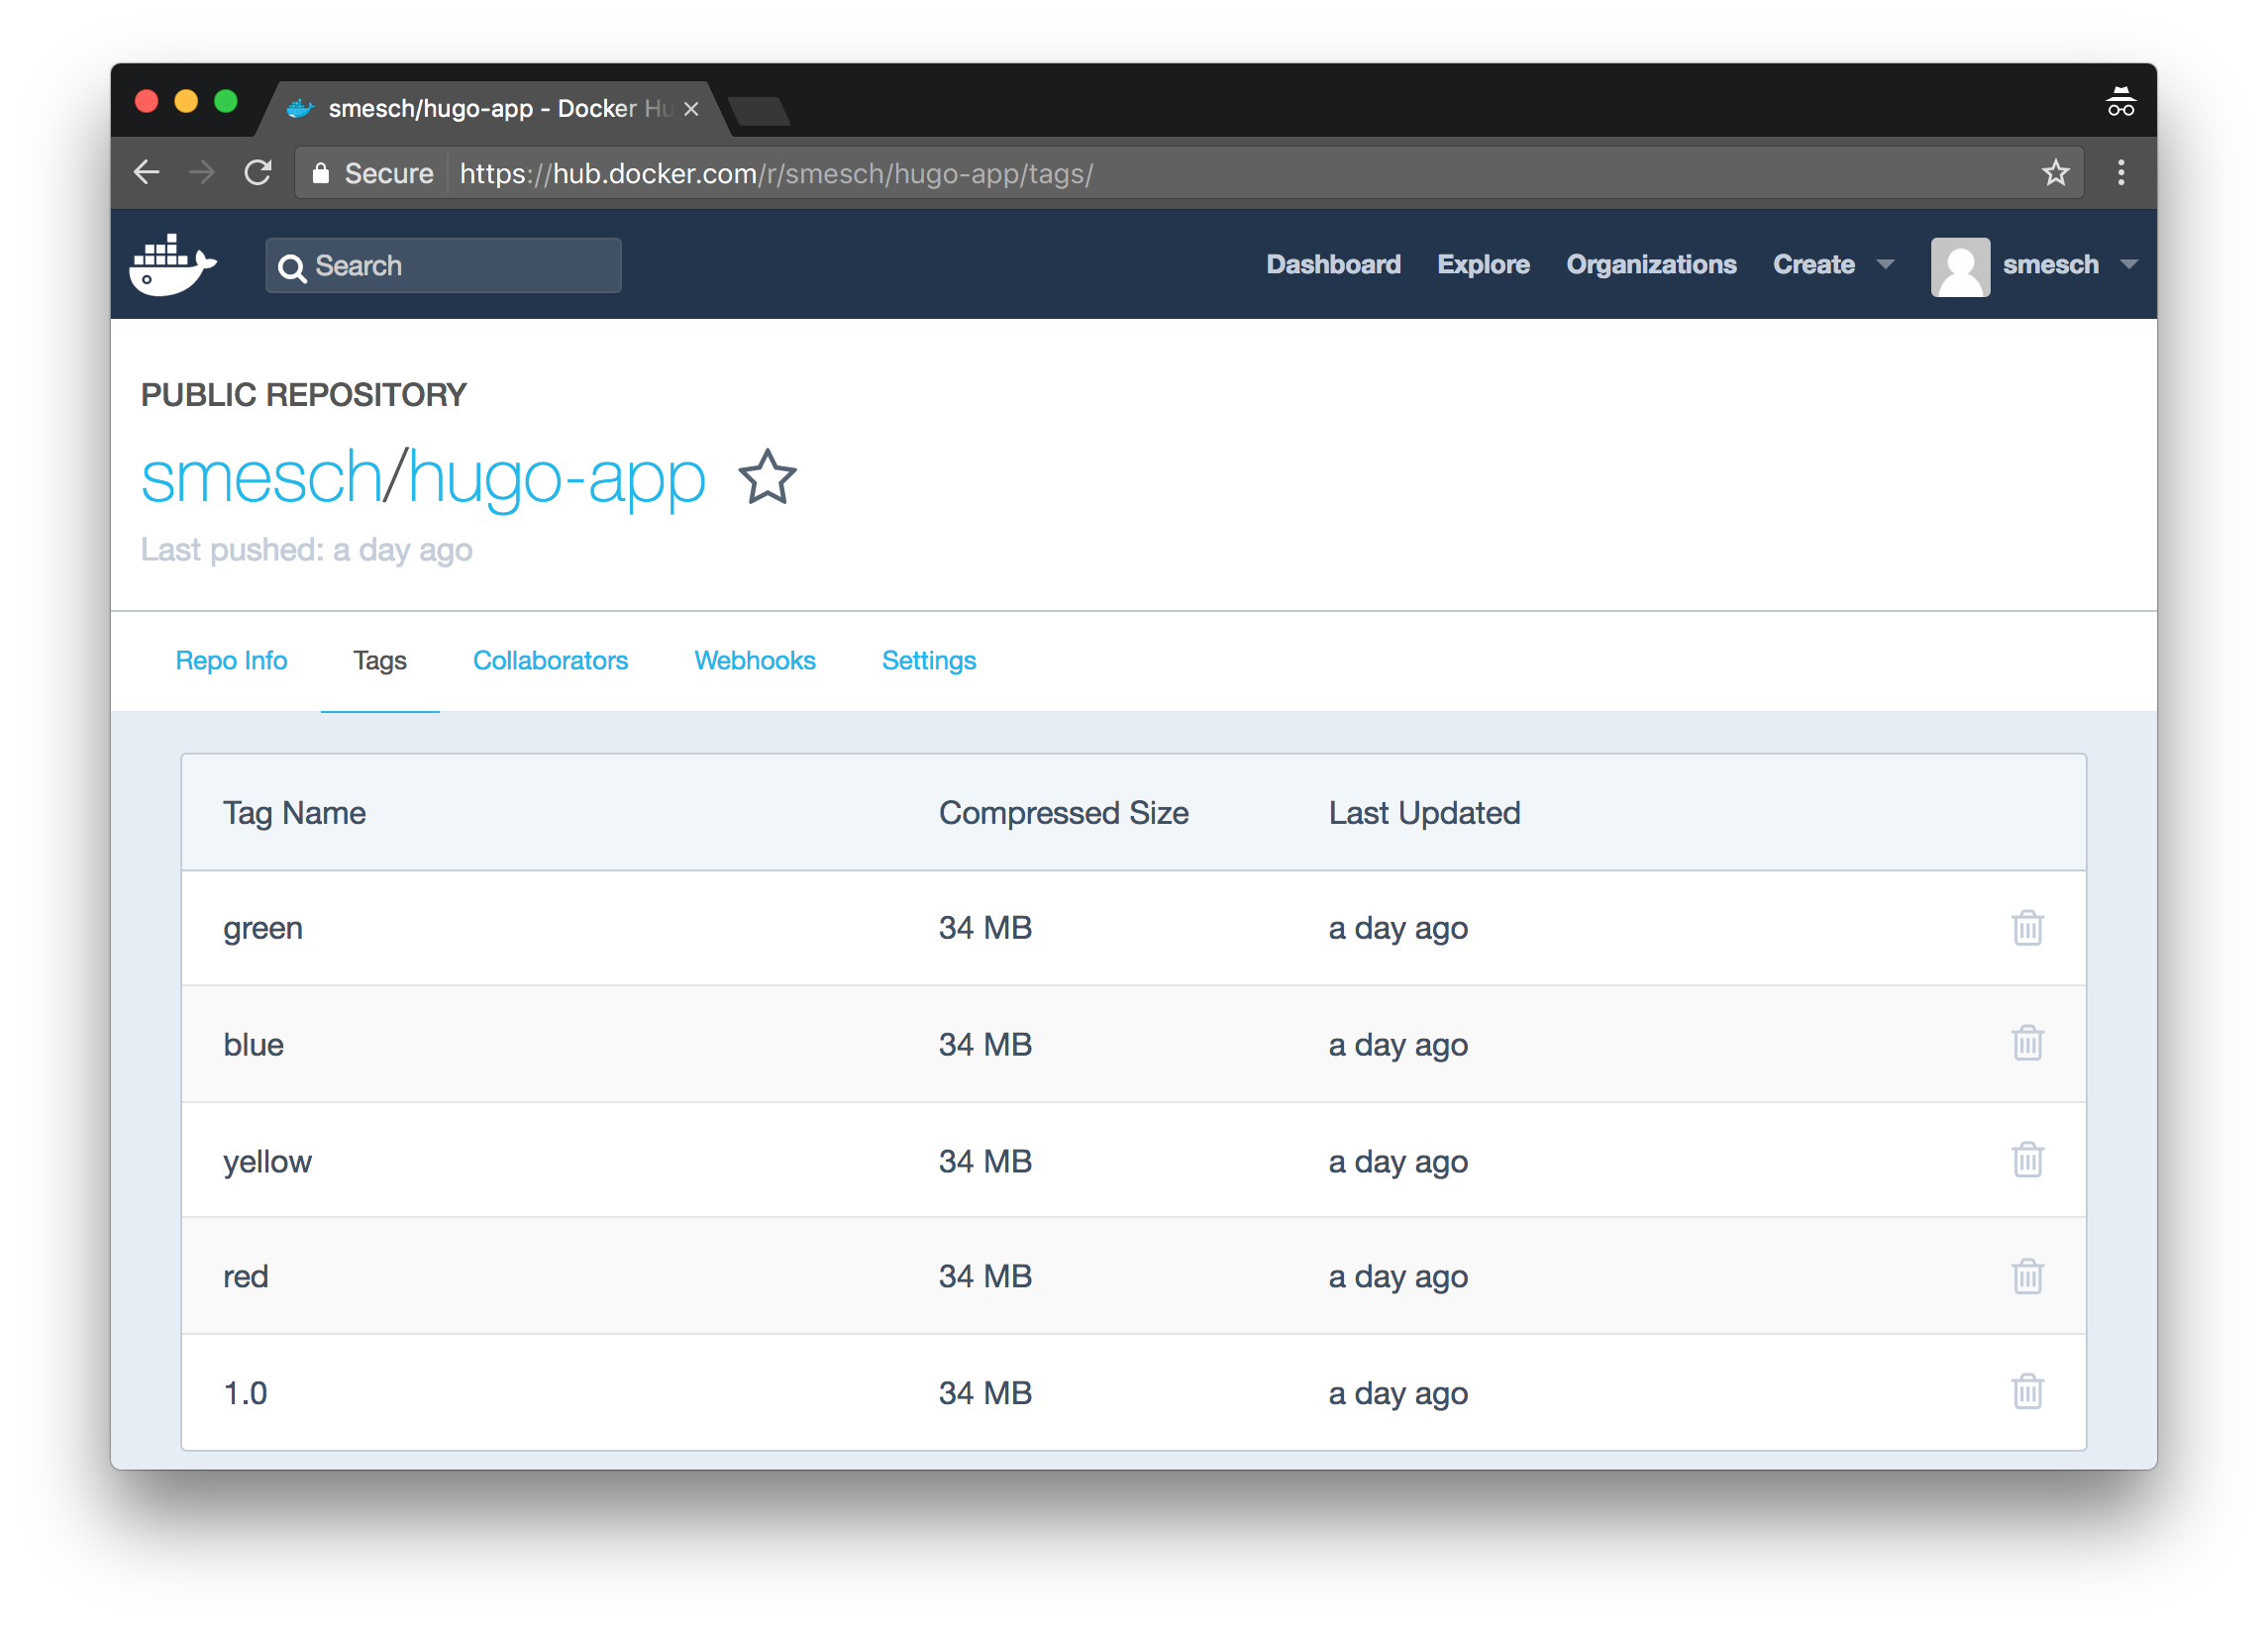
In the previous lab, we created the initial Docker image for the Hugo site with a tag of 1.0. In order to demonstrate the three deployment methods below, we will create four additional versions of the Docker image, with tags of red, yellow, blue and green. The name of each tag will correspond with the main theme color being used for the Hugo site.
If you haven’t completed the previous lab or would just prefer to use existing Docker images from my Docker Hub repository, set the Docker Hub username variable to my Docker Hub username (export DOCKER_HUB_USERNAME="smesch") and then continue on to the next section.
Before we proceed, let’s first make sure your credentials are setup for GitHub and the Docker Hub.
Configure your global Git settings with your username, email and set the password cache to 60 minutes:
# Set your GitHub username and email
export GITHUB_USERNAME="smesch"
export GITHUB_EMAIL="steven@kumorilabs.com"

git config --global user.name "${GITHUB_USERNAME}"
git config --global user.email "${GITHUB_EMAIL}"
git config --global credential.helper cache
git config --global credential.helper 'cache --timeout=3600'
Login to the Docker Hub (you will be prompted for your Docker Hub password):
# Set your Docker Hub username
export DOCKER_HUB_USERNAME="smesch"

docker login -u ${DOCKER_HUB_USERNAME}
You are now ready to create the first Docker image with tag red, which is the default theme color:
export HUGO_APP_TAG="red"
docker build -t ${DOCKER_HUB_USERNAME}/hugo-app:${HUGO_APP_TAG} --rm docker/hugo-app/
docker push ${DOCKER_HUB_USERNAME}/hugo-app:${HUGO_APP_TAG}
docker rmi $(docker images --filter=reference="${DOCKER_HUB_USERNAME}/hugo-app" -q)
Now let’s create the Docker image with tag yellow, but before we do so, we will change the theme color to yellow in the Hugo config file and then commit the change to your GitHub repository (you will be prompted for your GitHub credentials):
export HUGO_APP_TAG="yellow"
sed -i -e 's|primary = .*|primary = "'"${HUGO_APP_TAG}"'"|g' hugo-app/config.toml
git -C hugo-app/ commit -a -m "Set theme color to ${HUGO_APP_TAG}"
git -C hugo-app/ push -u origin master
docker build -t ${DOCKER_HUB_USERNAME}/hugo-app:${HUGO_APP_TAG} --rm docker/hugo-app/
docker push ${DOCKER_HUB_USERNAME}/hugo-app:${HUGO_APP_TAG}
docker rmi $(docker images --filter=reference="${DOCKER_HUB_USERNAME}/hugo-app" -q)
To create the Docker images with tags blue & green, repeat the commands above twice, each time changing the value of the HUGO_APP_TAG variable to blue and then green.
Once you have created the additional Docker images, the hugo-app repository in your Docker Hub account should look something like this:
Rolling Updates
Now that all of the Docker images are created, we can start with the first demonstration: Rolling Updates
In the previous lab, we created a Deployment and Service using manifests (configuration files). It is also possible to create resources directly from the command line with kubectl, which we will do for this demonstration.
First, we will create a new Deployment called hugo-app-rolling-update, which will run a single pod with the hugo-app:red Docker image you just created:
kubectl create deployment hugo-app-rolling-update \
        --image=${DOCKER_HUB_USERNAME}/hugo-app:red
We can now edit the configuration of the Deployment directly with kubectl to add additional options:
kubectl edit deployment hugo-app-rolling-update
This will bring up a text editor with the Deployment configuration, where you will add the lines highlighted below to specify the container port we need to expose and the minReadySeconds setting, which will set a 20 second grace period after a Pod is started before it is considered ready (for the purpose of the demonstration):
spec:
> minReadySeconds: 20
  replicas: 1
  selector:
    matchLabels:
      app: hugo-app-rolling-update
      containers:
      - image: smesch/hugo-app:red
        imagePullPolicy: IfNotPresent
>       ports:
>       - containerPort: 80
>         protocol: TCP
        name: hugo-app
Save the changes you made to the file and we will now scale up the Deployment to increase the amount of Pods to 6:
kubectl scale deployment hugo-app-rolling-update --replicas 6
deployment "hugo-app-rolling-update" scaled
Now let’s create the Service:
kubectl expose deployment hugo-app-rolling-update --name=hugo-app-rolling-update-svc \
        --type=LoadBalancer --port=80 --target-port=80
service "hugo-app-rolling-update-svc" exposed
This will create a LoadBalancer Service called hugo-app-rolling-update-svc, which will expose port 80 publicly. And as we didn’t specify a selector, it will use the label from the Deployment. We didn’t specify a label when creating the Deployment, so it defaulted to app: + the name of the Deployment (app: hugo-app-rolling-update)
The Hugo site is now reachable and we will create a DNS CNAME record in your Route 53 domain with a prefix of hugo-rolling-update (e.g., hugo-rolling-update.k8s.kumorilabs.com), using the dns-record-single.json template file:
# Set the DNS record prefix & the Service name and then retrieve the ELB URL
export DNS_RECORD_PREFIX="hugo-rolling-update"
export SERVICE_NAME="hugo-app-rolling-update-svc"
export HUGO_APP_ELB=$(kubectl get svc/${SERVICE_NAME} \
       --template="{{range .status.loadBalancer.ingress}} {{.hostname}} {{end}}")

# Add to JSON file
sed -i -e 's|"Name": ".*|"Name": "'"${DNS_RECORD_PREFIX}.${DOMAIN_NAME}"'",|g' \
    scripts/apps/dns-records/dns-record-single.json
sed -i -e 's|"Value": ".*|"Value": "'"${HUGO_APP_ELB}"'"|g' \
    scripts/apps/dns-records/dns-record-single.json

# Create DNS record
aws route53 change-resource-record-sets \
    --hosted-zone-id ${DOMAIN_NAME_ZONE_ID} \
    --change-batch file://scripts/apps/dns-records/dns-record-single.json
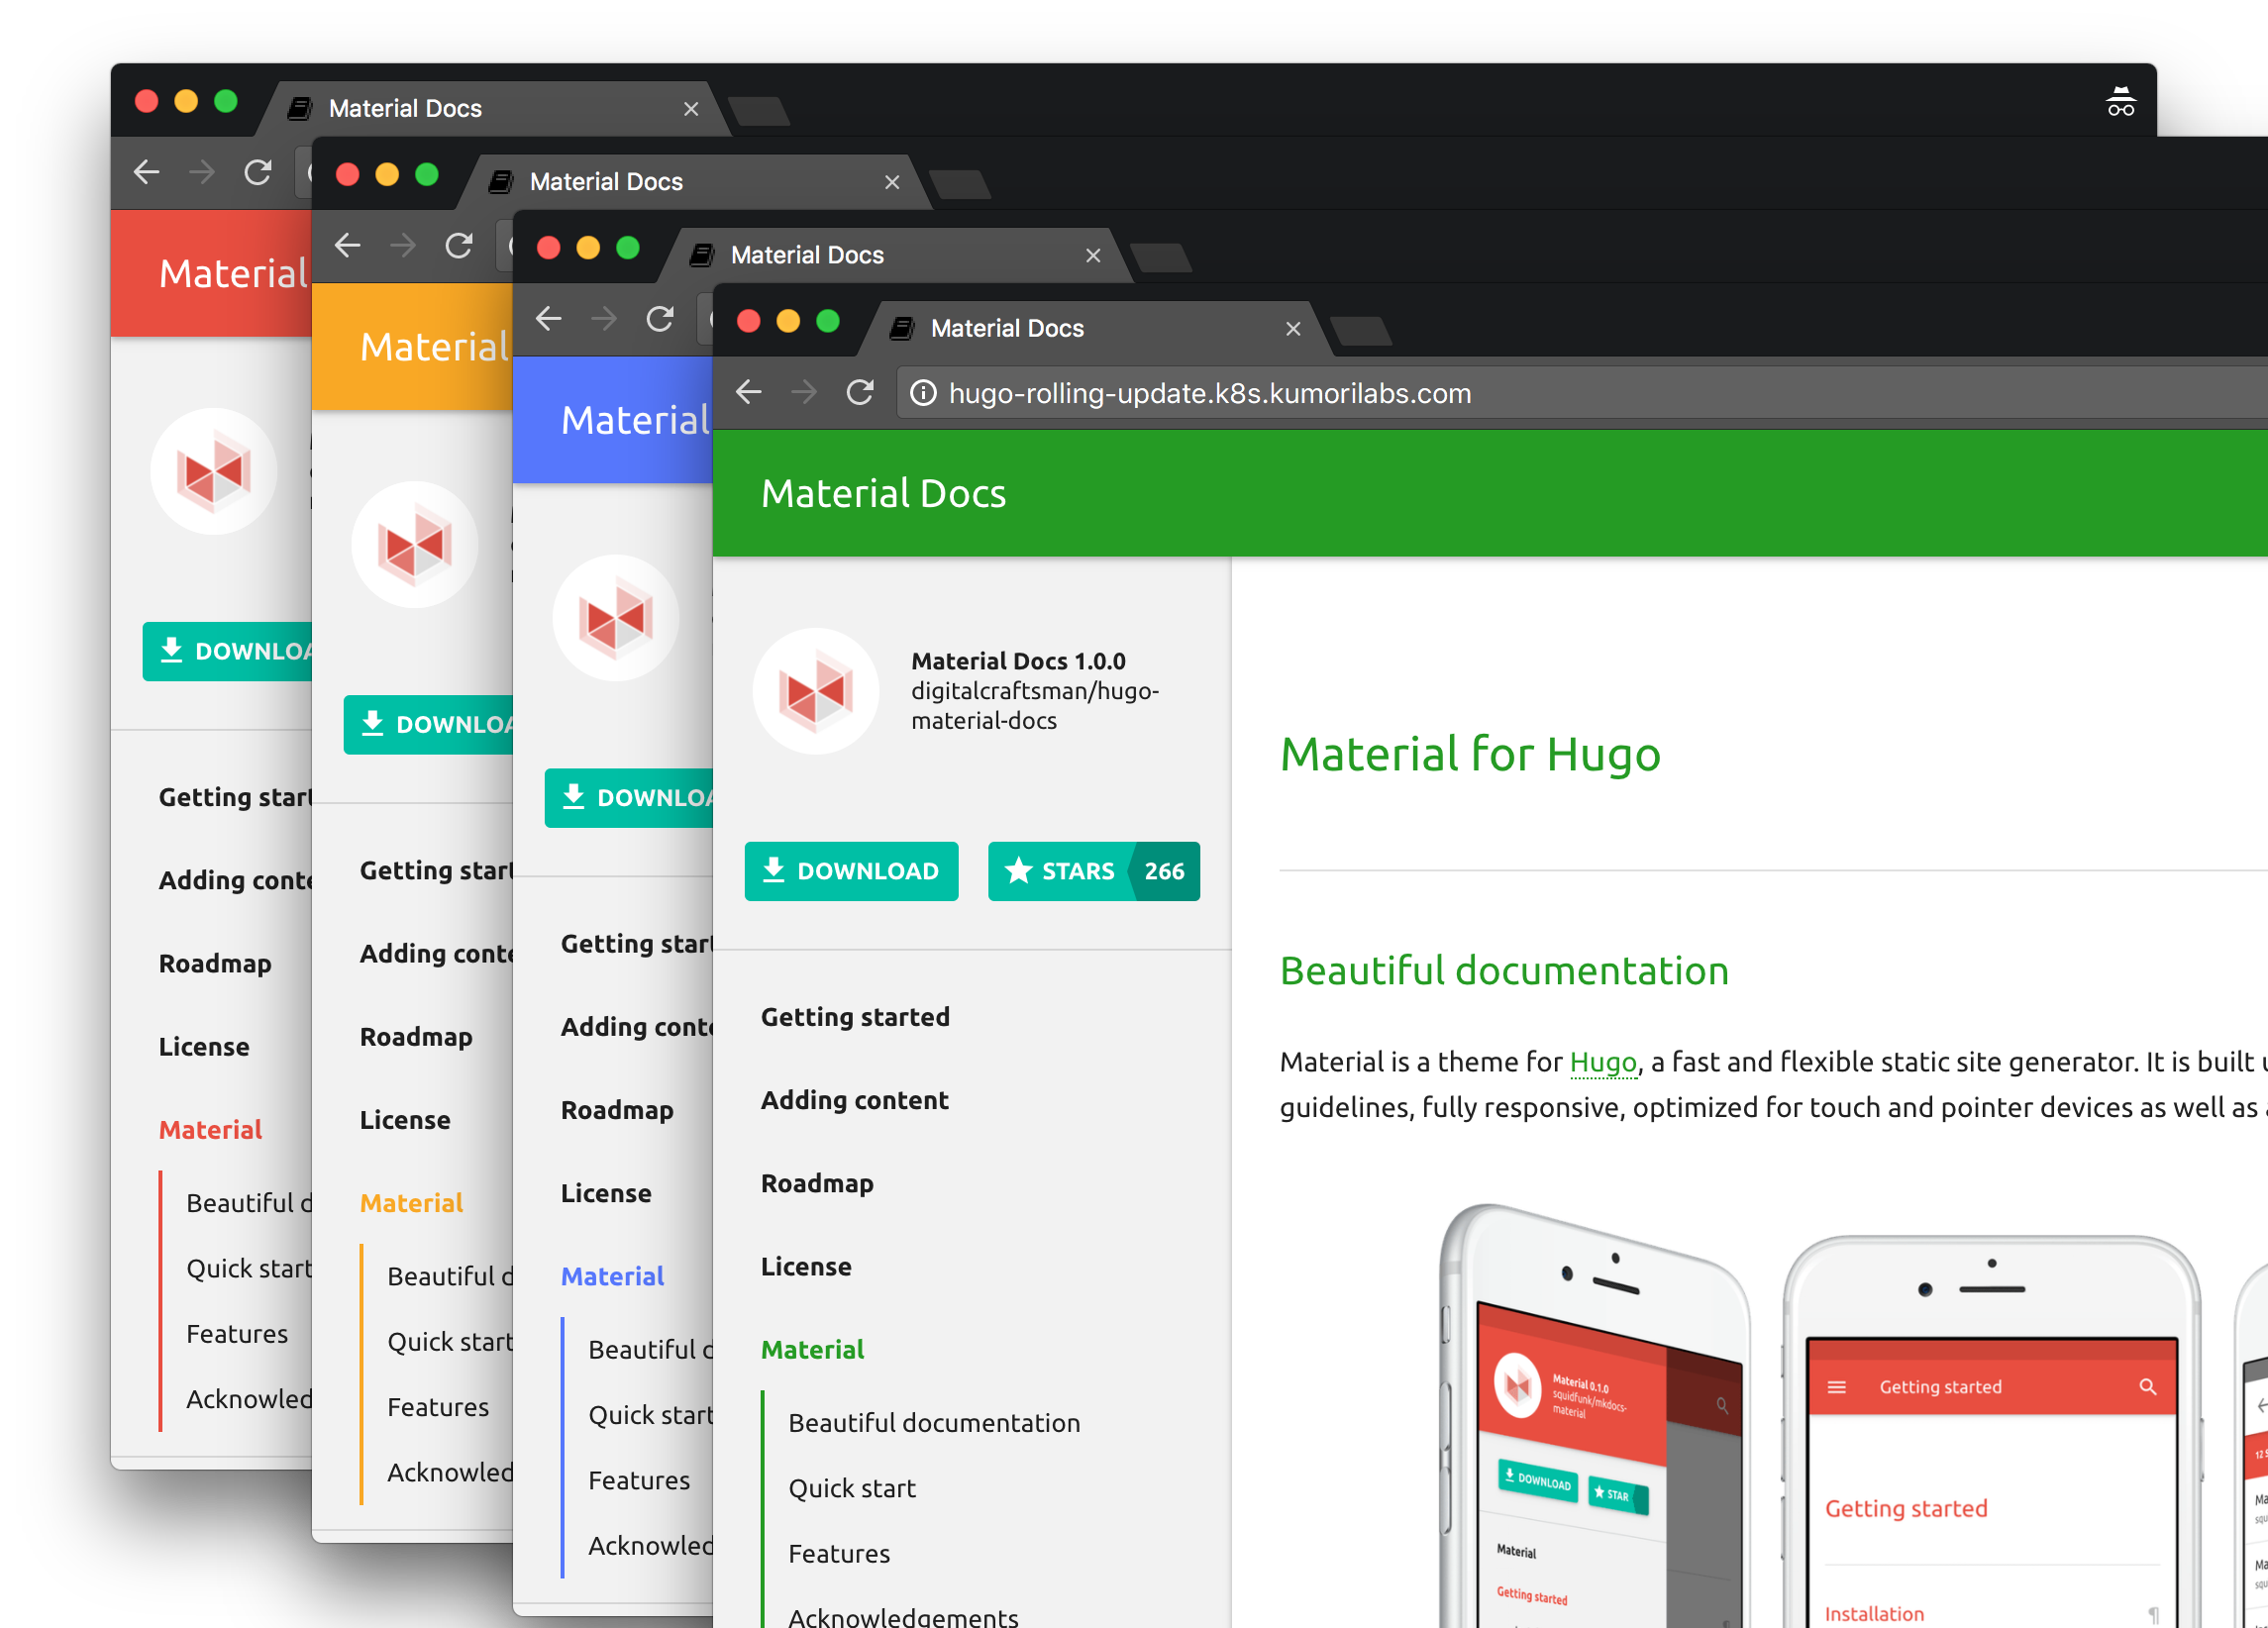
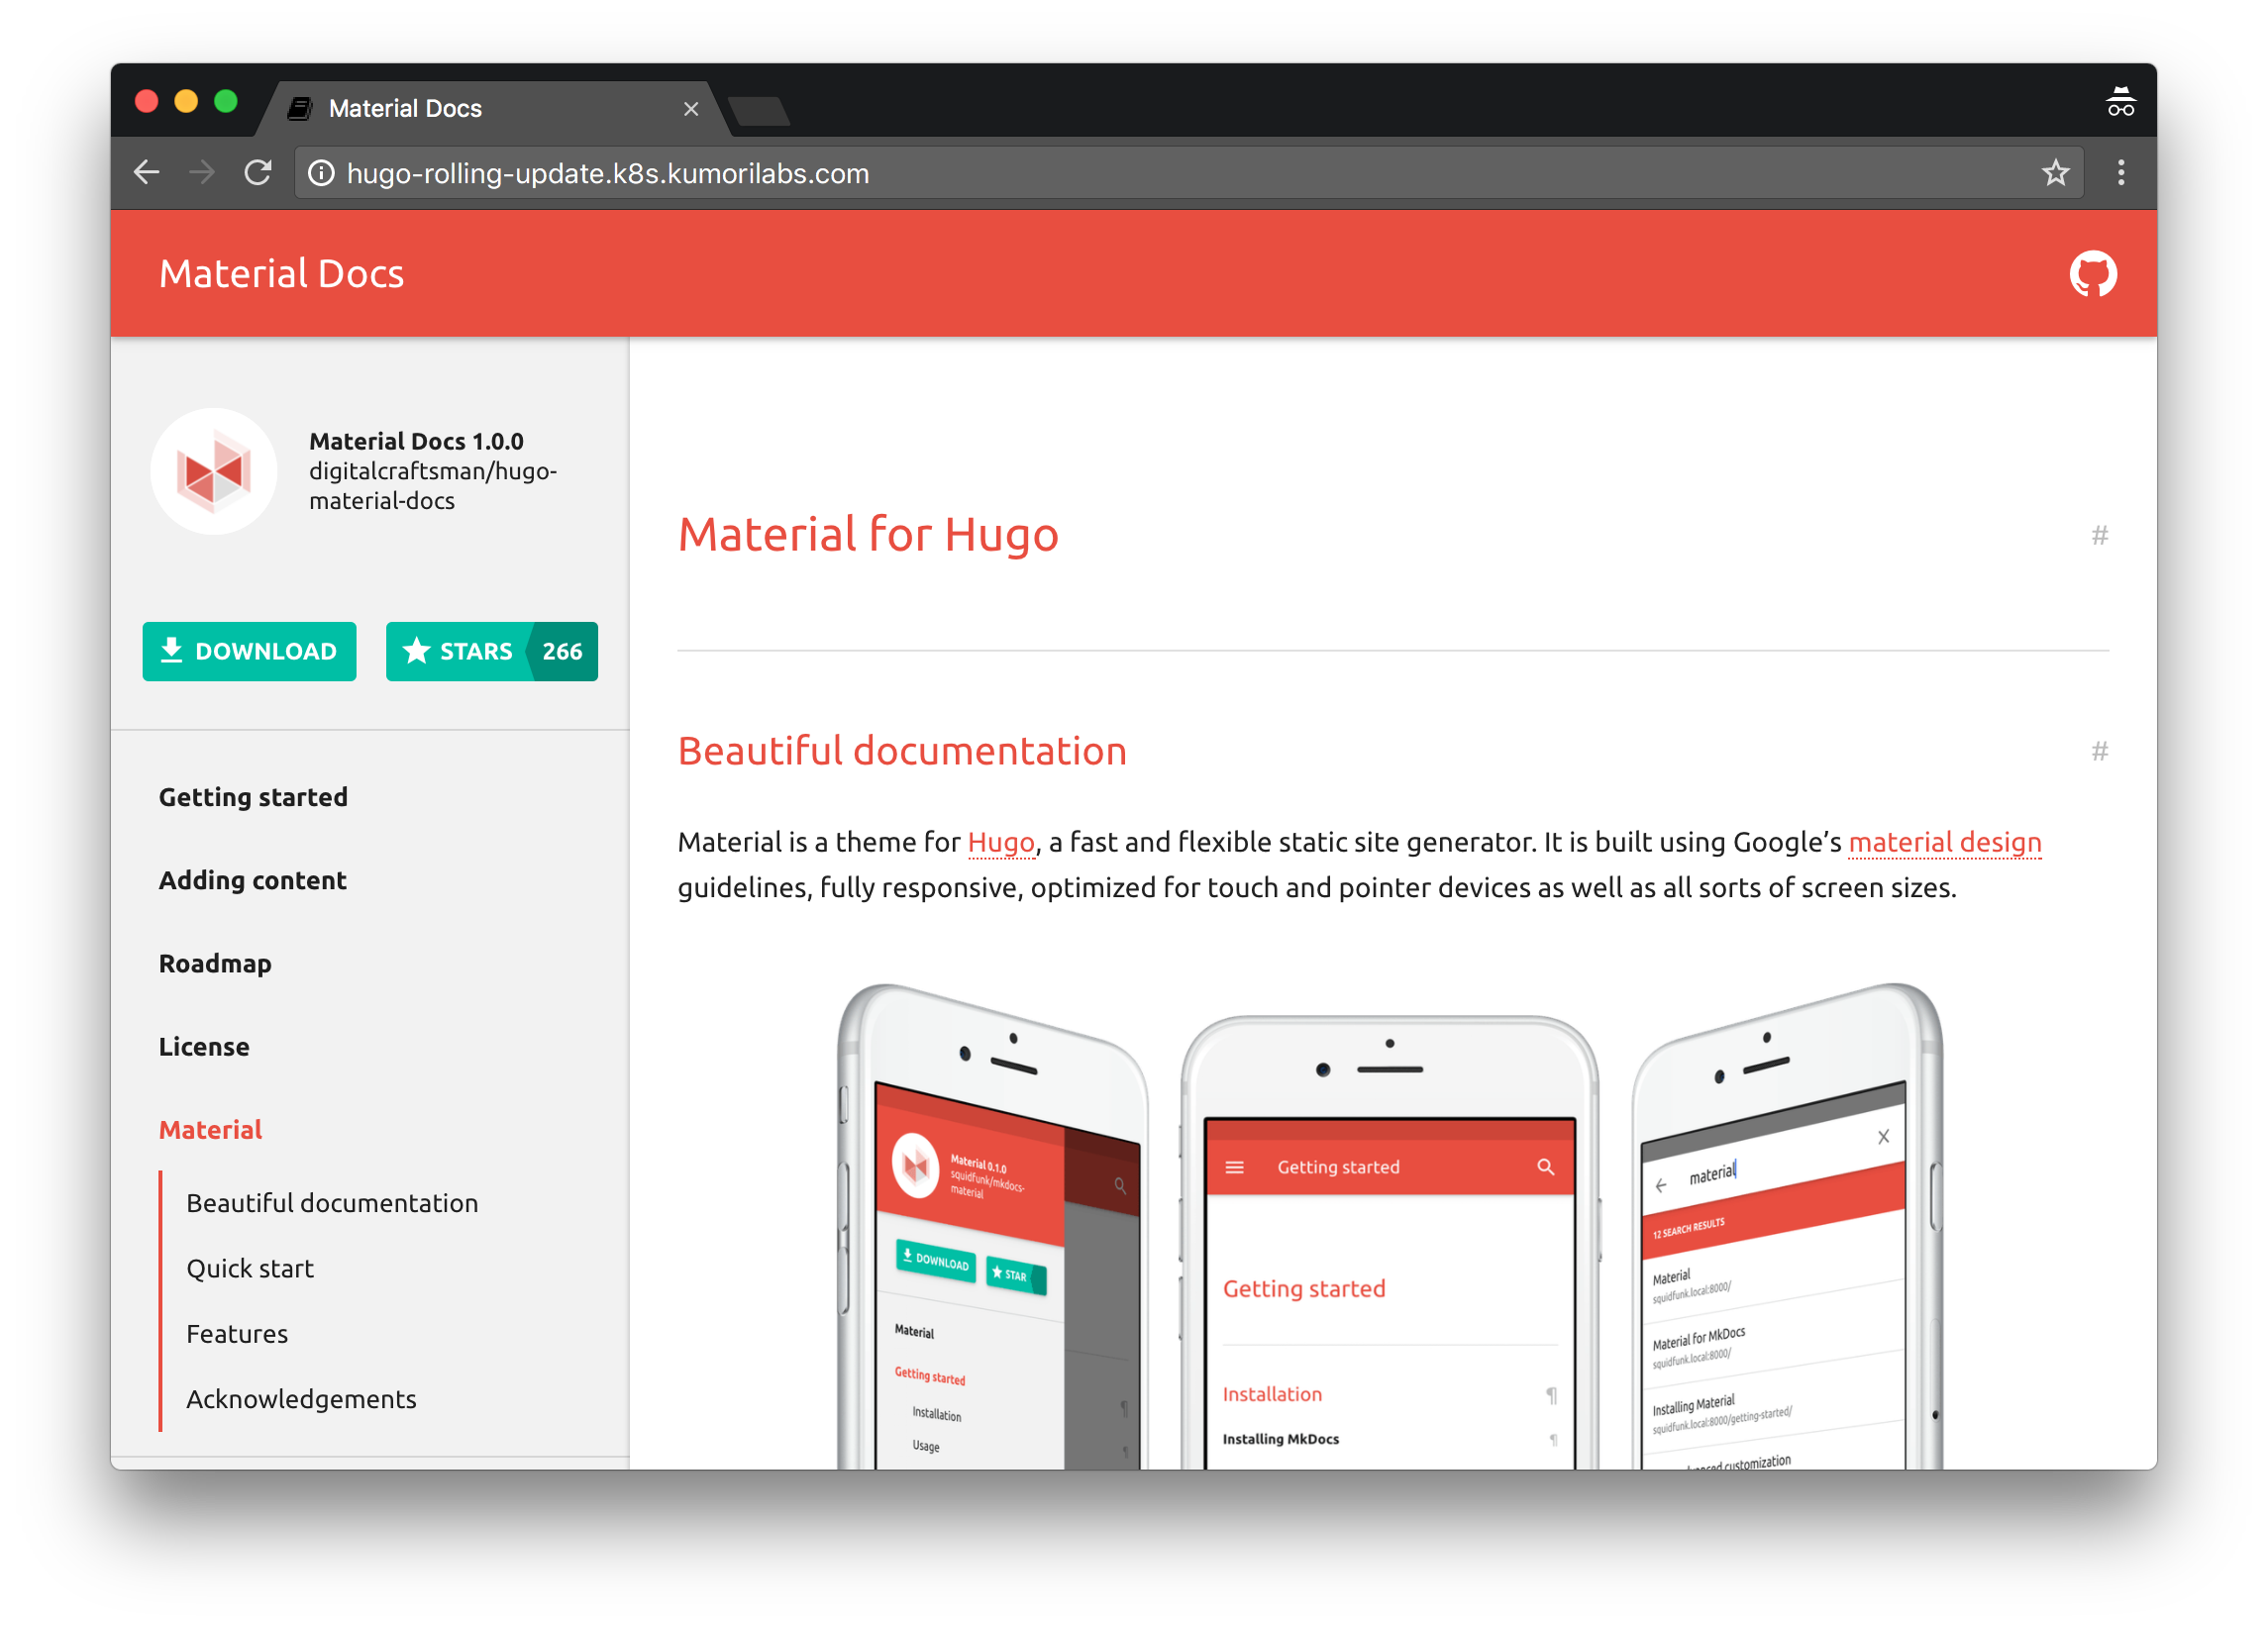
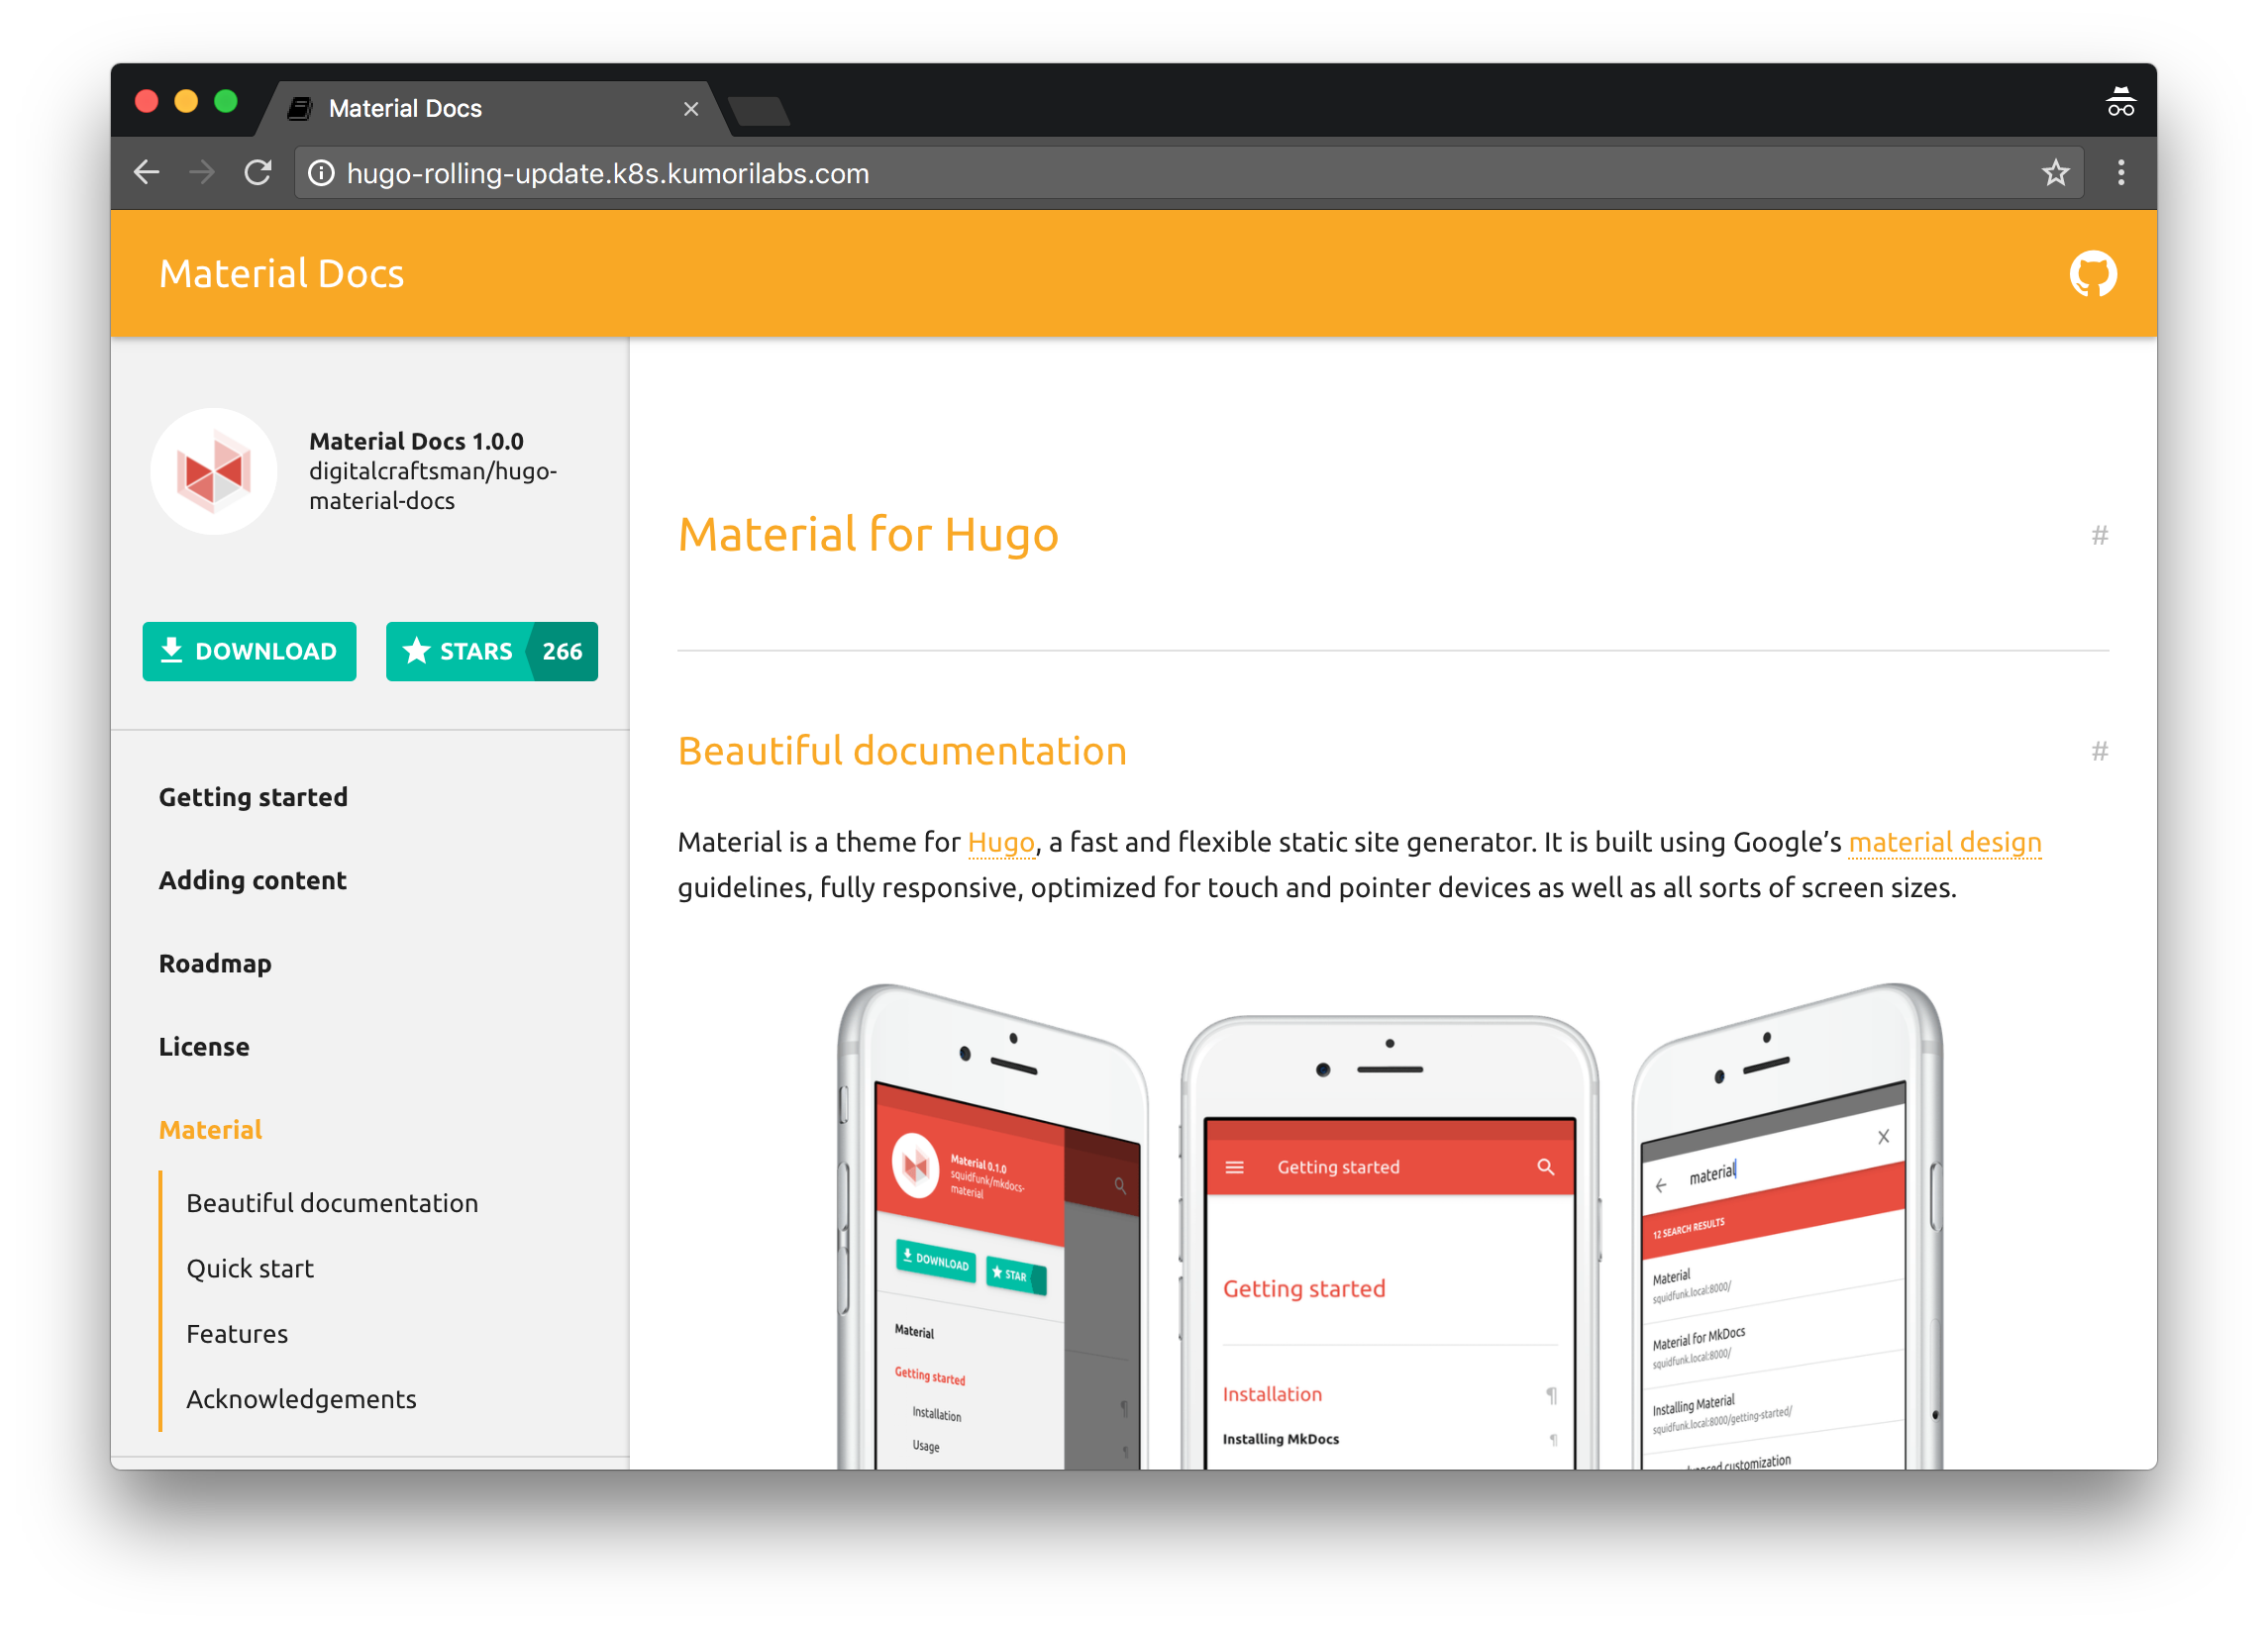
Within a minute or two, the Hugo site should be reachable at the DNS name we just created (e.g., hugo-rolling-update.k8s.kumorilabs.com). Browse to it and you’ll notice that the theme color is currently red (leave your browser open):
Now let’s update the Docker image that the Deployment is using to yellow and then immediately pause the rollout:
kubectl set image deploy/hugo-app-rolling-update \
        hugo-app=${DOCKER_HUB_USERNAME}/hugo-app:yellow; \
        kubectl rollout pause deploy/hugo-app-rolling-update
deployment "hugo-app-rolling-update" image updated
deployment "hugo-app-rolling-update" paused
Open up a second terminal (if using Vagrant, browse to the root of the repository from a second terminal and connect with vagrant ssh) to monitor the status of the rollout:
kubectl rollout status deploy/hugo-app-rolling-update
Waiting for rollout to finish: 2 out of 6 new replicas have been updated...
Switch back to the first terminal to resume the rollout:
kubectl rollout resume deploy/hugo-app-rolling-update
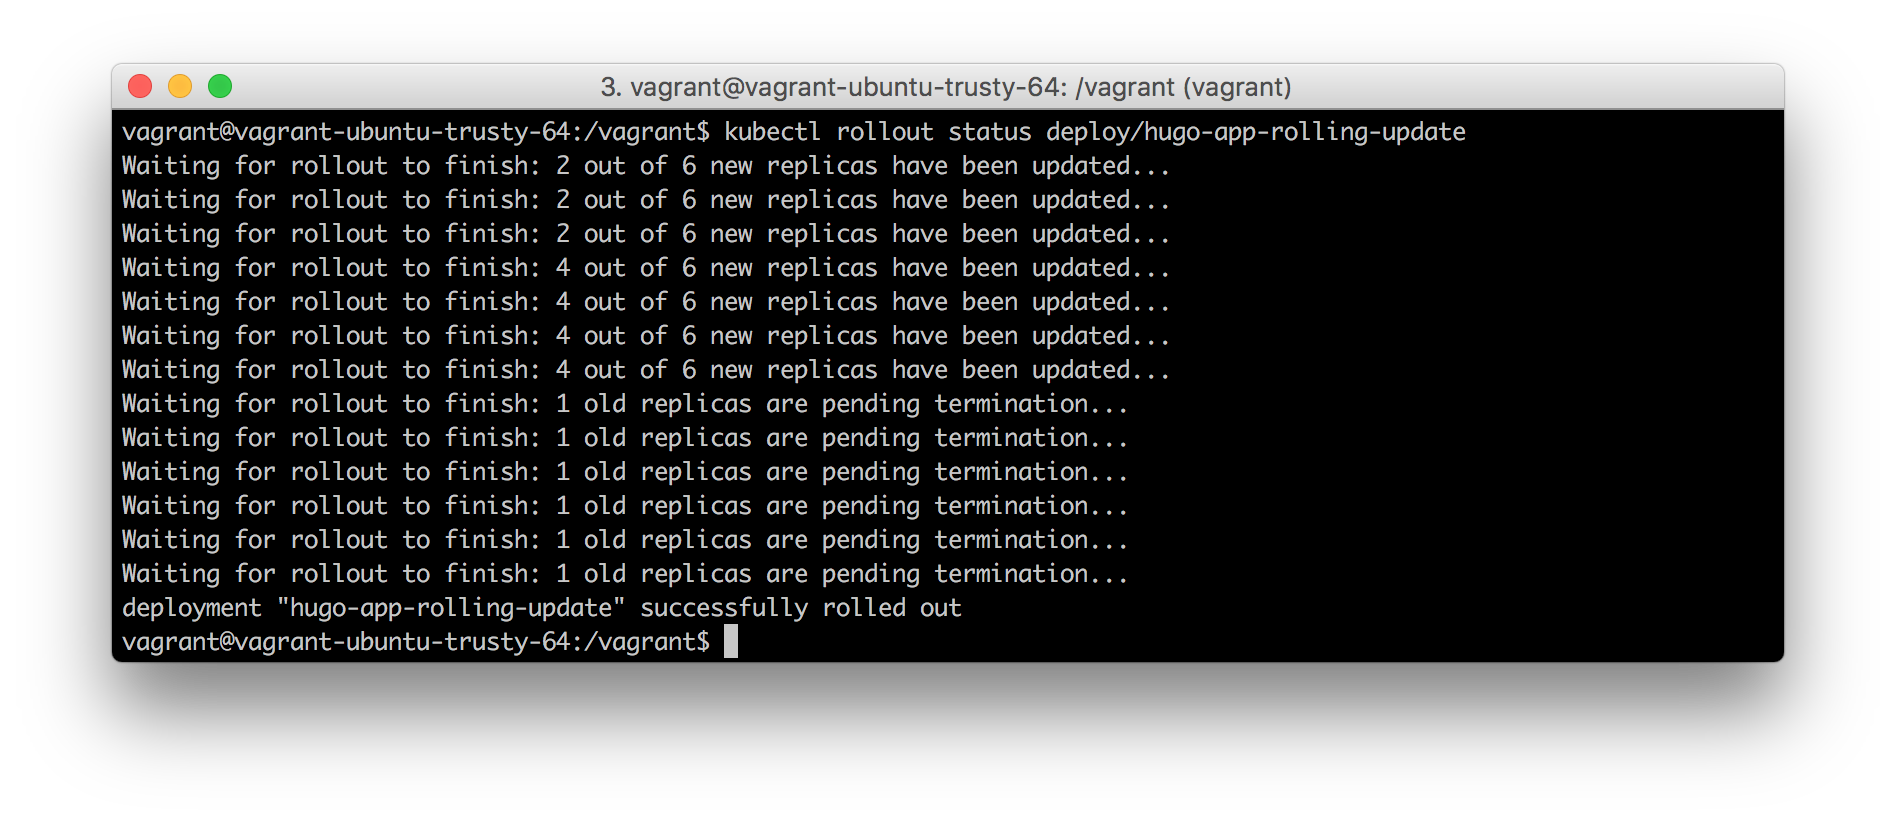
And back on the second terminal you will see the rollout happen in real-time:
Waiting for rollout to finish: 2 out of 6 new replicas have been updated...
Waiting for rollout to finish: 2 out of 6 new replicas have been updated...
Waiting for rollout to finish: 2 out of 6 new replicas have been updated...
Waiting for rollout to finish: 4 out of 6 new replicas have been updated...
Waiting for rollout to finish: 4 out of 6 new replicas have been updated...
Waiting for rollout to finish: 4 out of 6 new replicas have been updated...
Waiting for rollout to finish: 4 out of 6 new replicas have been updated...
Waiting for rollout to finish: 1 old replicas are pending termination...
Waiting for rollout to finish: 1 old replicas are pending termination...
Waiting for rollout to finish: 1 old replicas are pending termination...
Waiting for rollout to finish: 1 old replicas are pending termination...
Waiting for rollout to finish: 1 old replicas are pending termination...
Waiting for rollout to finish: 1 old replicas are pending termination...
deployment "hugo-app-rolling-update" successfully rolled out
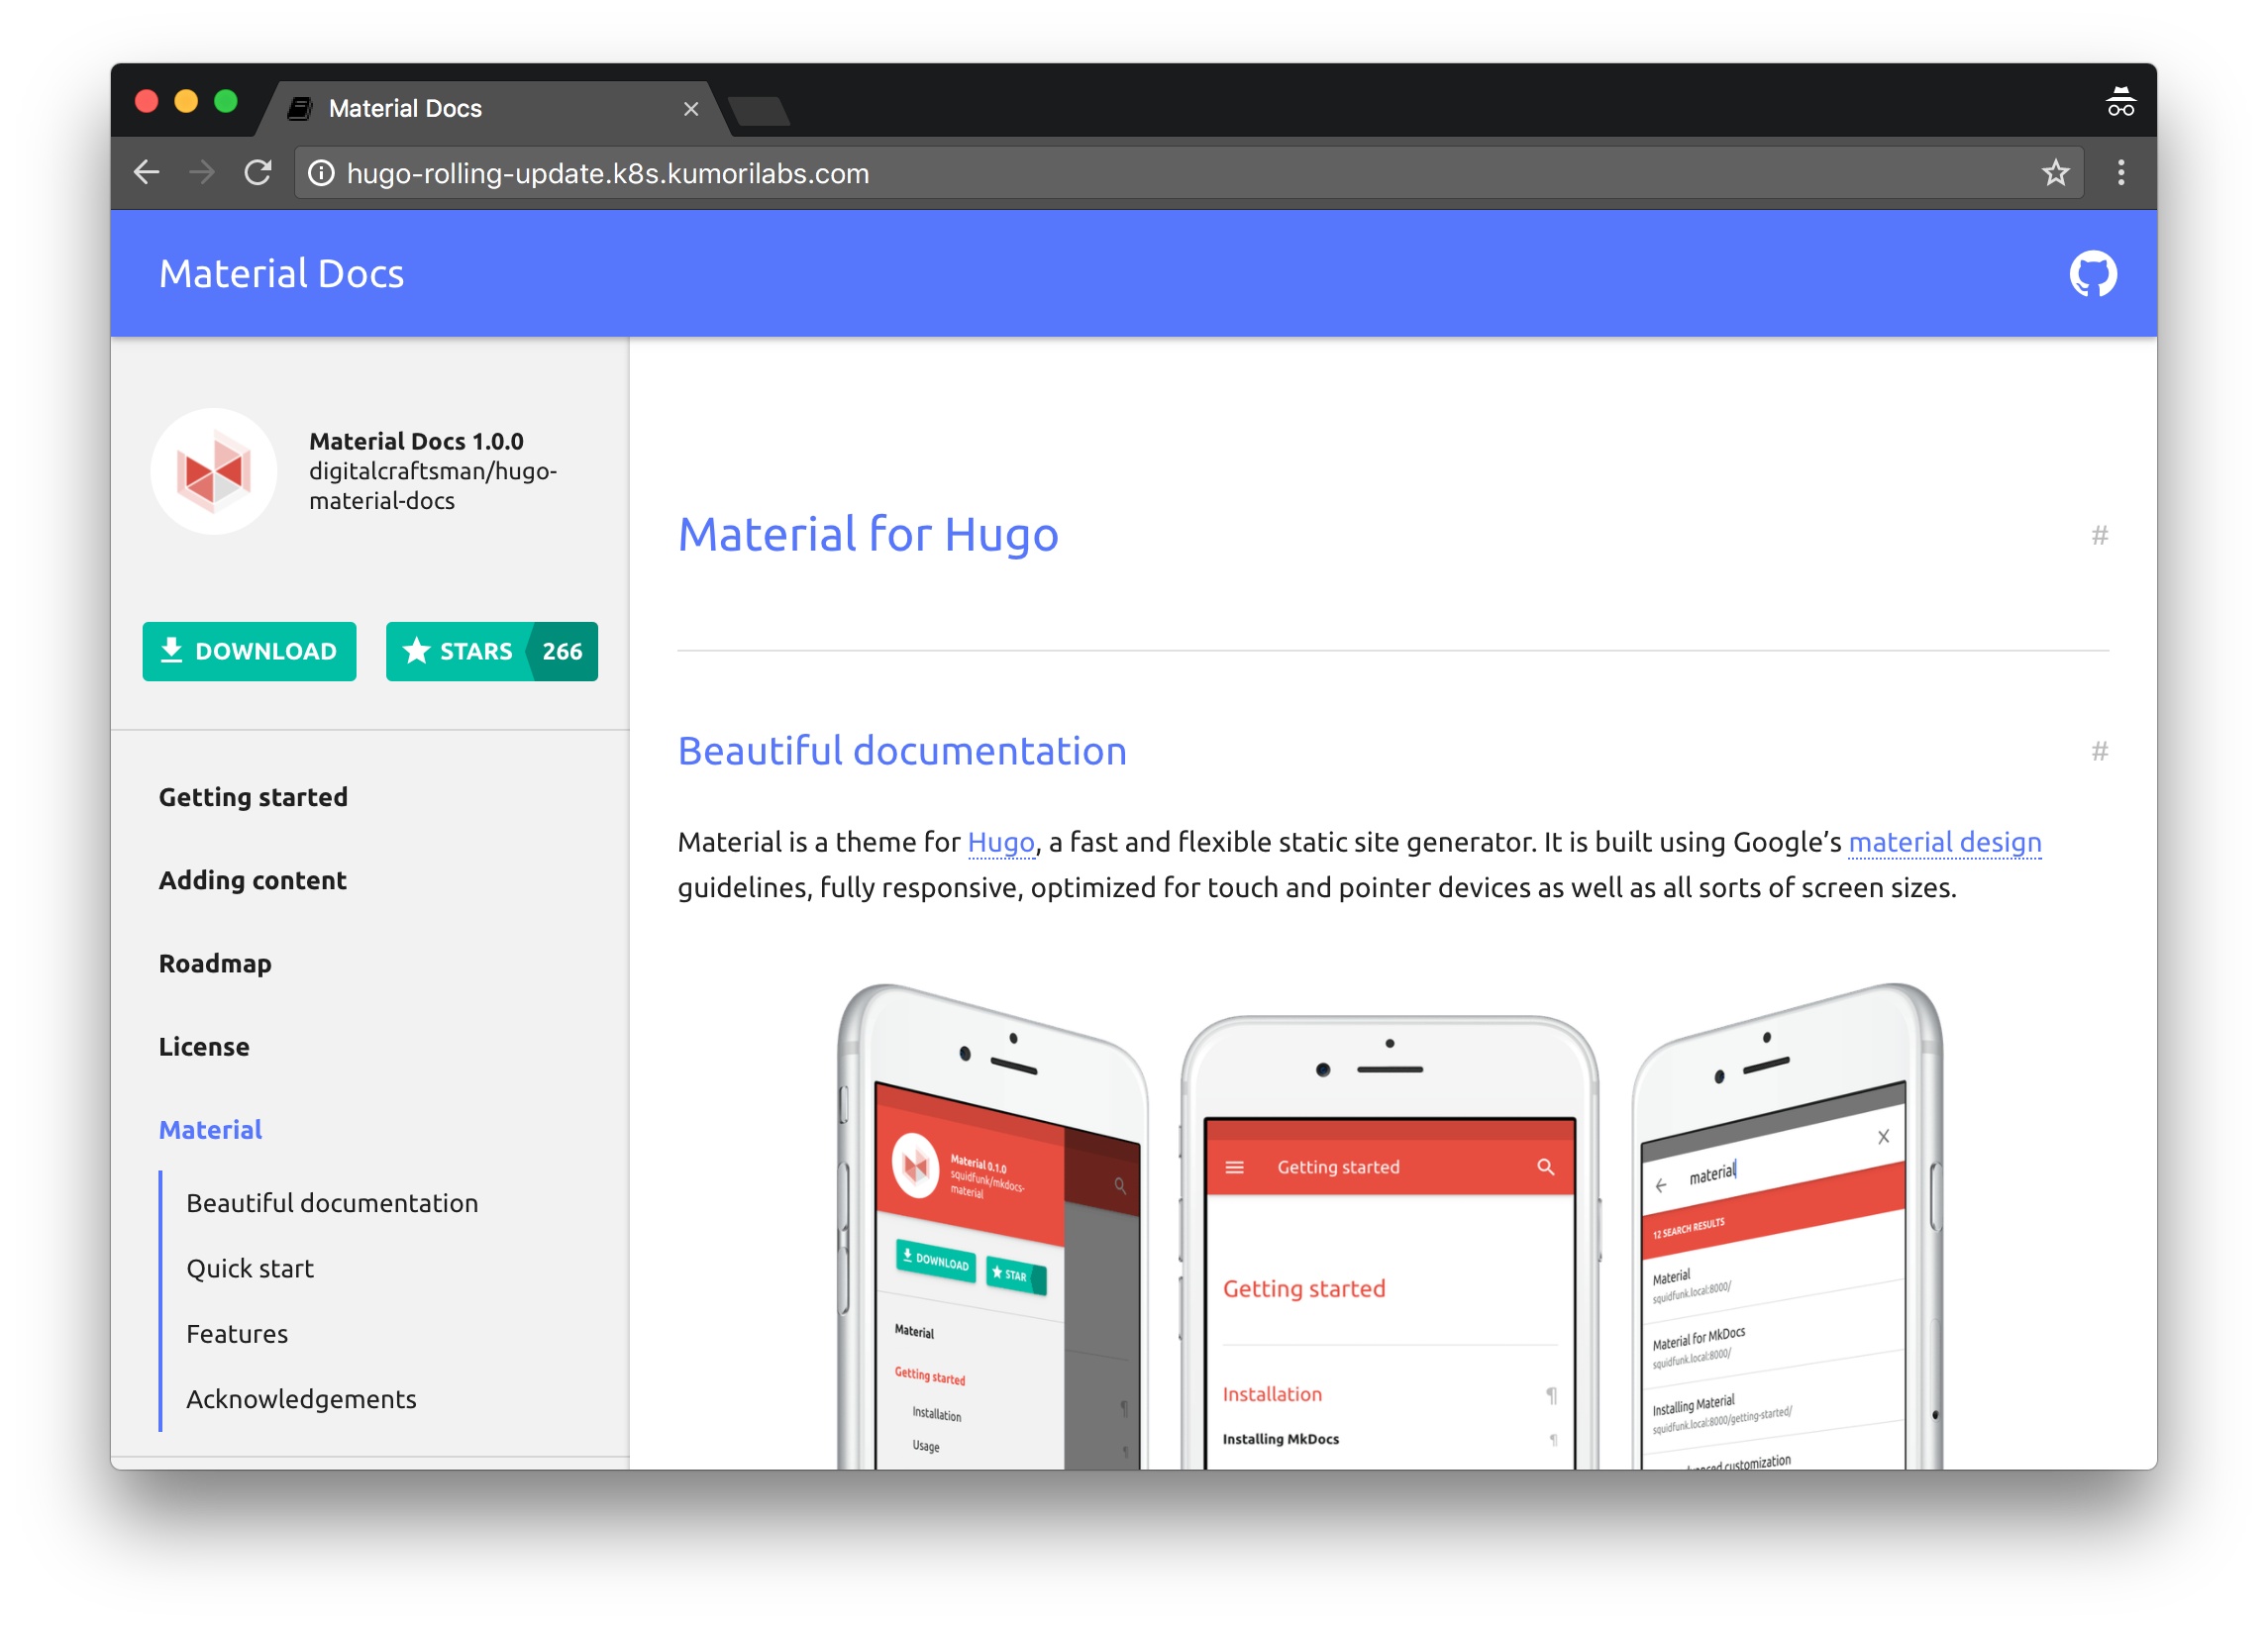
To confirm that the rolling update has been completed successfully, refresh your browser and you should see that the theme color has changed to yellow:
Before proceeding to the next section, delete the Deployment and Service we just created:
kubectl delete deploy hugo-app-rolling-update
kubectl delete svc hugo-app-rolling-update-svc
Rolling back a Deployment
If you encounter a problem during or after a rolling update, it is possible to rollback to a previous version.
To demonstrate this, we will perform similar steps from the previous section, but this time we will create the initial Deployment with a manifest, which allows us to specify the --record option. Setting this option when creating the initial Deployment will record the commands for all future updates made to the Deployment, which is helpful when rolling back to an older version.
First, let’s update the manifest for the Deployment with your Docker Hub repository:
sed -i -e "s|image: .*/|image: ${DOCKER_HUB_USERNAME}/|g" \
    ./kubernetes/hugo-app-rolling-update/hugo-app-rolling-update-deploy.yaml
And now we will create both the Deployment and Service with a single command, by specifying the directory where the two manifest files are located (as opposed to specifying each file individually):
kubectl create -f ./kubernetes/hugo-app-rolling-update --record
deployment "hugo-app-rolling-update" created
service "hugo-app-rolling-update-svc" created
Wait about a minute for the Service to create the AWS ELB and then create the DNS CNAME record in your Route 53 domain with a prefix of hugo-rolling-update (e.g., hugo-rolling-update.k8s.kumorilabs.com), using the dns-record-single.json template file:
# Set the DNS record prefix & the Service name and then retrieve the ELB URL
export DNS_RECORD_PREFIX="hugo-rolling-update"
export SERVICE_NAME="hugo-app-rolling-update-svc"
export HUGO_APP_ELB=$(kubectl get svc/${SERVICE_NAME} \
       --template="{{range .status.loadBalancer.ingress}} {{.hostname}} {{end}}")

# Add to JSON file
sed -i -e 's|"Name": ".*|"Name": "'"${DNS_RECORD_PREFIX}.${DOMAIN_NAME}"'",|g' \
    scripts/apps/dns-records/dns-record-single.json
sed -i -e 's|"Value": ".*|"Value": "'"${HUGO_APP_ELB}"'"|g' \
    scripts/apps/dns-records/dns-record-single.json

# Create DNS record
aws route53 change-resource-record-sets \
    --hosted-zone-id ${DOMAIN_NAME_ZONE_ID} \
    --change-batch file://scripts/apps/dns-records/dns-record-single.json
Within a minute or two, the Hugo site should be reachable at the DNS name we just created (e.g., hugo-rolling-update.k8s.kumorilabs.com). Browse to it and you’ll notice that the theme color is currently red (leave your browser open):
Now let’s update the Docker image that the Deployment is using to yellow:
kubectl set image deploy/hugo-app-rolling-update \
        hugo-app=${DOCKER_HUB_USERNAME}/hugo-app:yellow
Wait about a minute, refresh your browser and you should see that the theme color has changed to yellow:
Now let’s check the rollout history for the Deployment, where we will see the two commands that have been recorded (Deployment creation and the change to yellow):
kubectl rollout history deployment hugo-app-rolling-update
deployments "hugo-app-rolling-update"
REVISION	CHANGE-CAUSE
1		kubectl create --filename=./kubernetes/hugo-app-rolling-update --record=true
2		kubectl set image deploy/hugo-app-rolling-update hugo-app=smesch/hugo-app:yellow
Let’s now rollback the Deployment to it’s original state (red):
kubectl rollout undo deploy/hugo-app-rolling-update
deployment "hugo-app-rolling-update" rolled back
Wait about a minute, refresh your browser and you should see that the theme color has changed back to red:
Let’s now make a a few different updates, going from red to yellow, yellow to blue and then blue to green:
kubectl set image deploy/hugo-app-rolling-update \
        hugo-app=${DOCKER_HUB_USERNAME}/hugo-app:yellow
kubectl set image deploy/hugo-app-rolling-update \
        hugo-app=${DOCKER_HUB_USERNAME}/hugo-app:blue
kubectl set image deploy/hugo-app-rolling-update \
        hugo-app=${DOCKER_HUB_USERNAME}/hugo-app:green
Wait about a minute, refresh your browser and you should see that the theme color has changed to green:

Now let’s check the rollout history for the Deployment again, where we will see the updates that were just made:
kubectl rollout history deployment hugo-app-rolling-update
REVISION	CHANGE-CAUSE
3		kubectl create --filename=./kubernetes/hugo-app-rolling-update --record=true
4		kubectl set image deploy/hugo-app-rolling-update hugo-app=smesch/hugo-app:yellow
5		kubectl set image deploy/hugo-app-rolling-update hugo-app=smesch/hugo-app:blue
6		kubectl set image deploy/hugo-app-rolling-update hugo-app=smesch/hugo-app:green
You can rollback to a specific version using the revision number. Let’s rollback to revision number 5 (blue):
kubectl rollout undo deploy/hugo-app-rolling-update --to-revision=5
deployment "hugo-app-rolling-update" rolled back
Wait about a minute, refresh your browser and you should see that the theme color has changed to blue:
Before proceeding to the next demonstration, delete the Deployment and Service we just created:
kubectl delete deploy hugo-app-rolling-update
kubectl delete svc hugo-app-rolling-update-svc
Canary Deployments
In this second demonstration, we will look at Canary Deployments.
First, let’s update the manifests we will be using with your Docker Hub repository:
sed -i -e "s|image: .*/|image: ${DOCKER_HUB_USERNAME}/|g" \
    ./kubernetes/hugo-app-canary/hugo-app-canary-deploy-red.yaml

sed -i -e "s|image: .*/|image: ${DOCKER_HUB_USERNAME}/|g" \
    ./kubernetes/hugo-app-canary/hugo-app-canary-deploy-yellow.yaml
Now let’s create the initial Deployment (red) and the Service:
kubectl create -f ./kubernetes/hugo-app-canary/hugo-app-canary-deploy-red.yaml
kubectl create -f ./kubernetes/hugo-app-canary/hugo-app-canary-svc.yaml
Wait about a minute for the Service to create the AWS ELB and then create the DNS CNAME record in your Route 53 domain with a prefix of hugo-canary (e.g., hugo-canary.k8s.kumorilabs.com), using the dns-record-single.json template file:
# Set the DNS record prefix & the Service name and then retrieve the ELB URL
export DNS_RECORD_PREFIX="hugo-canary"
export SERVICE_NAME="hugo-app-canary-svc"
export HUGO_APP_ELB=$(kubectl get svc/${SERVICE_NAME} \
       --template="{{range .status.loadBalancer.ingress}} {{.hostname}} {{end}}")

# Add to JSON file
sed -i -e 's|"Name": ".*|"Name": "'"${DNS_RECORD_PREFIX}.${DOMAIN_NAME}"'",|g' \
    scripts/apps/dns-records/dns-record-single.json
sed -i -e 's|"Value": ".*|"Value": "'"${HUGO_APP_ELB}"'"|g' \
    scripts/apps/dns-records/dns-record-single.json

# Create DNS record
aws route53 change-resource-record-sets \
    --hosted-zone-id ${DOMAIN_NAME_ZONE_ID} \
    --change-batch file://scripts/apps/dns-records/dns-record-single.json
Within a minute or two, the Hugo site should be reachable at the DNS name we just created (e.g., hugo-canary.k8s.kumorilabs.com). Browse to it and you’ll notice that the theme color is currently red (leave your browser open):

We currently have one Deployment running three Pods with the red Docker image, which has two labels defined (app=hugo-app-canary & track=stable). And the LoadBalancer Service we created is using a single selector which matches the app label (app=hugo-app-canary):
kubectl describe deploy hugo-app-red
Name:			hugo-app-red
...
Labels:			app=hugo-app-canary
			track=stable
...
Replicas:		3 desired | 3 updated | 3 total | 3 available | 0 unavailable
kubectl describe svc hugo-app-canary-svc
Name:			hugo-app-canary-svc
...
Selector:		app=hugo-app-canary
Now let’s create the canary Deployment, which will run a single Pod with the yellow Docker image, which has two labels defined (app=hugo-app-canary & track=canary):
kubectl create -f ./kubernetes/hugo-app-canary/hugo-app-canary-deploy-yellow.yaml
kubectl describe deployment hugo-app-yellow
Name:			hugo-app-yellow
...
Labels:			app=hugo-app-canary
			track=canary
...
Replicas:		1 desired | 1 updated | 1 total | 1 available | 0 unavailable
The canary Deployment also has the same app=hugo-app-canary label which the Service is using as a selector and therefore the Service will route requests sequentially to both Deployments. And because there are three Pods for the original Deployment (red) and one Pod for the canary Deployment (yellow), 75% of the requests will be routed to the original Deployment and 25% to the canary Deployment.
You can simulate this by forcing a page reload in your browser multiple times until you see the theme color change from red to yellow and back to red.
kubectl get pods --label-columns=track
NAME                               READY     STATUS    RESTARTS   AGE       TRACK
hugo-app-red-800725366-glzmw       1/1       Running   0          19m       stable
hugo-app-red-800725366-k1t2n       1/1       Running   0          19m       stable
hugo-app-red-800725366-pz054       1/1       Running   0          19m       stable
hugo-app-yellow-1428429530-9698c   1/1       Running   0          1m        canary
To increase the percentage of requests that go to the canary Deployment, we will scale up the yellow Deployment to three Pods and then scale down the red Deployment to one Pod:
kubectl scale deployment hugo-app-yellow --replicas=3
deployment "hugo-app-yellow" scaled
kubectl scale deployment hugo-app-red --replicas=1
deployment "hugo-app-red" scaled
kubectl get pods --label-columns=track
NAME                               READY     STATUS    RESTARTS   AGE       TRACK
hugo-app-red-800725366-k1t2n       1/1       Running   0          36m       stable
hugo-app-yellow-1428429530-9698c   1/1       Running   0          18m       canary
hugo-app-yellow-1428429530-g896j   1/1       Running   0          2m        canary
hugo-app-yellow-1428429530-s03cj   1/1       Running   0          2m        canary
Force a page reload in your browser multiple times again and this time you should see the theme color yellow a majority of the time and occasionally red.
Before proceeding to the final demonstration, delete the Deployments and Service we just created:
kubectl delete deployment hugo-app-red
kubectl delete deployment hugo-app-yellow
kubectl delete svc hugo-app-canary-svc
Blue-Green Deployments
In this final demonstration, we will look at Blue-Green Deployments.
First, let’s update the manifests we will be using with your Docker Hub repository:
sed -i -e "s|image: .*/|image: ${DOCKER_HUB_USERNAME}/|g" \
    ./kubernetes/hugo-app-blue-green/hugo-app-blue-green-deploy-blue.yaml

sed -i -e "s|image: .*/|image: ${DOCKER_HUB_USERNAME}/|g" \
    ./kubernetes/hugo-app-blue-green/hugo-app-blue-green-deploy-green.yaml
Now let’s create the initial Deployment (blue) and the Service:
kubectl create -f ./kubernetes/hugo-app-blue-green/hugo-app-blue-green-deploy-blue.yaml
kubectl create -f ./kubernetes/hugo-app-blue-green/hugo-app-blue-green-svc.yaml
Wait about a minute for the Service to create the AWS ELB and then create the DNS CNAME record in your Route 53 domain with a prefix of hugo-blue-green (e.g., hugo-blue-green.k8s.kumorilabs.com), using the dns-record-single.json template file:
# Set the DNS record prefix & the Service name and then retrieve the ELB URL
export DNS_RECORD_PREFIX="hugo-blue-green"
export SERVICE_NAME="hugo-app-blue-green-svc"
export HUGO_APP_ELB=$(kubectl get svc/${SERVICE_NAME} \
       --template="{{range .status.loadBalancer.ingress}} {{.hostname}} {{end}}")

# Add to JSON file
sed -i -e 's|"Name": ".*|"Name": "'"${DNS_RECORD_PREFIX}.${DOMAIN_NAME}"'",|g' \
    scripts/apps/dns-records/dns-record-single.json
sed -i -e 's|"Value": ".*|"Value": "'"${HUGO_APP_ELB}"'"|g' \
    scripts/apps/dns-records/dns-record-single.json

# Create DNS record
aws route53 change-resource-record-sets \
    --hosted-zone-id ${DOMAIN_NAME_ZONE_ID} \
    --change-batch file://scripts/apps/dns-records/dns-record-single.json
Within a minute or two, the Hugo app should be reachable at the DNS name we just created (e.g., hugo-blue-green.k8s.kumorilabs.com). Browse to it and you’ll notice that the theme color is currently blue (leave your browser open):

We currently have one Deployment running three Pods with the blue Docker image, which has two labels defined (app:hugo-app-blue-green & color:blue). And the LoadBalancer Service we created is using two selectors which match these app labels:
kubectl describe deployment hugo-app-blue
Name:			hugo-app-blue
...
Labels:			app=hugo-app-blue-green
			color=blue
...
Replicas:		3 desired | 3 updated | 3 total | 3 available | 0 unavailable
kubectl describe svc hugo-app-blue-green-svc
Name:			hugo-app-blue-green-svc
...
Selector:		app=hugo-app-blue-green,color=blue
Now let’s create the second Deployment, which will run three Pods with the green Docker image, which has two labels defined (app:hugo-app-blue-green & color:green):
kubectl create -f ./kubernetes/hugo-app-blue-green/hugo-app-blue-green-deploy-green.yaml
kubectl describe deployment hugo-app-green
Name:			hugo-app-green
...
Labels:			app=hugo-app-blue-green
			color=green
...
Replicas:		3 desired | 3 updated | 3 total | 3 available | 0 unavailable
As you can see, the second Deployment has the same app label, but the color label is green.
To have all requests immediately rerouted to the green Deployment, we will change the selector the LoadBalancer Service is using for color from blue to green:
kubectl set selector svc/hugo-app-blue-green-svc color=green
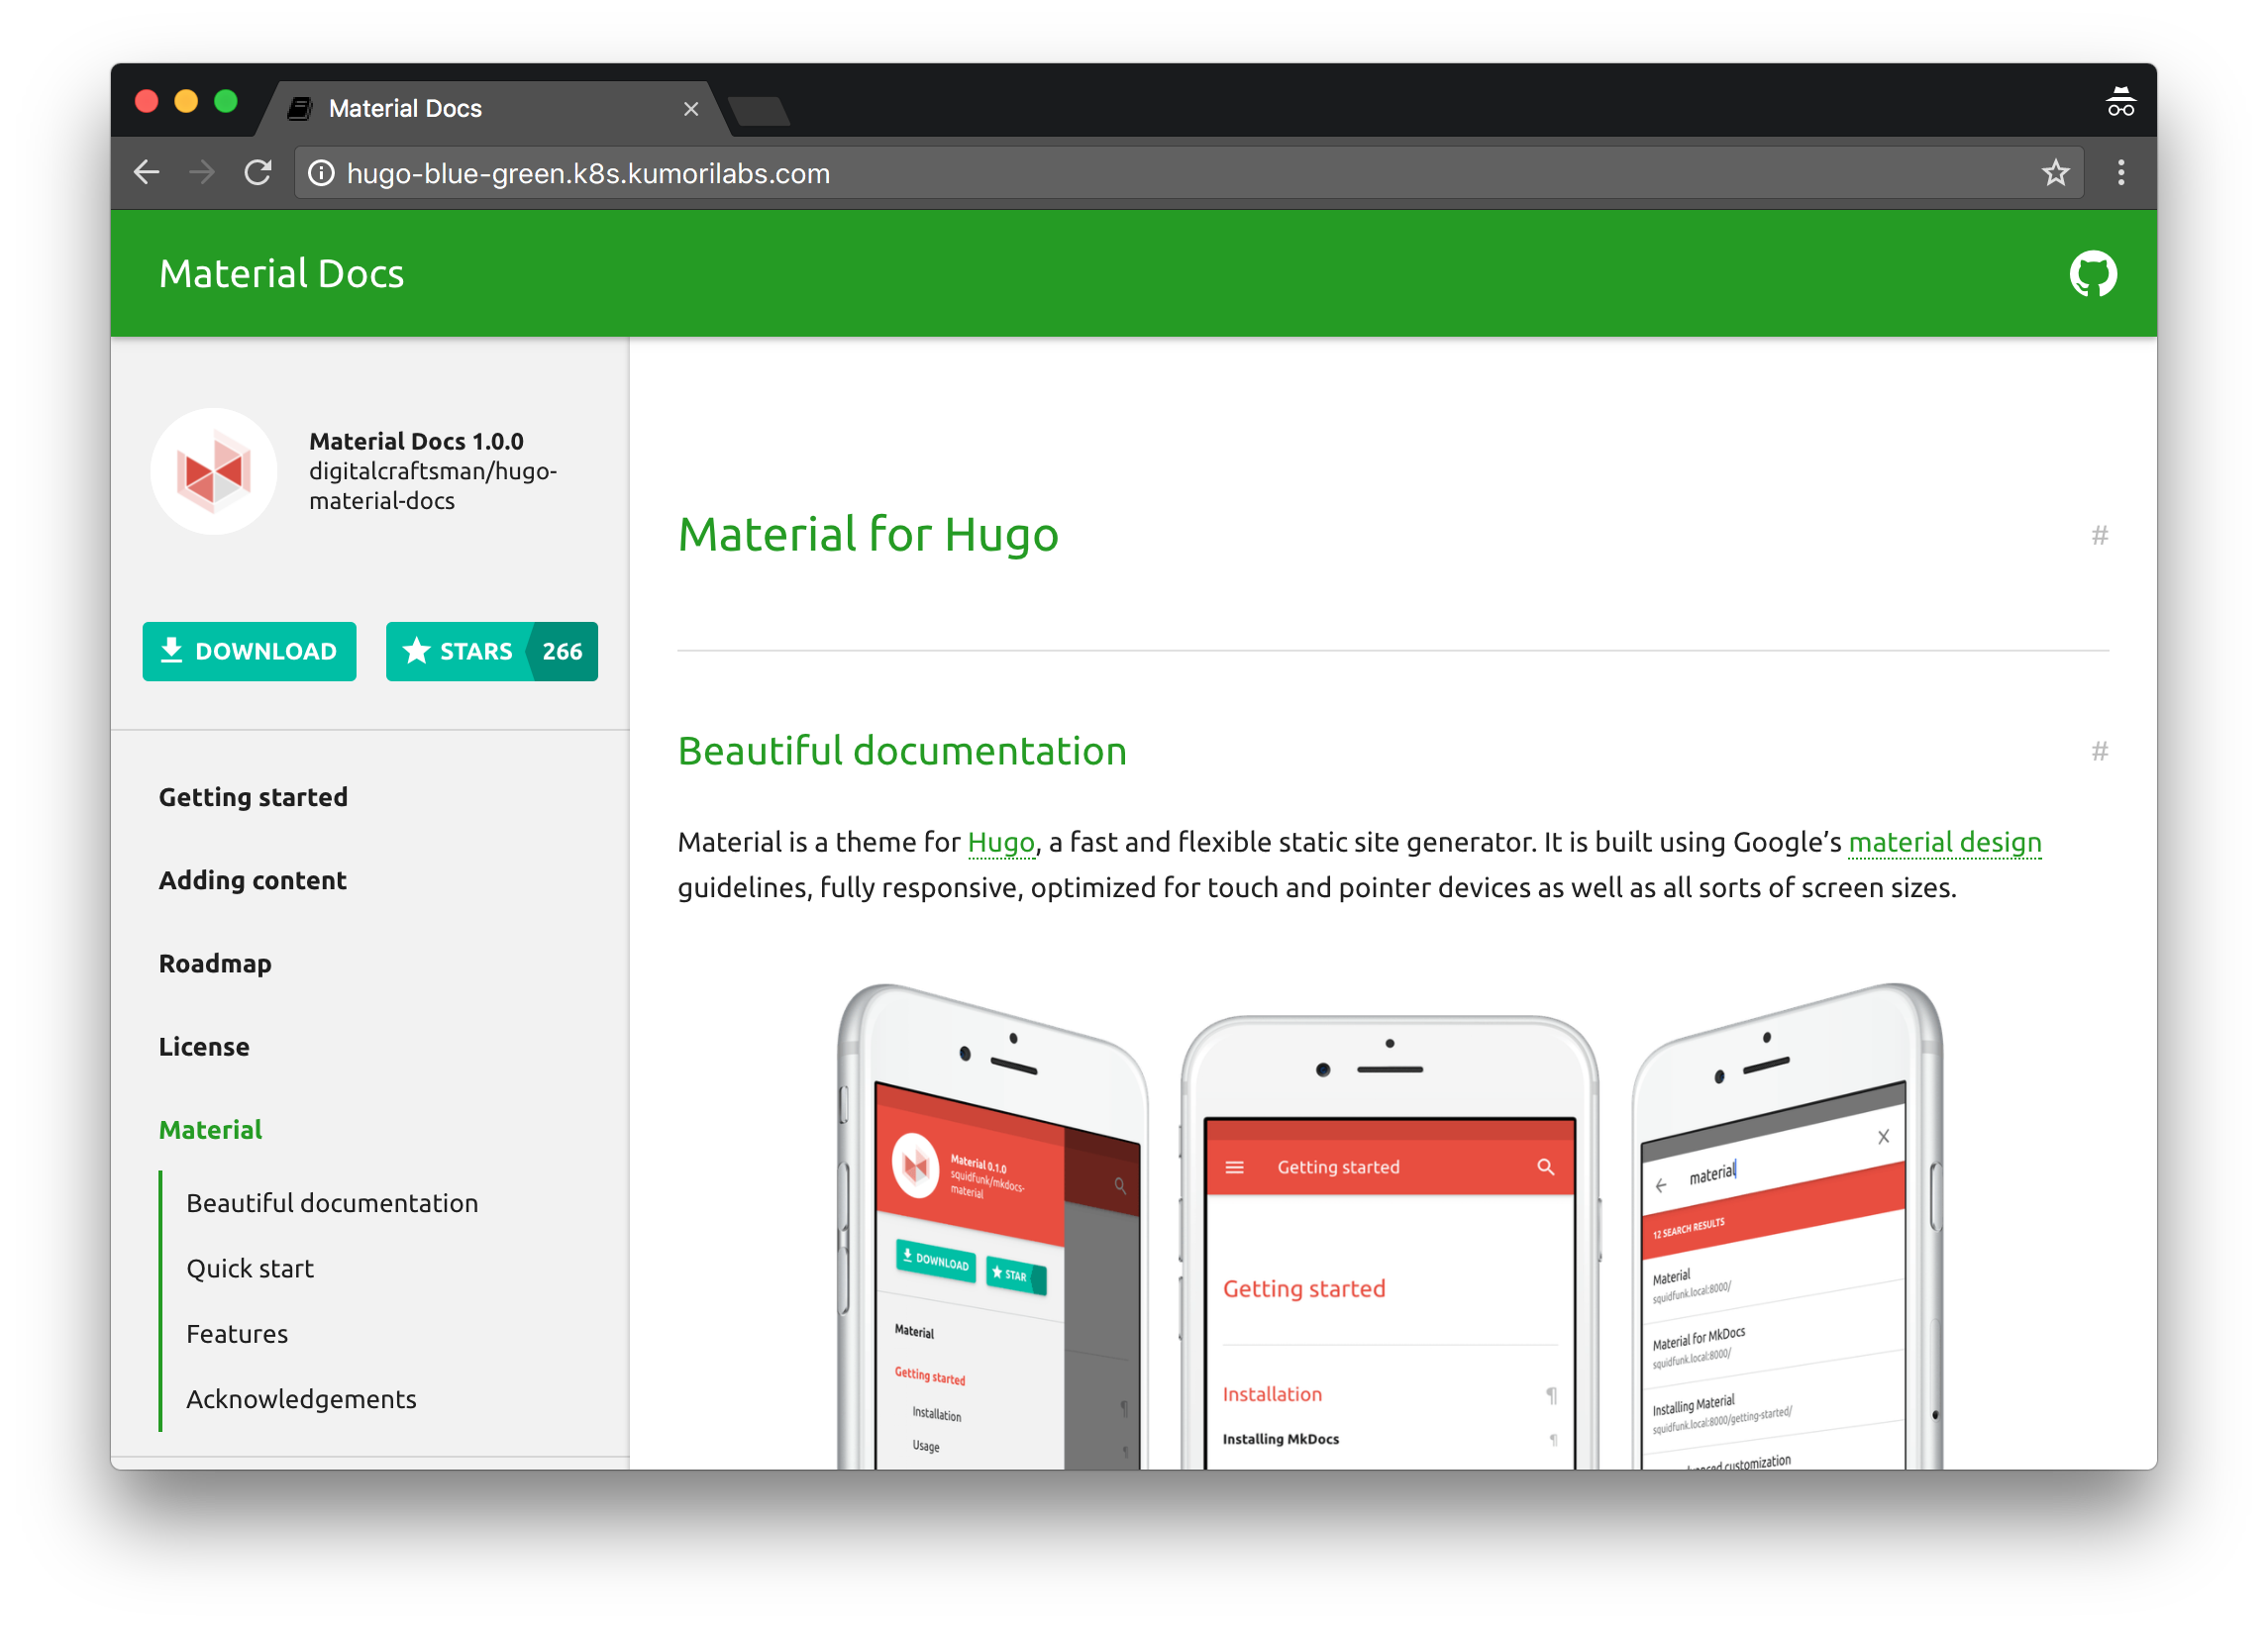
Refresh your browser and you should see that the theme color has changed to green:
Cleanup
Before proceeding to the next lab, delete the cluster and it’s associated S3 bucket:
Delete the cluster
Delete the cluster:
kops delete cluster ${CLUSTER_FULL_NAME} --yes
Delete the S3 bucket in AWS:
aws s3api delete-bucket --bucket ${CLUSTER_FULL_NAME}-state
In addition to the step-by-step instructions provided for each lab, the repository also contains scripts to automate some of the activities being performed in this blog series. See the Using Scripts guide for more details.
Next Up
In the next lab, Lab #5: Setup Horizontal Pod & Cluster Autoscaling in Kubernetes, we will go through the following:
- Deploying the Heapster Monitoring add-on
- Deploying the Cluster Autoscaler add-on
- Demonstration of Horizontal Pod Autoscaling
- Demonstration of Cluster Autoscaling
Other Labs in the Series
- Introduction: A Blog Series About All Things Kubernetes
- Lab #1: Deploy a Kubernetes Cluster in AWS with Kops
- Lab #2: Maintaining your Kubernetes Cluster
- Lab #3: Creating Deployments & Services in Kubernetes
- Lab #5: Setup Horizontal Pod & Cluster Autoscaling in Kubernetes
- Lab #6: Integrating Jenkins and Kubernetes
- Lab #7: Continuous Deployment with Jenkins and Kubernetes
- Lab #8: Continuous Deployment with Travis CI and Kubernetes
- Lab #9: Continuous Deployment with Wercker and Kubernetes
- Lab #10: Setup Kubernetes Federation Between Clusters in Different AWS Regions