By Ryan Eschinger | February 20, 2017
This post was originally published at ryaneschinger.com

Have you ever wanted to refactor a Terraform configuration against an already
existing infrastructure? In the past, modifying
the Terraform state required
manually editing a potentially large and confusing JSON file. Recent versions of
Terraform make it possible to manipulate a Terraform state file using supported
CLI commands. With this new capability, it is significantly easier to refactor
an existing Terraform configuration
into modules without
affecting the underlying infrastructure in any way. If you
are importing existing cloud
infrastructure into Terraform, you will also likely be using
the
terraform state *
commands to build a modular configuration.
Let’s look at an example. We are going to build a simple infrastructure consisting of a couple of AWS EC2 instances running nginx behind an Elastic Load Balancer (Classic ELB). To keep the example simple, we are going to depend on EC2-Classic networking but you can use the same technique to manage your VPC resources. If you are following along, make sure your AWS account and region support EC2-Classic.
Let’s look at our initial Terraform configuration:
All the source code for this post can be found in the terraform-state-mv-example repository on github.
As mentioned above, this Terraform configuration creates all of the resources necessary for a simple web tier that serves up static web content over nginx. The following resources are created:
- 2 EC2 instances running CoreOS. The instances are provisioned using cloud-config and will run nginx via a docker container.
- A key pair for SSH access to the instances
- A “web” security group that allows SSH and HTTP traffic (on port 8080) to the instances.
- An ELB for load balancing HTTP traffic to the instances.
- A “weblb” security group that allows HTTP traffic (port 80) to the ELB.
This example is not intended to represent best practices for a web infrastructure on AWS. I tried to keep it as simple as possible to just demonstrate the process of moving state. In a real production infrastructure, we would likely use a VPC with the instances on a private subnet (amongst other things).
Let’s go ahead and apply this to create our infrastructure.
Warning: running this command will create AWS resources that may cost you money. Behave accordingly.
$ terraform apply
data.template_file.web_cloud_config: Refreshing state...
data.aws_availability_zones.available: Refreshing state...
data.aws_ami.coreos: Refreshing state...
aws_key_pair.kp: Creating...

...

aws_elb.weblb: Creation complete

Apply complete! Resources: 6 added, 0 changed, 0 destroyed.

The state of your infrastructure has been saved to the path
below. This state is required to modify and destroy your
infrastructure, so keep it safe. To inspect the complete state
use the `terraform show` command.

State path: terraform.tfstate

Outputs:

elb_dns_name = tf-lb-00e01795e4de87b93f3304f8ed-1895192165.us-east-1.elb.amazonaws.com
After a few minutes, you should be able to verify that the infrastructure has been created and that nginx is responding:
$ curl -sI $(terraform output elb_dns_name) | head -n1
HTTP/1.1 200 OK
At this point, we have a flat Terraform configuration that provisions our web infrastructure. However, we soon realize that we’d like to be able to reuse this infrastructure and decide to refactor it into a Terraform module. Here is what our main.tf file looks after the refactor:
I am not including the source of the web module in this post as it is almost
identical to the original flat configuration. You can view the full version in
the modules branch
on
github.
Now that we have a reusable module, we want to modify the Terraform state of our
existing infrastructure. If you run terraform plan right now, you’ll will see
that Terraform thinks it needs to destroy your existing resources and create new
ones to replace them.
# the below output was manually edited to make it more readable
$ terraform plan
Refreshing Terraform state in-memory prior to plan...
...

- aws_elb.weblb

- aws_instance.instance.0

- aws_instance.instance.1

- aws_key_pair.kp

- aws_security_group.web

- aws_security_group.weblb

+ module.web.aws_elb.weblb
...

+ module.web.aws_instance.instance.0
...

+ module.web.aws_instance.instance.1
...

+ module.web.aws_key_pair.kp
...

+ module.web.aws_security_group.web
...

+ module.web.aws_security_group.weblb
...

Plan: 6 to add, 0 to change, 6 to destroy.
In the final line of the plan output, Terraform tells us that it wants to delete
6 resources and create 6 new ones. The goal here is to get to the point where
terraform plan reports that there are no changes necessary. After all, the
infrastructure already exists and we don’t want to experience any downtime just
because we refactored our configuration. The way to accomplish this is using
the terraform state mv
command.
But, before we just start moving state around, let’s look at the Terraform graph. This will help us decide how to approach the state editing in the most painless way possible. The original Terraform graph should look something like this:
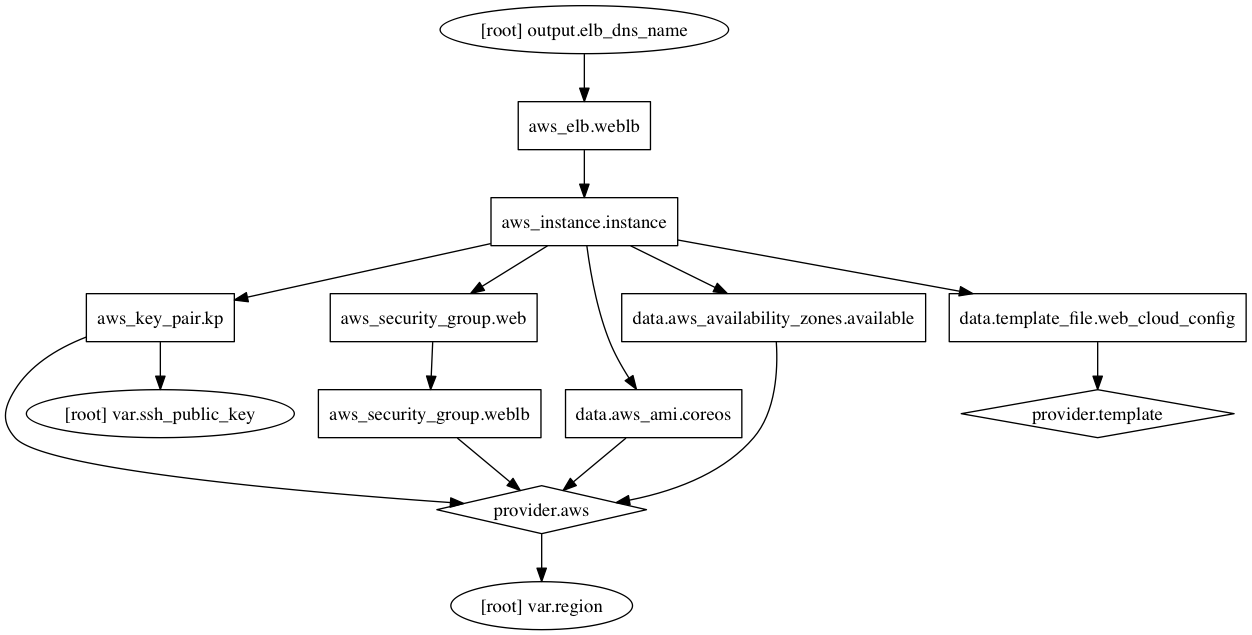
For the most part, we really only need to consider the nodes that map to the physical resources of our infrastructure when we are planning our state surgery. This means we can ignore all of the nodes that correspond to data sources, variables, and providers. Here is an edited version of the graph that just includes the resources we want to move:
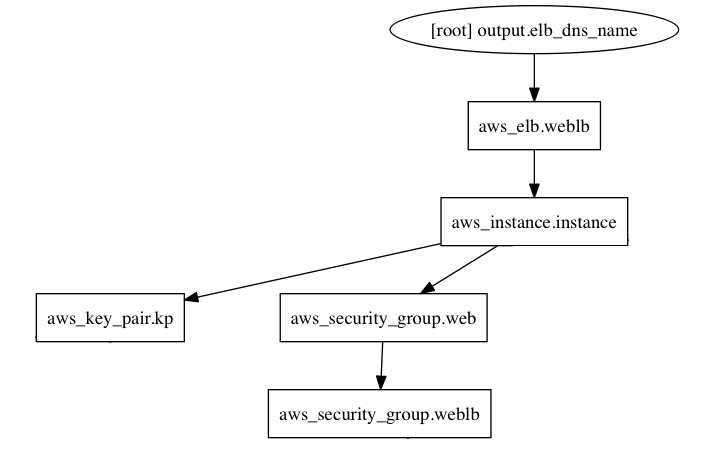
To keep things manageable, we want to start moving the resources that have the
fewest dependencies first. As you can see from the graph,
the
aws_key_pair
resource does not have any dependencies so we’ll start with that.
Referring back to the plan output above, we see that Terraform wants to remove
the existing aws_key_pair.kp resource and create a new one called
module.web.aws_key_pair.kp. So, we just have to modify the state so that
Terraform realizes those are actually the same resource:
$ terraform state mv aws_key_pair.kp module.web.aws_key_pair.kp
Moved aws_key_pair.kp to module.web.aws_key_pair.kp
That was easy. If we run terraform plan again, we should see that Terraform no
longer wants to remove aws_key_pair.kp nor create
module.web.aws_key_pair.kp. And, we should see that Terraform now only wants
to add and destroy 5 resources:
$ terraform plan
...
Plan: 5 to add, 0 to change, 5 to destroy.
As you can see, the plan output basically tells you exactly what you need to do.
You find the id of the resource that Terraform wants to remove and map it to the
corresponding resource it wants to create using terraform state mv.
Be careful when refactoring a Terraform configuration against live
infrastructure. If you are diligent about using
the plan command to ensure
your changes do exactly what you want, it can be relatively safe. However, if
you prematurely apply an
incorrect configuration, you can cause real damage and major outages. Also, if
you are
using remote state
(and
you should be),
you’ll want to ensure you can rollback your state file to a known good version.
When testing a refactor, it may be worth temporarily working with a local state
file so that you can more easily abandon your changes if they are not working
out. Most importantly, you also should be testing the refactor against an
identical, non-production infrastructure first!
Referring back to our graph, the next resource with the fewest dependencies is
the security group aws_security_group.weblb. Let’s move it and then check out
the plan:
$ terraform state mv aws_security_group.weblb module.web.aws_security_group.weblb
Moved aws_security_group.weblb to module.web.aws_security_group.weblb

$ terraform plan
...
Plan: 4 to add, 0 to change, 4 to destroy.
It is very helpful, especially as you are getting familiar with this process, to
move one resource at a time. Run terraform state mv and then terraform plan
and make sure you get the expected results. Repeat.
Next, we can move aws_security_group.web:
$ terraform state mv aws_security_group.web module.web.aws_security_group.web
Moved aws_security_group.web to module.web.aws_security_group.web

$ terraform plan
...
Plan: 3 to add, 0 to change, 3 to destroy.
Now we have just 3 resources left. Next in line are the aws_instance
resources. This is a little different as this resource was created with
a count of
two. In the plan output, we see that Terraform wants to destroy resources
aws_instance.instance.0 and aws_instance.instance.1 and wants to create
module.web.aws_instance.instance.0 and module.web.aws_instance.instance.1.
However, the representation of the resource id is slightly different when using
the terraform state mv command. Based on our previous examples, you would
likely think the command to move instance 0 would be:
terraform state mv aws_instance.instance.0 module.web.aws_instance.instance.0
However, that will result in an error: Error moving state: Error parsing
address 'aws_instance.instance.0': Unexpected value for InstanceType field:
"0". Instead, you should use array index notation when working with resources
that were created with a count. Here is the correct way to move the two
instances:
$ terraform state mv aws_instance.instance[0] module.web.aws_instance.instance[0]
Moved aws_instance.instance[0] to module.web.aws_instance.instance[0]

$ terraform state mv aws_instance.instance[1] module.web.aws_instance.instance[1]
Moved aws_instance.instance[1] to module.web.aws_instance.instance[1]
Now terraform plan should tell us that there is only 1 resource to create and
destroy: the ELB. This one is straightforward:
$ terraform state mv aws_elb.weblb module.web.aws_elb.weblb
Moved aws_elb.weblb to module.web.aws_elb.weblb
And that should do it! When we run terraform plan now, we should get a message
that says No changes. Infrastructure is up-to-date..
Now that you know how to manipulate Terraform state, go forth and refactor your
Terraform configurations into modules! While the process can be rather tedious,
it is much easier than it was before the terraform state * commands existed
— when you had to manually hack the JSON in the tfstate file. Even with
much more complicated Terraform configurations, this process seems to work well
if you are careful and deliberate about the process. I’d love to hear your
experiences with manipulating Terraform state — let me know!